How To Make A Barbie Cake
Elevate your Barbie birthday party with our charming Barbie Cake recipe! This amazing Barbie cake is more than just a delicious cake; it’s a fairy tale come to life.

What ingredients do you need for this barbie birthday cake?

Barbie Doll Cake Tutorial Ingredients
vanilla cake mix
eggs
water
oil
Pink gel color
Non stick Baking Spray
Frosting of any kind (I used American Crusting Buttercream)
What tools do you need for this barbie cake?
Tools Needed For Barbie Cake
Equipment
Turn Table
6 cupcake liners
Cupcake pan
2 piping bags
Tip 1M
Coupler with Tip 12 or 14 and Tip 104
Cake Drum or Cake Plate
Dress Mold Pan
Doll Bust: *note the one I purchased was ethnic, she is much darker than pictured as an FYI*
How do you make it?
- Add all of the ingredients to a stand mixer or use a hand mixer.
- Remove about 1 cup batter and dye it pink.
- Spray down the cavity of the dress mold
- Alternately add pink and non dyed batter to the pan.
- Do Not Fill all the way to the top.
- I was able to scoop out 6 cupcakes with a ice cream scooper and that was the perfect amount to bake inside the pan
- If you fill the pan up, it will over flow
- Bake cupcakes for 15-17 mins and the cake for 45-50 min or until a skewer comes out clean
- Let cake rest outside the oven for 20 mins before turning over and removing from the pan
- Once cooled place the barbie topper into the cake, creating a hole.
- Remove the doll and freeze the cake for at least 3-6 hours, preferably overly night
- Freezing cake helps you significantly decrease your chances for having crumbs in the frosting, particularly if it’s a chocolate cake.
To make the ombre dress:
- Once the cake is solid, dye 1 cup of butter cream frosting deep pink.
- Add a tip 1M to a piping bag. (See decorating basics for instructions)
- Snip off the tip.
- Add about ¾ cup buttercream to the bag, don’t over fill it.
- Twist off the top so nothing comes back out.
- To make the rosette, you will first make a “star” gently squeeze a small amount of frosting, then make a circle around the star ending at the bottom.
Practice this a couple of times if you’ve never done it. If the cake is frozen it’s much easier to remove the frosting. If a “tail” of buttercream lags, STOP squeezing before completing the circle and then you should stop the tail.
- After each row of rosettes, empty all frosting back into a bowl and add another ¾ cup of white buttercream to the colored buttercream.
- Reload the bag and pipe another row.
- Do this 3 times until you reach the top.
- Grab your second piping bag and fit it with a tip and coupler, starting with tip 104.
- Squeeze the left-over frosting from the first bag into the second.
- Turn the bag sideway and spin the cake while hold steady pressure and moving up and down in small quick motions.
Since having my baby girl (Seven YEARS AGO, can you believe it?), I have been happily submerged into Barbie everything. I didn’t take her to see the new movie but I definitely took myself and it was a super cute movie!
She already told me that she wants to have a Barbie themed birthday party, and I am SO down! I think THIS cake should be right in the center of the birthday festivities. It’s so funny because I was completely anti-barbie growing up. I didn’t want them at all. Give me books and legos. I find it so funny that my daughter is the opposite of me, but so much fun as well!
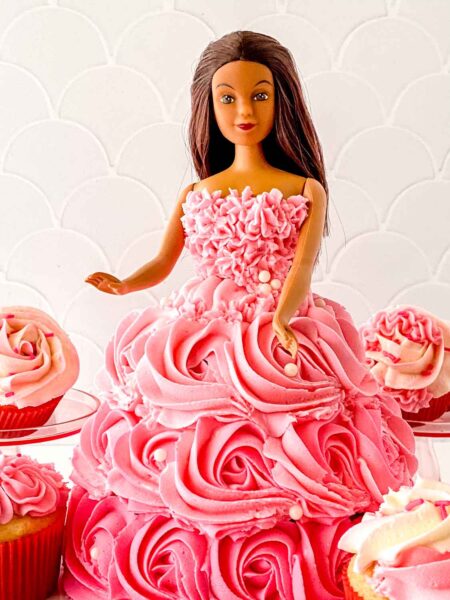
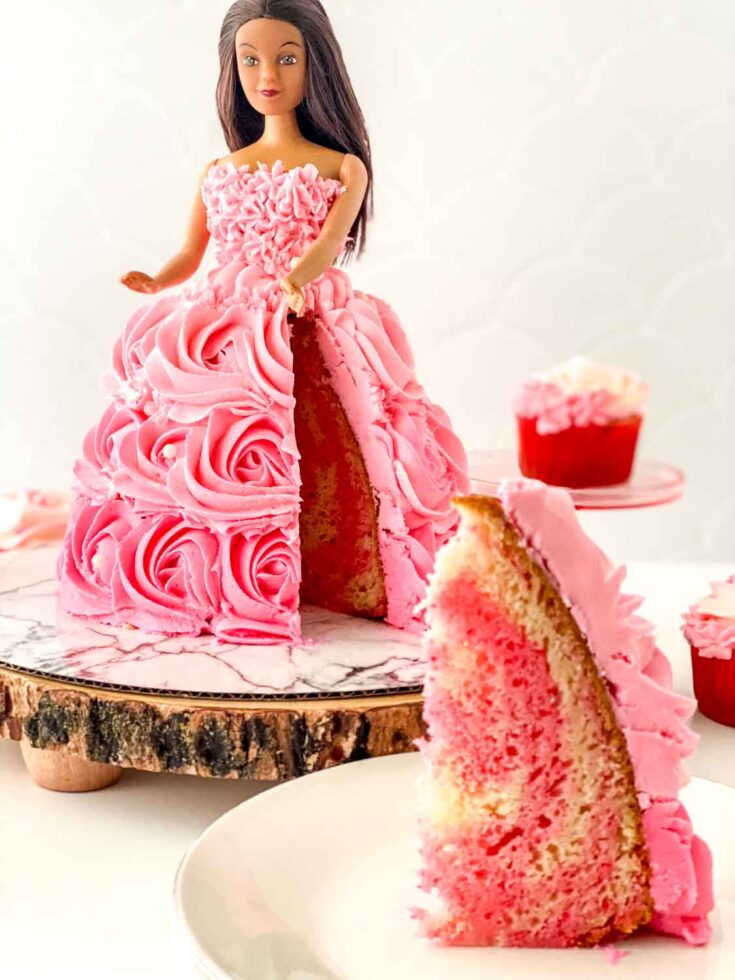
This super cute Barbie cake features pink and vanilla-flavored sponge, frosted with a vanilla buttercream, and shaped to create the doll’s dress, this is the perfect cake for your little princess. It’s one of those custom cakes that’s sure to make special occasions even more memorable. I’d recommend buying the Barbie doll of your choice for this fun cake.

This live-action film is set to explore the limitless potential inside every girl and encourage them to dream and imagine. Just like your Barbie cake, the film aims to blend creativity and joy, and capture the imagination of not only young girls but everyone who has grown up with the Barbie phenomenon.

This tip will create the “tutu” of the dress.
Switch the tip to tip 12 or 14 and pipe stars all over the bust creating the top of her dress.
Congratulations you’ve made a Barbie Cake!

Yes, you can! The cake pans can be adjusted for different sizes of Barbies. Just make sure the doll’s size matches the scale of the cake.
Absolutely. You can tint the buttercream to match your Barbie’s dress color or your child’s favorite color. Purple cake, anyone? Tint the buttercream any shade—pink, purple, ombré, even black—and use different piping tips (star, petal, ruffle) to create rosettes, ruffles, or stripes. Add edible glitter, sprinkles, pearls, or fondant decorations to match your theme.
Store in the fridge until party time. For travel, place on a flat sturd surface (cake board or platter) and slide—not lift—it to avoid damaging the frosting. If cut slices dry out, wrap them with plastic .

Tips and Tricks:
- Use a plastic wrap to cover the Barbie’s long hair and the top part of the doll to keep it clean during the decorating process.
- When stacking the cake layers, use parchment paper between them to prevent sticking.
- Use a star tip for the piping bag to create beautiful details on the front of the dress.

Where to Serve:
This Barbie cake is the ideal choice for your daughter’s birthday or any young girls’ birthday parties. It’s also a good idea for a 21st birthday or a fairy tale-themed anniversary. The best part is seeing the reactions when you reveal the cake!
Aesthetically stunning, this cake captures the essence of the iconic doll and brings joy to any little princess.
Not only does it make for stunning photos, but the taste – with rich chocolate or vanilla buttercream – also leaves everyone wanting another slice. This princess Barbie cake is one of the most creative and fun Barbie cake ideas you can use to celebrate your special occasions.
Barbie Doll Cake Care:
Handle the cake gently, especially while transporting. If you need to move it, slide it onto a solid, flat surface and ensure it’s stable during the journey. Now, get ready to charm your guests with your Princess Barbie Cake. Happy baking!
What are some other fun kid friendly dessert recipes to try?


Barbie Cake Tutorial
This super fun Barbie Doll Princess cake is so fun to make for any Barbie themed party or just to make for a fun treat!
Ingredients
- 1 box vanilla cake mix
- 3 eggs
- 1 cup water
- 1/3 cup oil
- Pink gel color
- Non stick Baking Spray
- Frosting of any kind (I used American Crusting Buttercream)
Instructions
- Add all of the ingredients to a stand mixer or use a hand mixer.
- Remove about 1 cup batter and dye it pink.
- Spray down the cavity of the dress mold
- Alternately add pink and non dyed batter to the pan.
- Do Not Fill all the way to the top.
- I was able to scoop out 6 cupcakes with a ice cream scooper and that was the perfect amount to bake inside the pan
- If you fill the pan up, it will over flow
- Bake cupcakes for 15-17 mins and the cake for 45-50 min or until a skewer comes out clean
- Let rest outside the oven for 20 mins before turning over and removing from the pan
- Once cooled place the barbie topper into the cake, creating a hole.
- Remove the doll and freeze the cake for at least 3-6 hours, preferably overly night
- Freezing cake helps you significantly decrease your chances for having crumbs in the frosting, particularly if it’s a chocolate cake.
To make the ombre dress:
- Once the cake is solid, dye 1 cup of butter cream frosting deep pink.
- Add a tip 1M to a piping bag. (See decorating basics for instructions)
- Snip off the tip.
- Add about ¾ cup buttercream to the bag, don’t over fill it.
- Twist off the top so nothing comes back out.
- To make the rosette, you will first make a “star” gently squeeze a small amount of frosting, then make a circle around the star ending at the bottom.
- Practice this s a couple of times if you’ve never done it. If the cake is frozen its much easier to remove the frosting. If a “tail” of buttercream lags, STOP squeezing before completing the circle and then you should stop the tail.
- After each row of rosettes, empty all frosting back into a bowl and add another ¾ cup of white buttercream to the colored buttercream.
- Reload the bag and pipe another row.
- Do this 3 times until you reach the top.
- Grab your second piping bag and fit it with a tip and coupler, starting with tip 104.
- Squeeze the left-over frosting from the first bag into the second.
- Turn the bag sideway and spin the cake while hold steady pressure and moving up and down in small quick motions.
- This will create the “tutu” of the dress.
- Switch the tip to tip 12 or 14 and pipe stars all over the bust creating the top of her dress.
- Congratulations you’ve made a Barbie Cake!
- Unedited videos included to be used as a guide.
Nutrition Information
Yield
12Serving Size
1Amount Per Serving Calories 249Total Fat 9gSaturated Fat 2gTrans Fat 0gUnsaturated Fat 7gCholesterol 47mgSodium 343mgCarbohydrates 38gFiber 1gSugar 21gProtein 3g

Before you go, Grab Your Free Printable Recipe Kit!
Keep track of all your favorite recipes and ingredients with this free printable book!
Hi! I’m Nellie. I am an entrepreneur, a busy mama of 3 and a wife to my high school sweetheart. I have been sharing content for over 12 years about how to cook easy recipes, workout tips and free printables that make life a little bit easier. I have been featured in places like Yahoo, Buzzfeed, What To Expect, Mediavine, Niche Pursuits, HuffPost, BabyCenter, Mom 2.0, Mommy Nearest, Parade, Care.com, and more!
Get comfortable and be sure to come hang out with me on social. Don’t forget to grab your free fitness journal before you go!