How To Make A Bluey Cake – Easy Tutorial
If you have a bluey fan in your like that you want to create an awesome cake for, this Bluey cake is perfect! Whether you are planning a Bluey birthday party or a fun day, this cake is adorable!
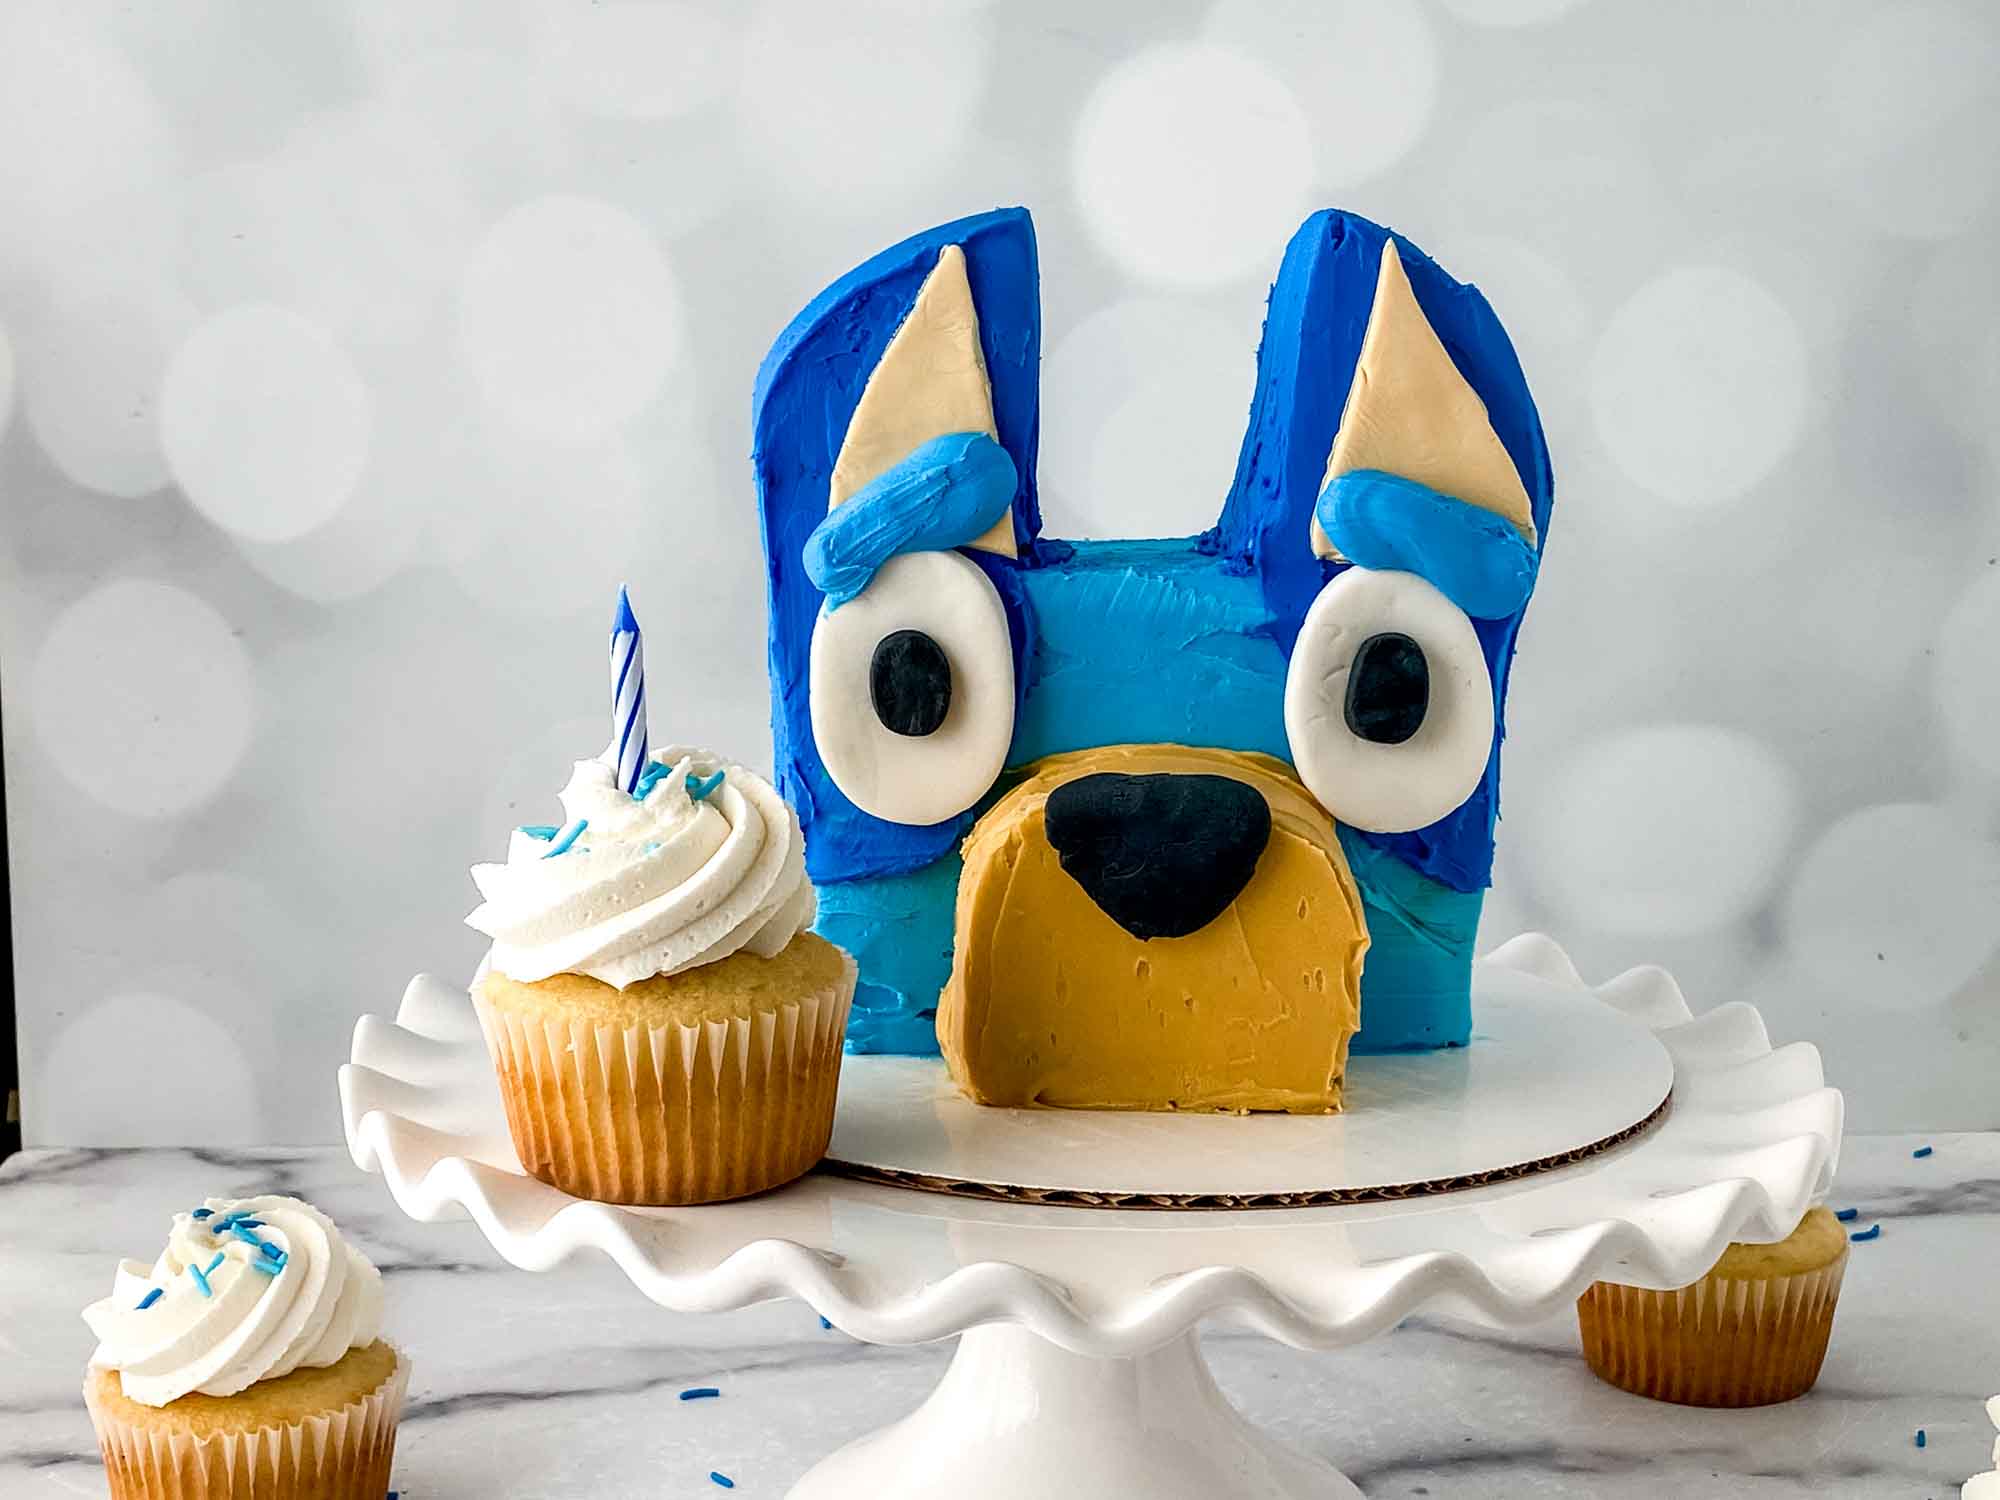
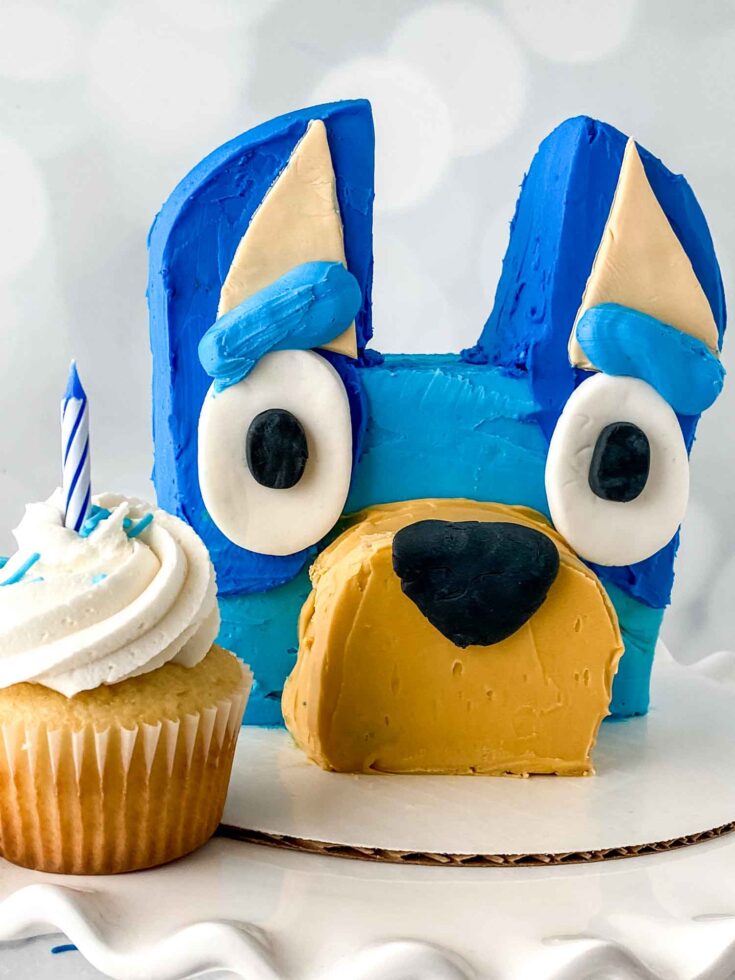
When my daughter turned four, Bluey was everything. I’m talking full Bluey birthday party — decorations, party favors, the works. So obviously the cake had to match. I decided to make it myself, and I’m so glad I did, because this 3D Bluey head cake ended up being the most talked-about thing at the whole party. Kids and adults both stopped to look at it before we cut it.
The good news is this is more achievable than it looks. You don’t need a cake decorating degree. What you need is an 8-inch round cake, some buttercream, fondant for the facial features, gel food colors, and patience for the smoothing steps. The technique that makes this cake look professional is the Viva paper towel method — I’ll walk you through exactly how it works. Once you understand that step, the rest falls into place.
Skill level: beginner to intermediate. If you’ve frosted a layer cake before, you can do this.
WHAT YOU’RE MAKING
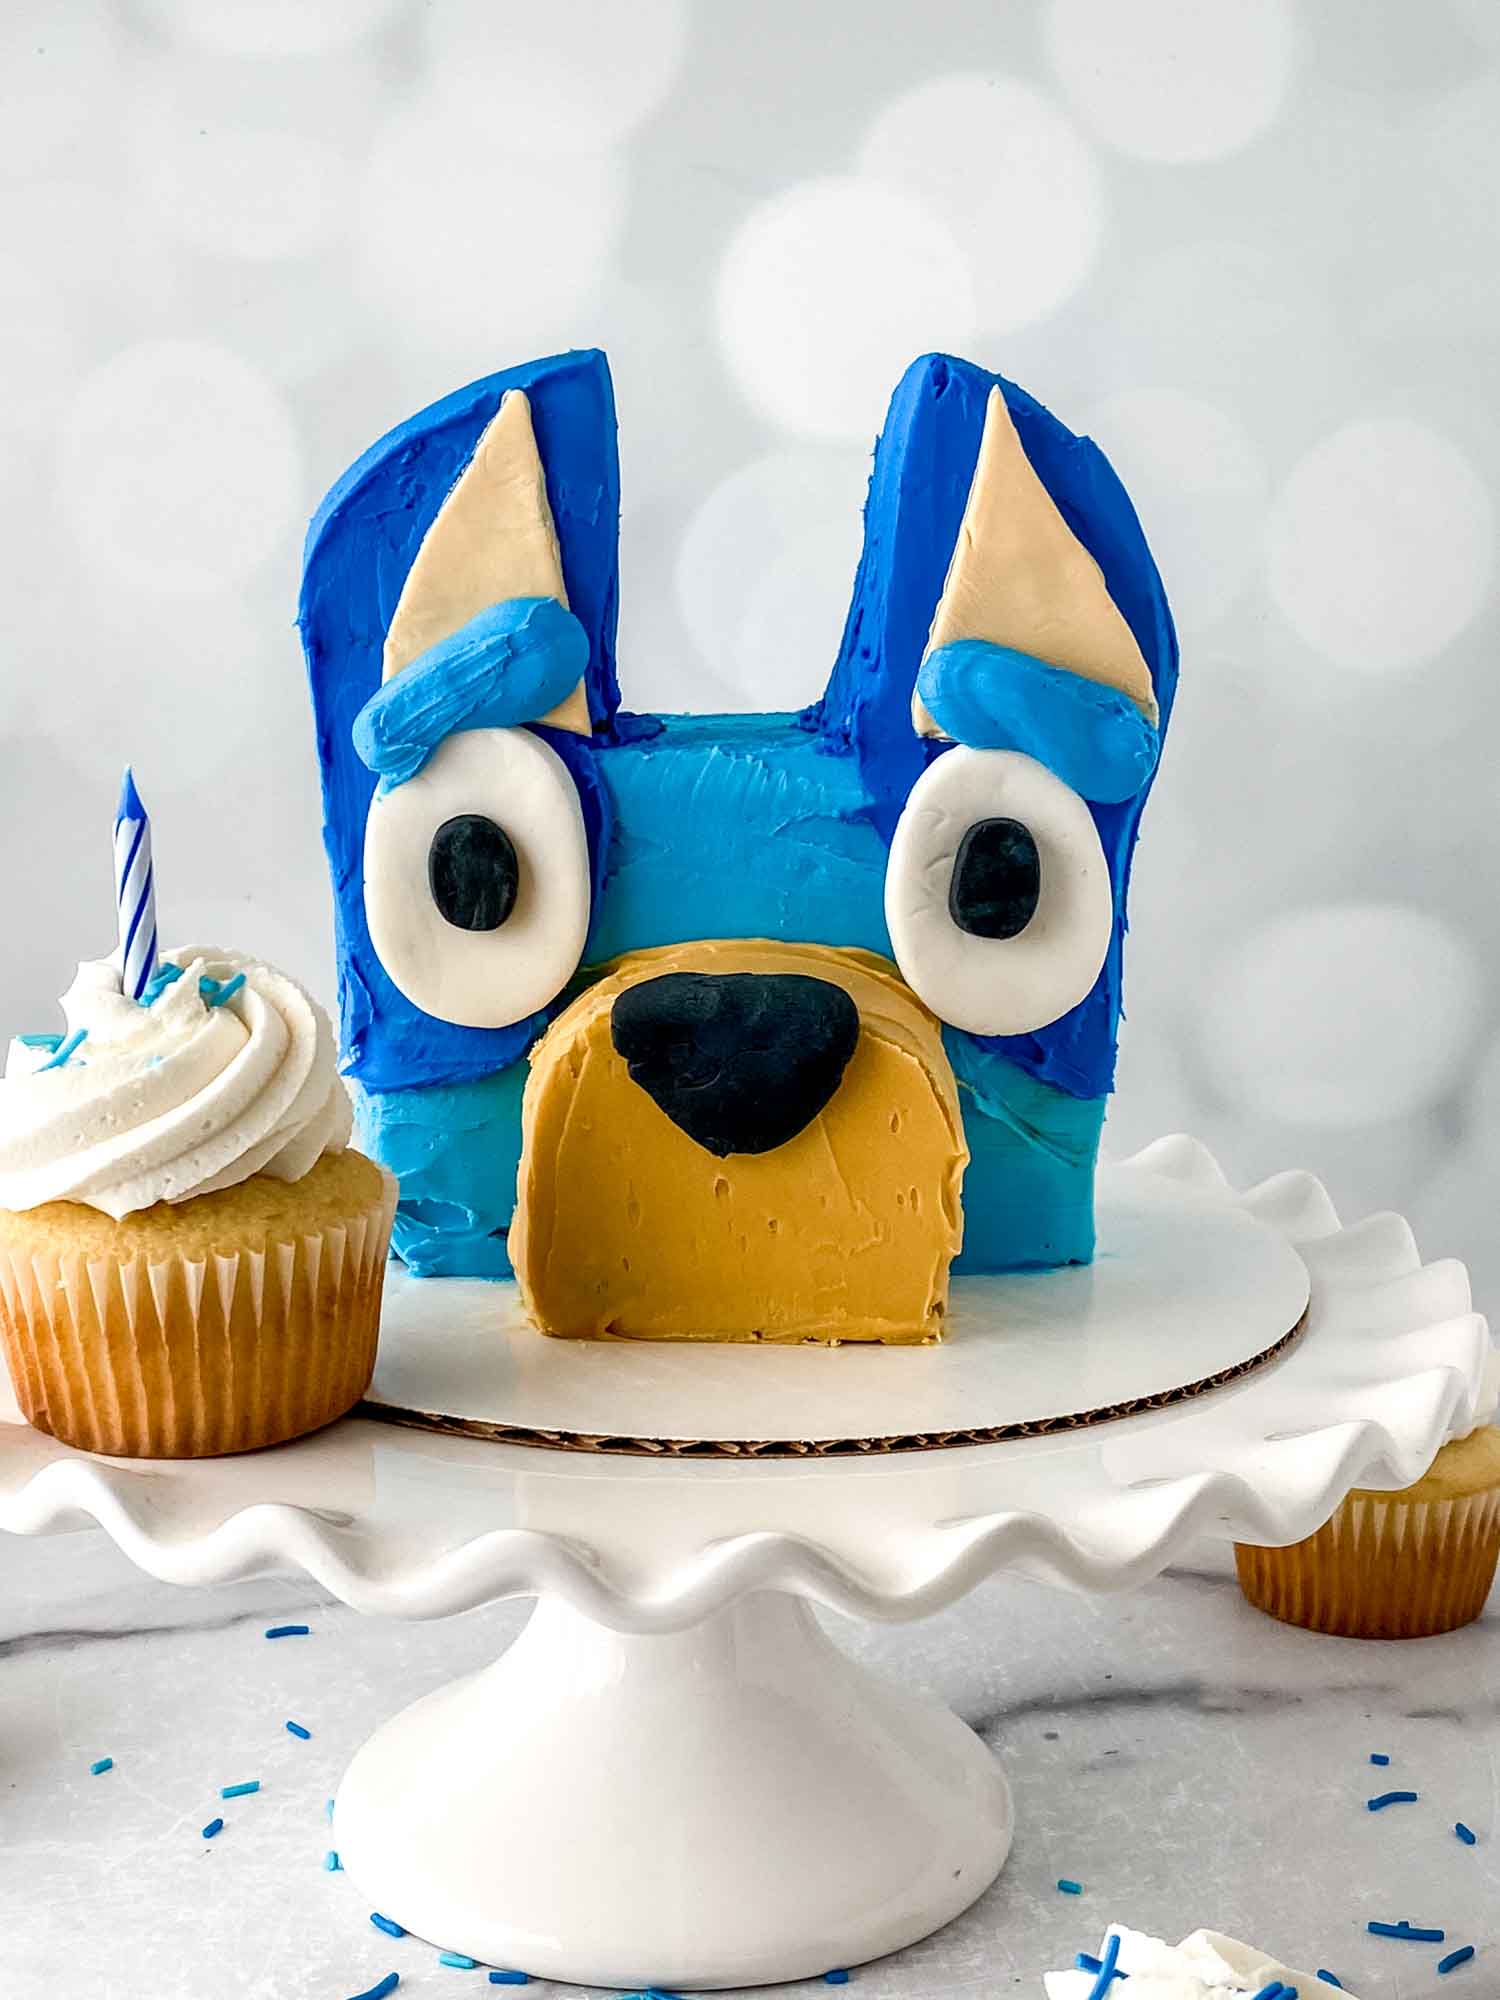
This is a sculpted 3D Bluey head cake built from a standard 8-inch round cake. You’ll carve the cake into Bluey’s square head shape, add carved cake pieces for the ears and nose, frost everything in two shades of blue with an ivory nose, and finish with fondant eyes and a fondant nose dot. The result looks just like Bluey’s face — recognizable to any fan on sight.
The cake itself is not included in this tutorial — you’ll need a pre-baked, cooled 8-inch round cake before you start decorating. Use your favorite vanilla, chocolate, or funfetti recipe, or a box mix. Whatever flavor your birthday kid loves.
This Bluey cake will be sure to stand out at your next event! With it’s 3D design, it looks just like Bluey and is sure to be the talk of your party. So gather up some supplies and let’s get baking! Your Bluey fan will absolutely love it!
For this recipe you will need an 8 inch cake that you will magically transform into Bluey’s head.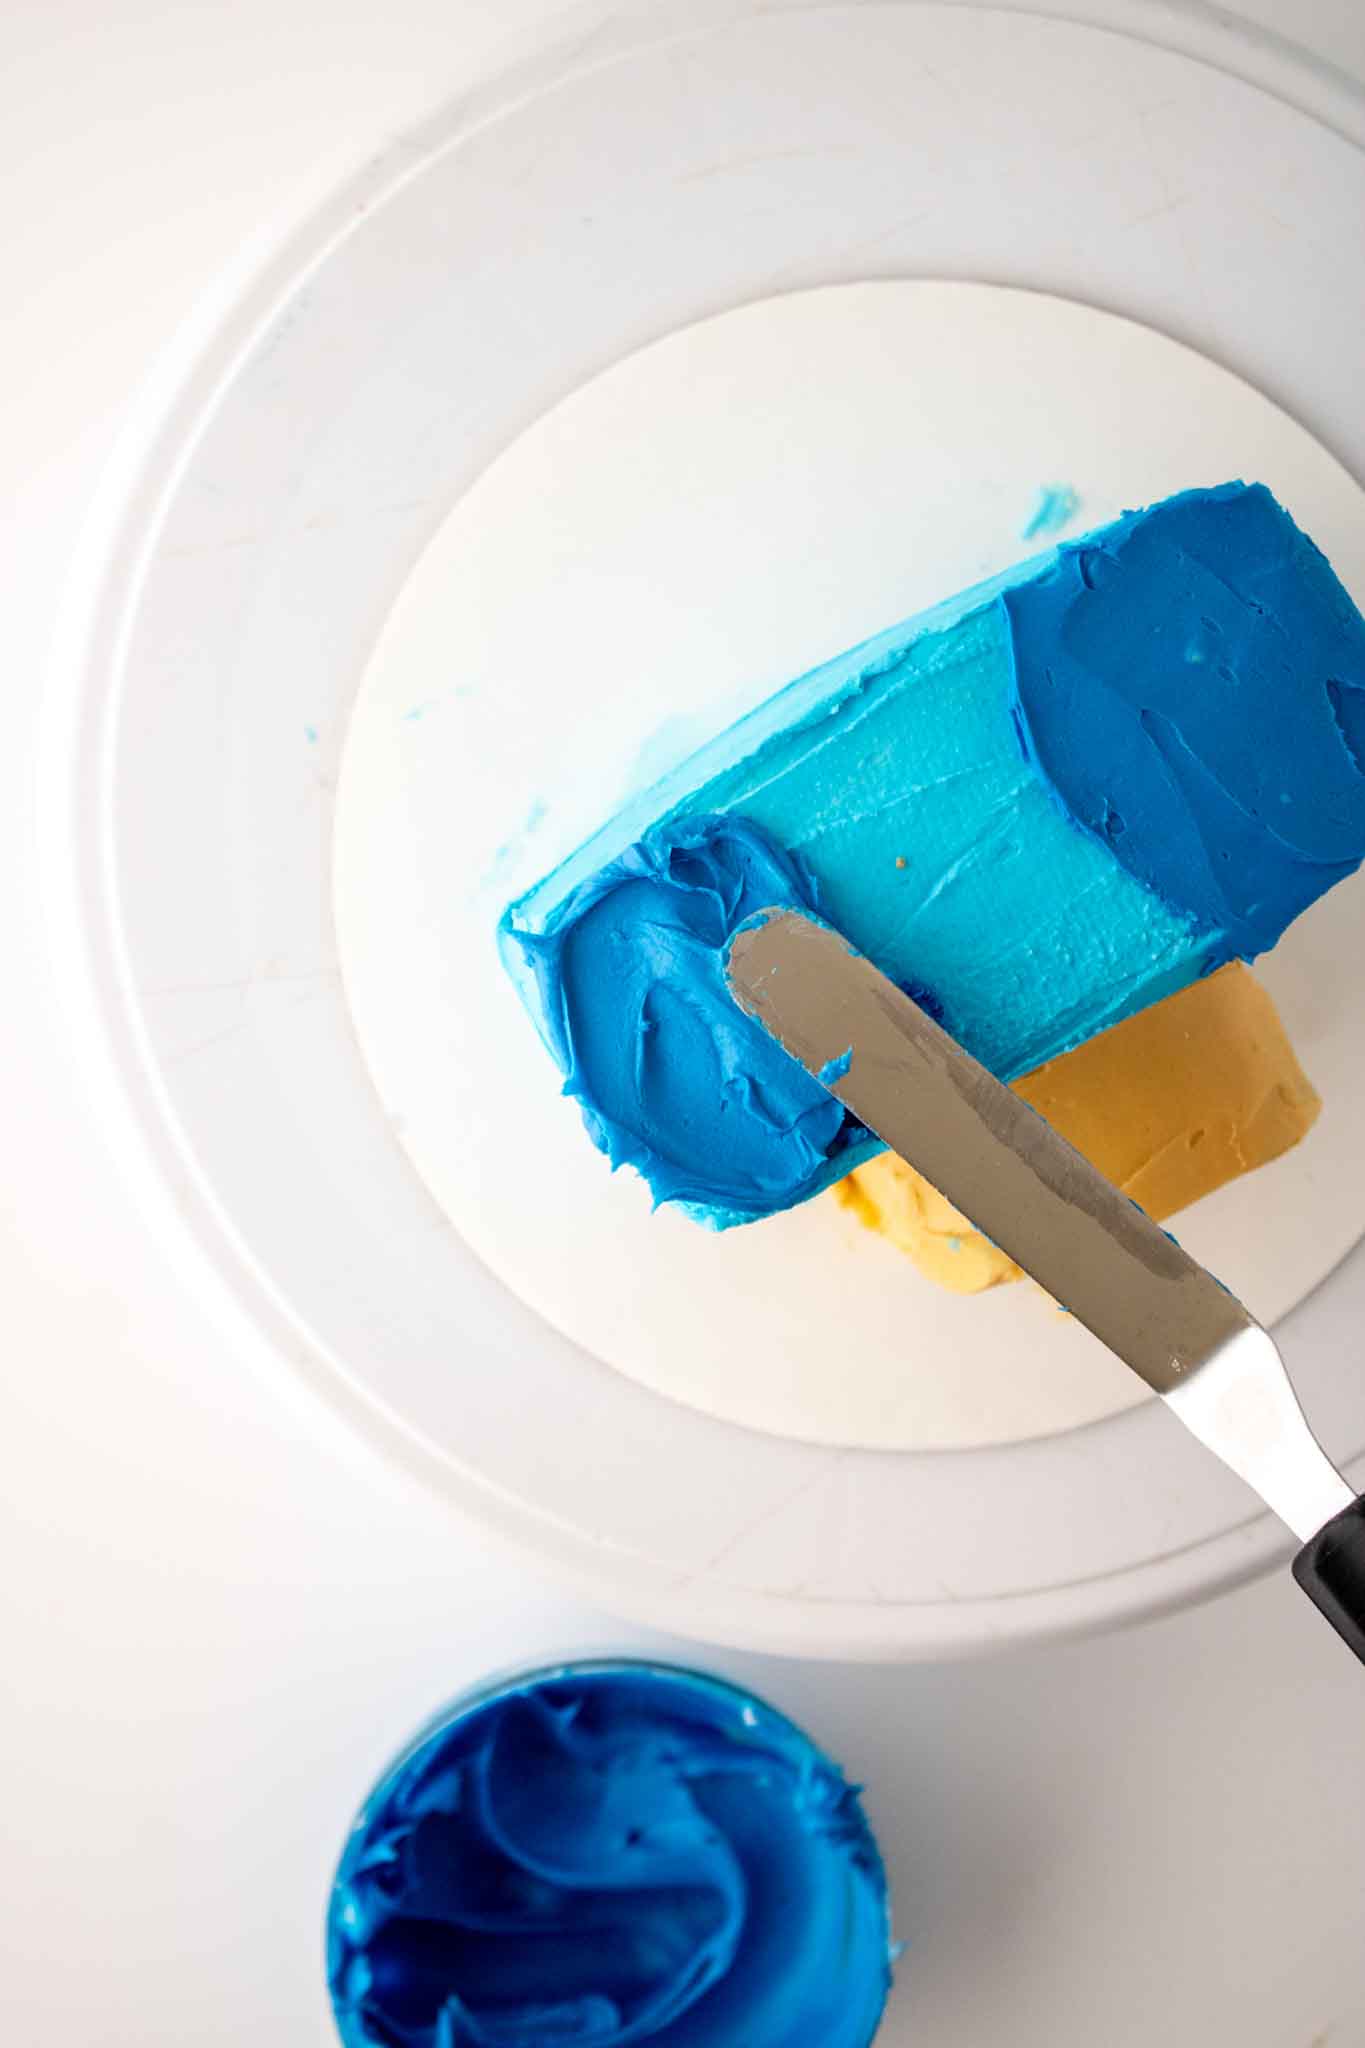

Bluey Cake Ingredients
Black Fondant
White Fondant
Small Egg or Oval Shaped Cookie Cutter
Large Piping Tip
long Skewers
Sky Blue Gel Food Color
Royal Blue Gel Food Color
Ivory Gel Food Color
White Buttercream
8 inch cake
vodka or lemon extract, optional
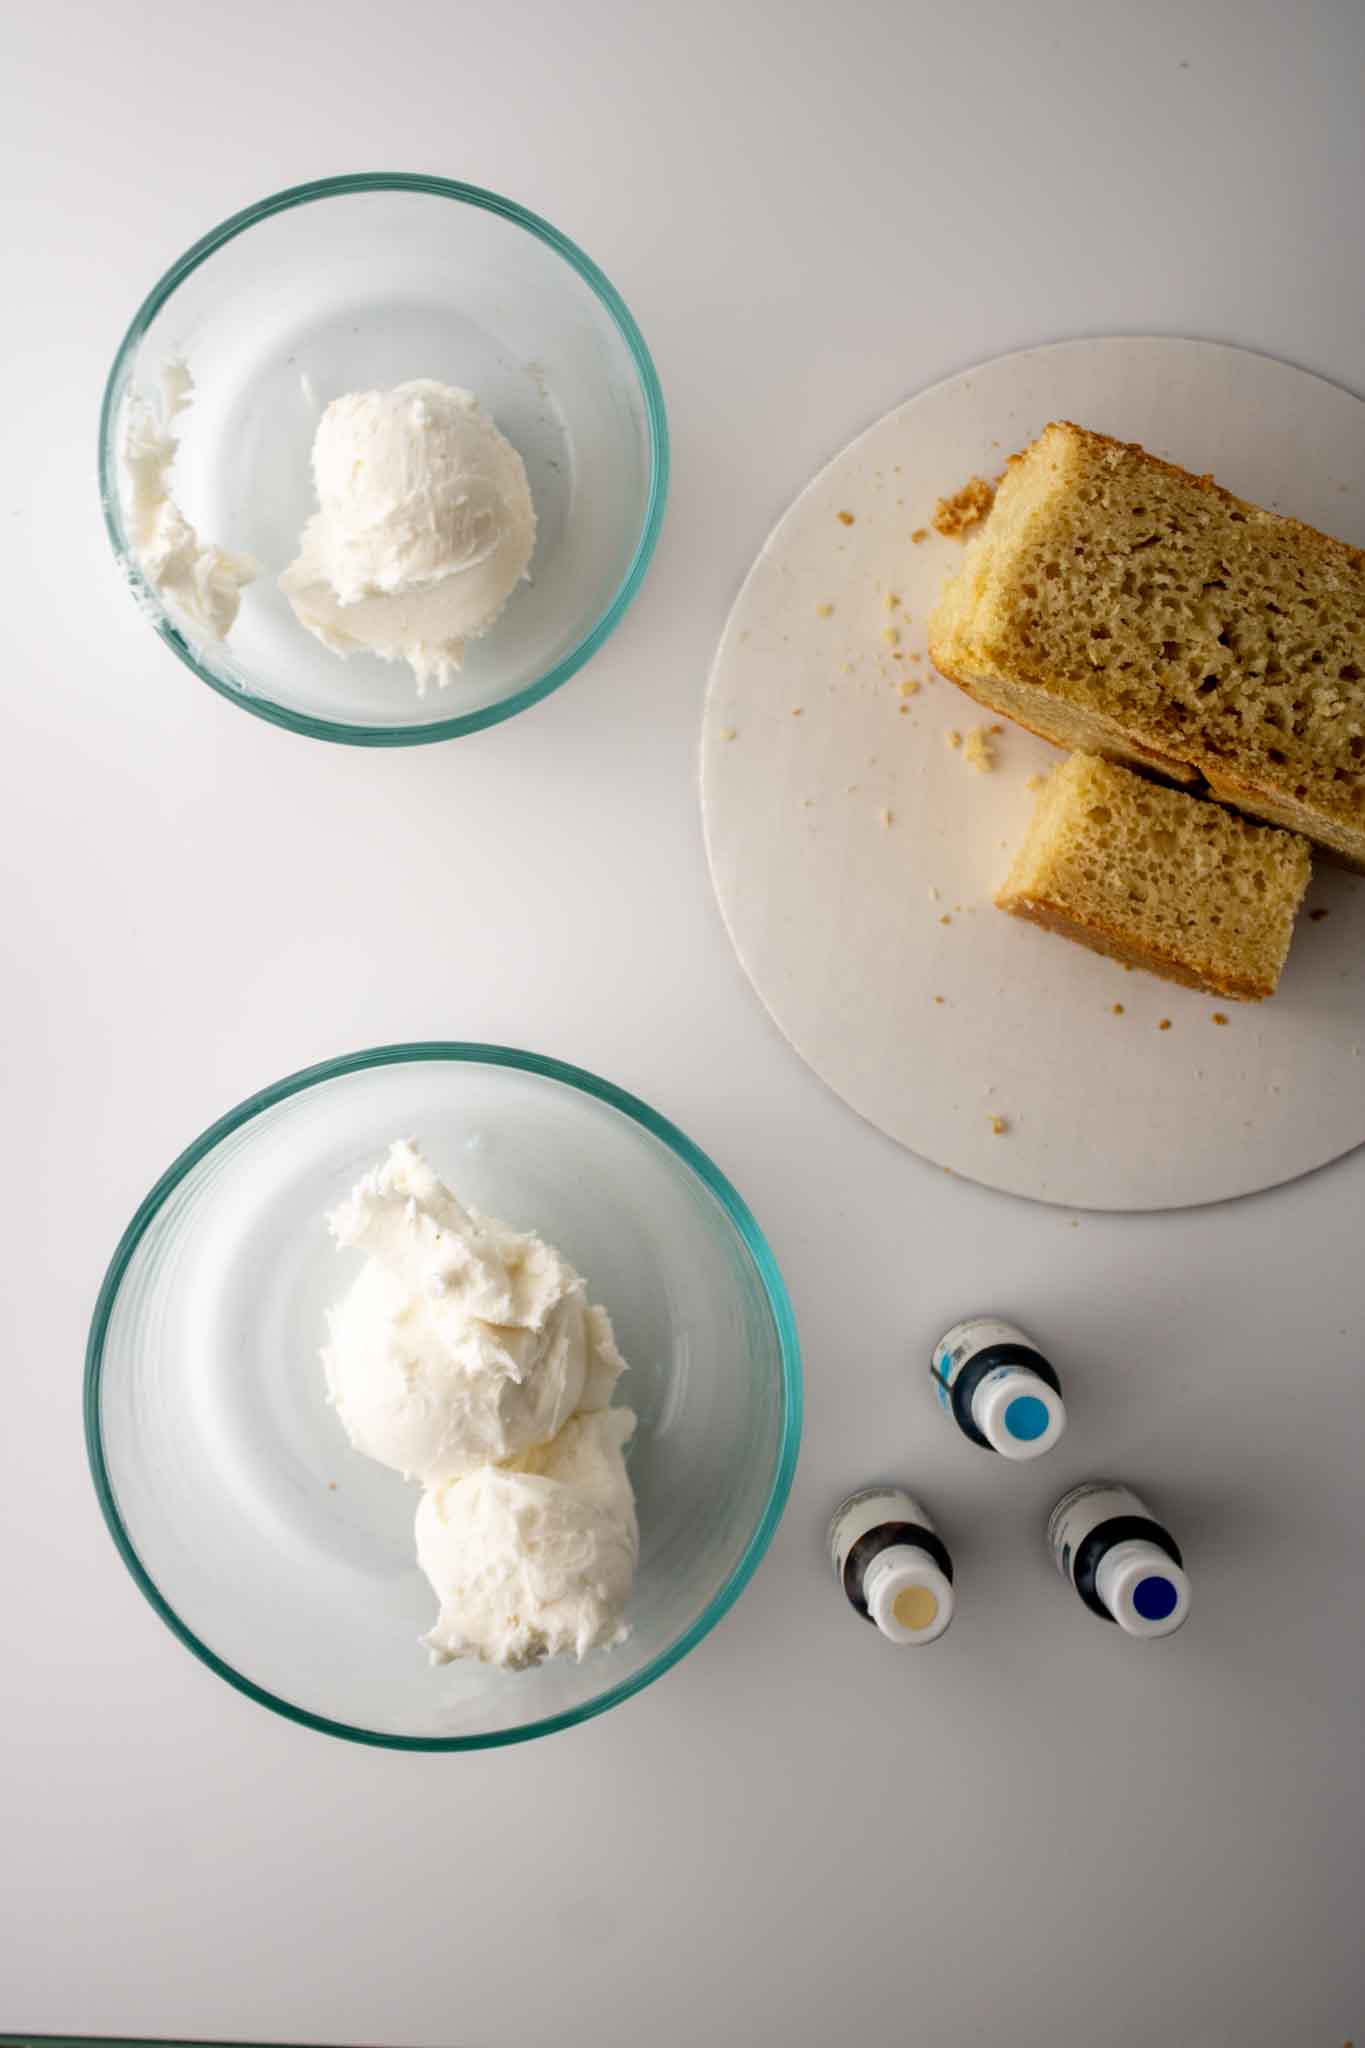
INGREDIENT NOTES
White buttercream: You need approximately 4–5 cups total for this cake. This must be a crusting buttercream — American-style, Swiss meringue, Italian, or mock buttercream all work. Do not use store-bought canned frosting. Canned frosting doesn’t crust, which means the Viva paper towel smoothing method won’t work and you won’t get a clean finish. Make your buttercream from scratch or use a bakery-style recipe.
Sky blue and royal blue gel food color: You need both. The lighter sky blue goes on the main head and the darker royal blue goes on the ears. Gel is essential — liquid food coloring will alter the buttercream consistency and produce dull color. Wilton or AmeriColor gels both work well.
Ivory gel food color: Just a drop or two, used to tint the nose frosting a warm off-white. This is what gives Bluey’s nose its characteristic cream color rather than stark white.
Black fondant (1 oz) and white fondant (1.5 oz): Pre-colored fondant is easiest. If you only have white fondant, knead in black gel color until fully incorporated (wear gloves — black dye stains). The white fondant becomes Bluey’s eyes; the black becomes the pupils and nose dot.
Vodka or lemon extract (optional): Useful if colors bleed during assembly. A clean paintbrush dipped in vodka can lift color mistakes from fondant or frosting. The alcohol evaporates completely within minutes — no taste, no effect.
8-inch round cake, baked and cooled: Two standard layers stacked gives you the height you need for carving. The cake must be completely cool before you start — a warm cake will tear and cause the frosting to slide.
How Do You Make A Bluey Cake?
STEP-BY-STEP WALKTHROUGH
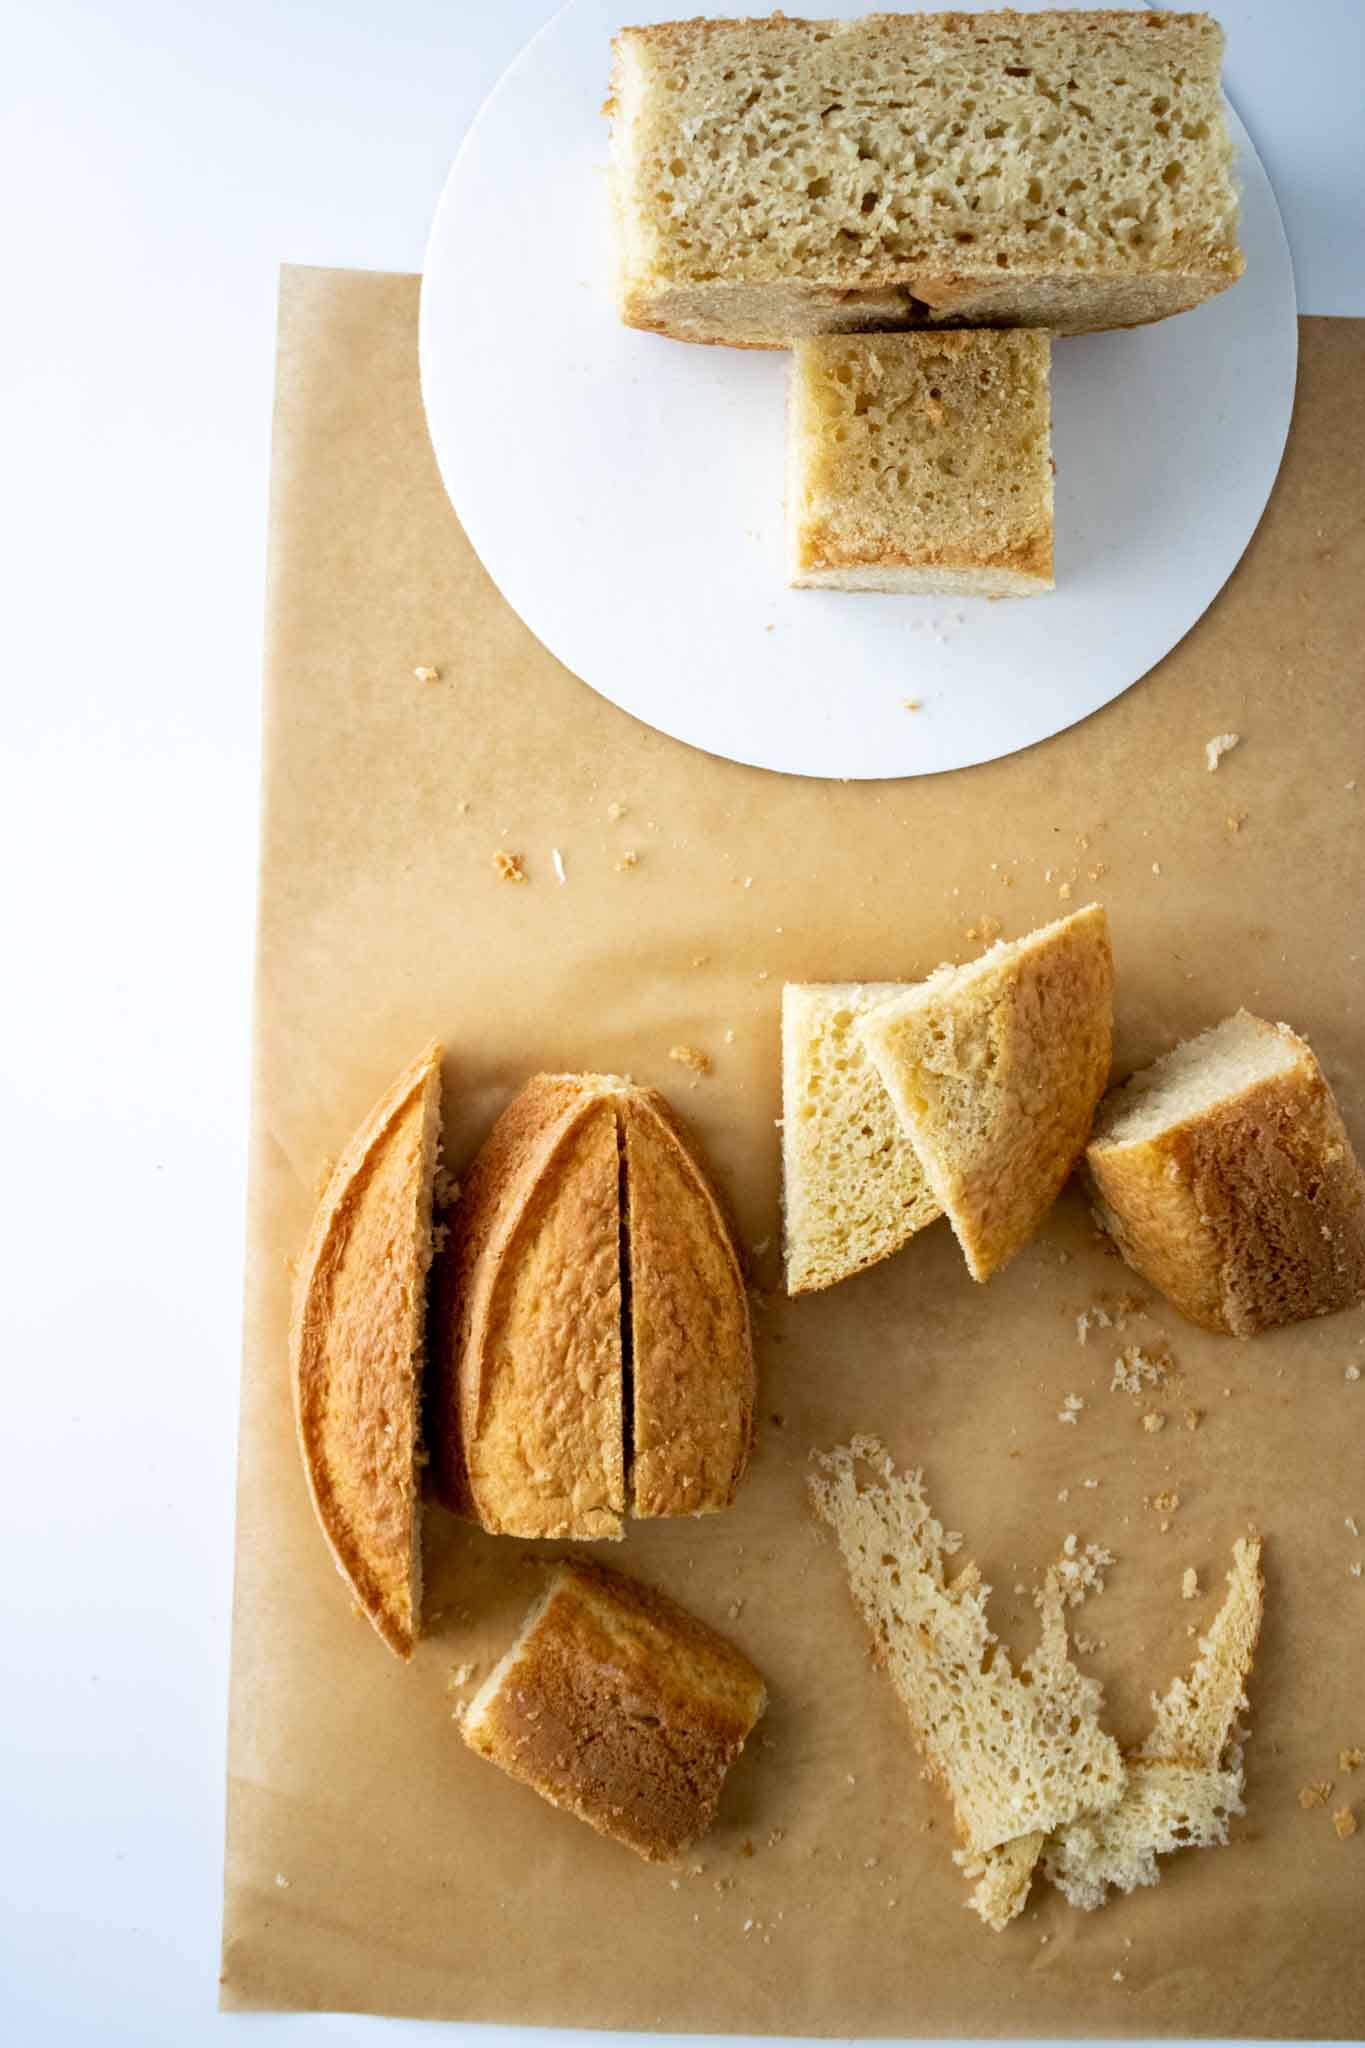
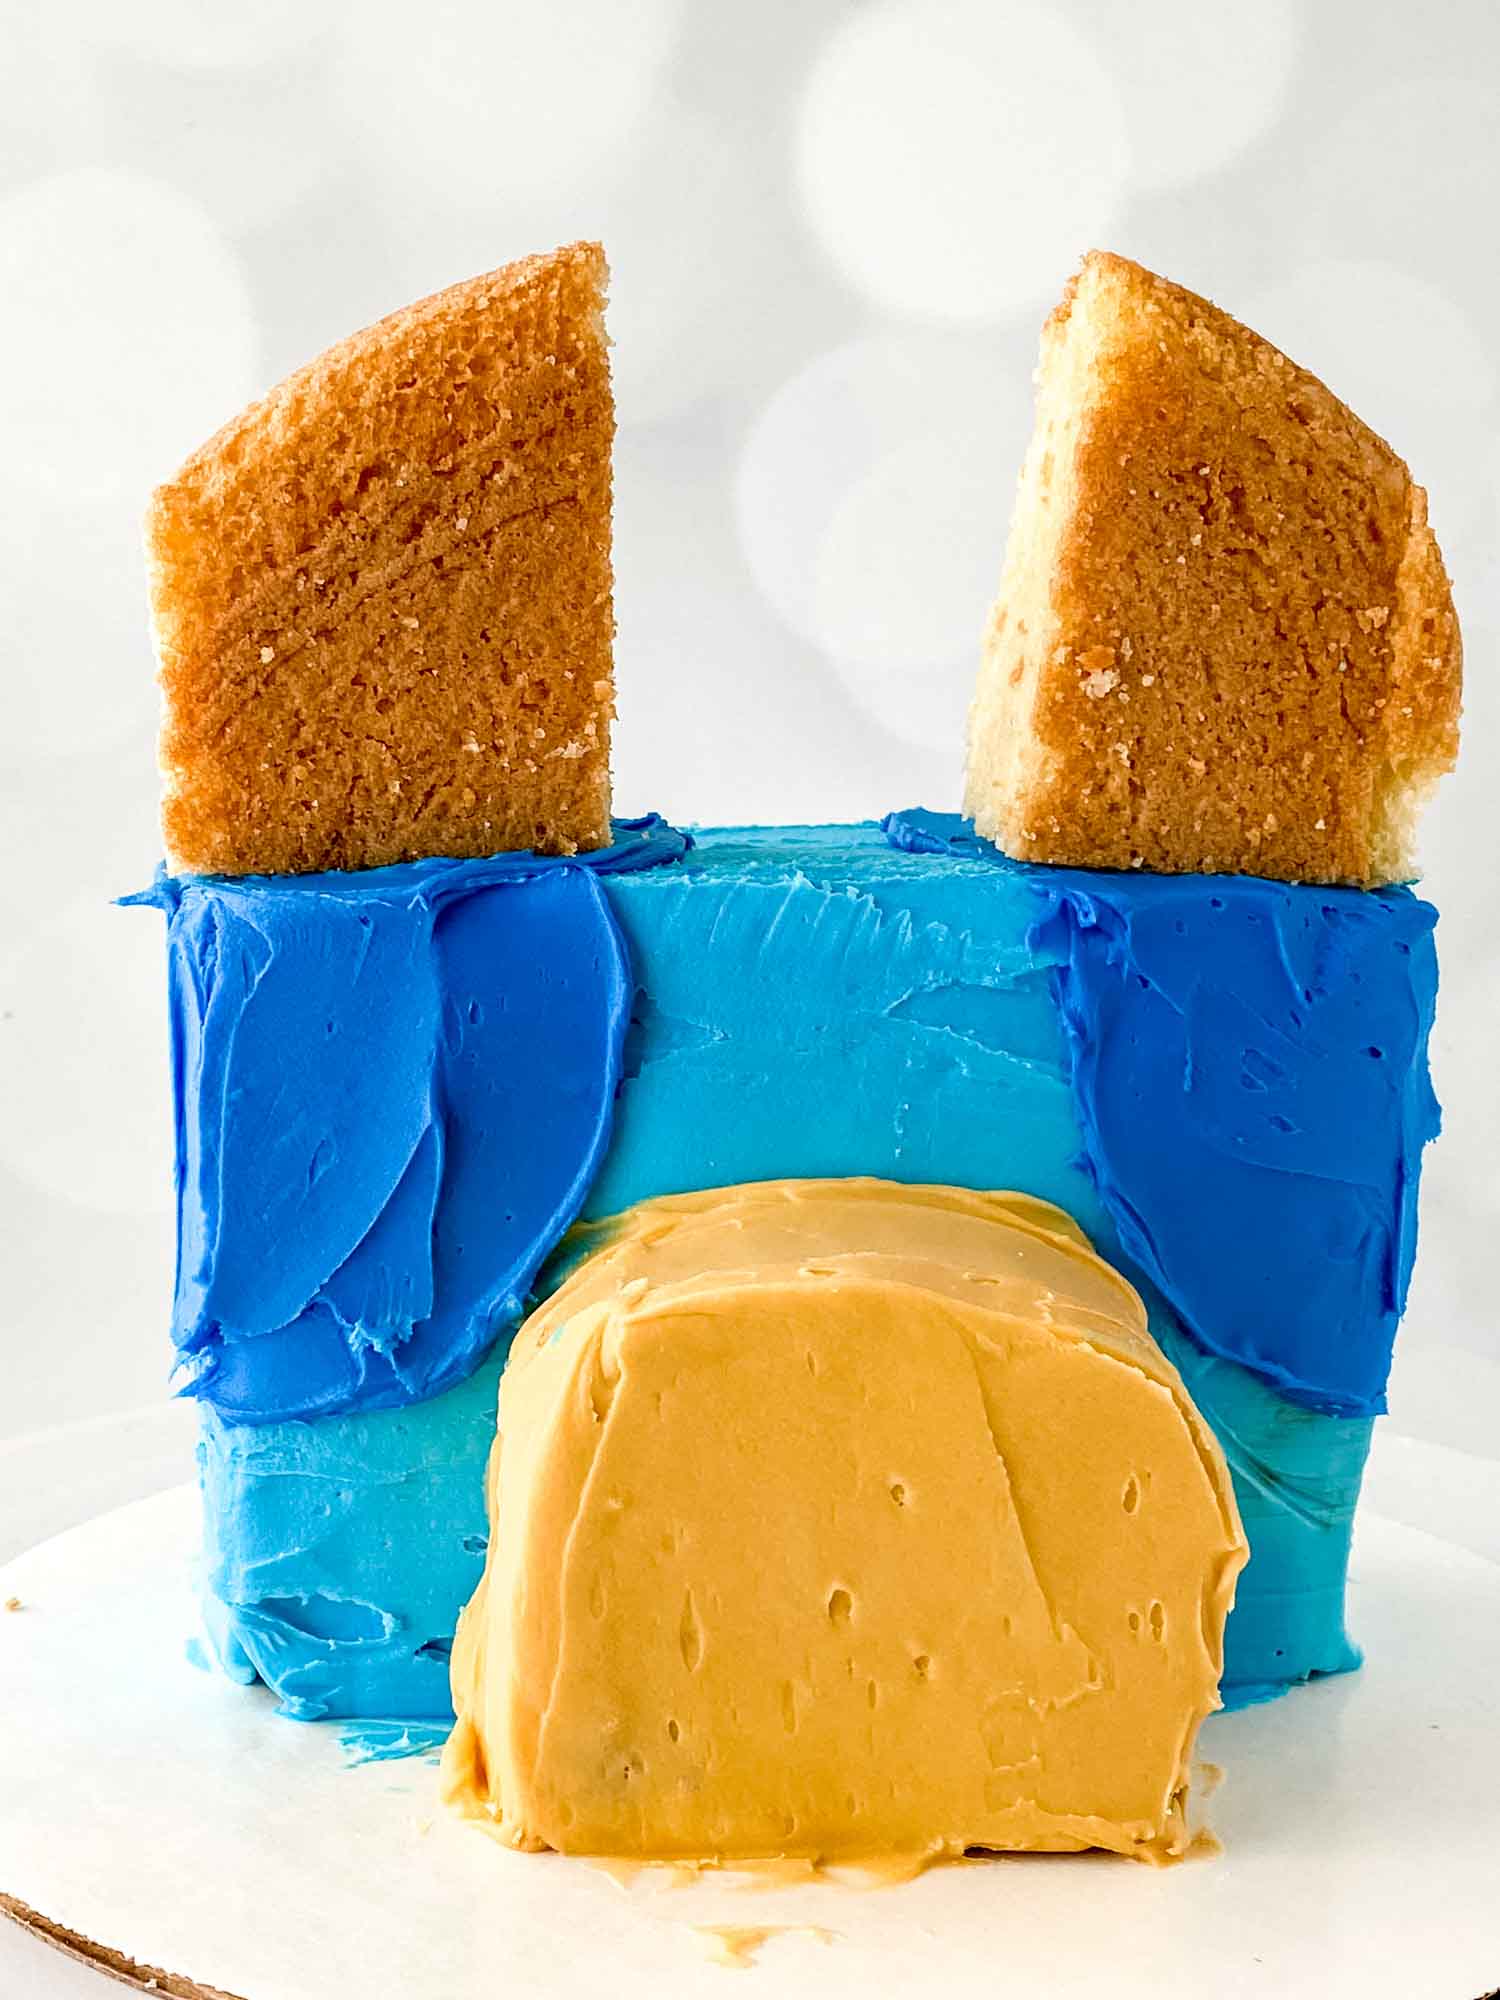
Step 1 — Carve the cake
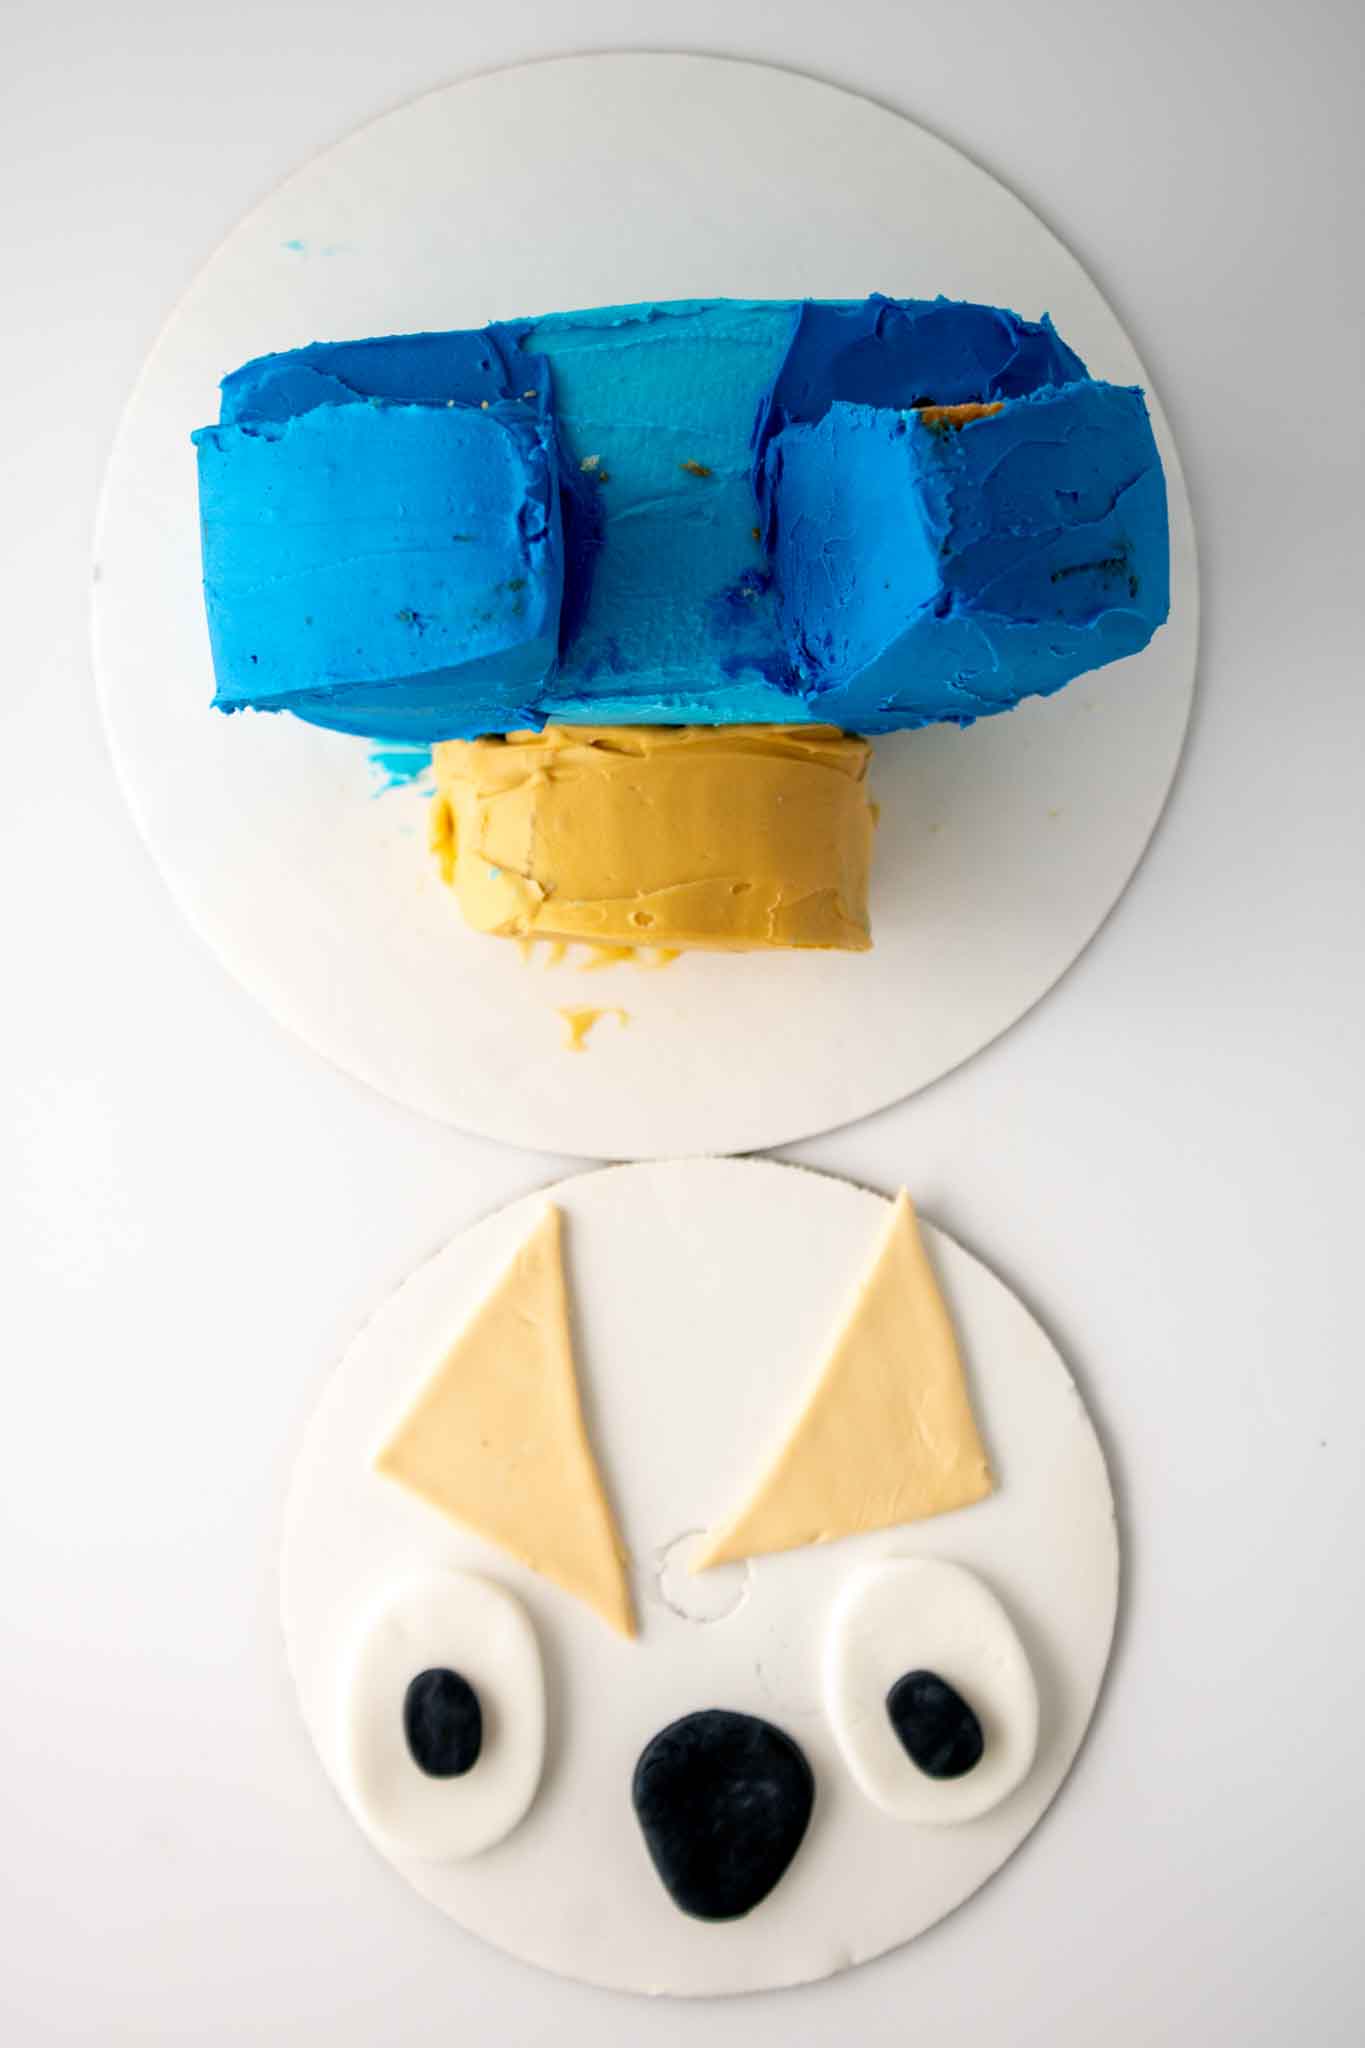
With your cooled two-layer cake still in the pan (or set on a board), use a serrated knife to level the dome off the top. You want a flat surface. Next, cut a 1.5-inch slice off one side of the cake. From this slice, cut three pieces: two for the ears (the outer pieces) and one for the nose (the middle piece). Square off the remaining main cake body — you’re removing the rounded edges to create Bluey’s characteristically boxy head shape. Save the scraps for cake pops.
Freeze the two ear pieces while you work on the main head. This firms them up and makes them much easier to handle when you attach them later.
Step 2 — Dye the frosting
Divide your buttercream: approximately 2 cups for the main head (sky blue), ½ cup for the nose (ivory), and the remainder for the ears and accents (will be dyed royal blue later). Add 1–2 drops of sky blue gel to the 2-cup portion and mix thoroughly before adding more — gel is concentrated. Add 1 drop of ivory gel to the nose portion. Keep the remaining buttercream white for now; you’ll dye it royal blue in a later step.
Note: Buttercream must be very soft and spreadable for smooth application. If it’s stiff, microwave it for 4 seconds and stir. Repeat if needed — you want it the consistency of thick mayonnaise.
Step 3 — Assemble and frost the head
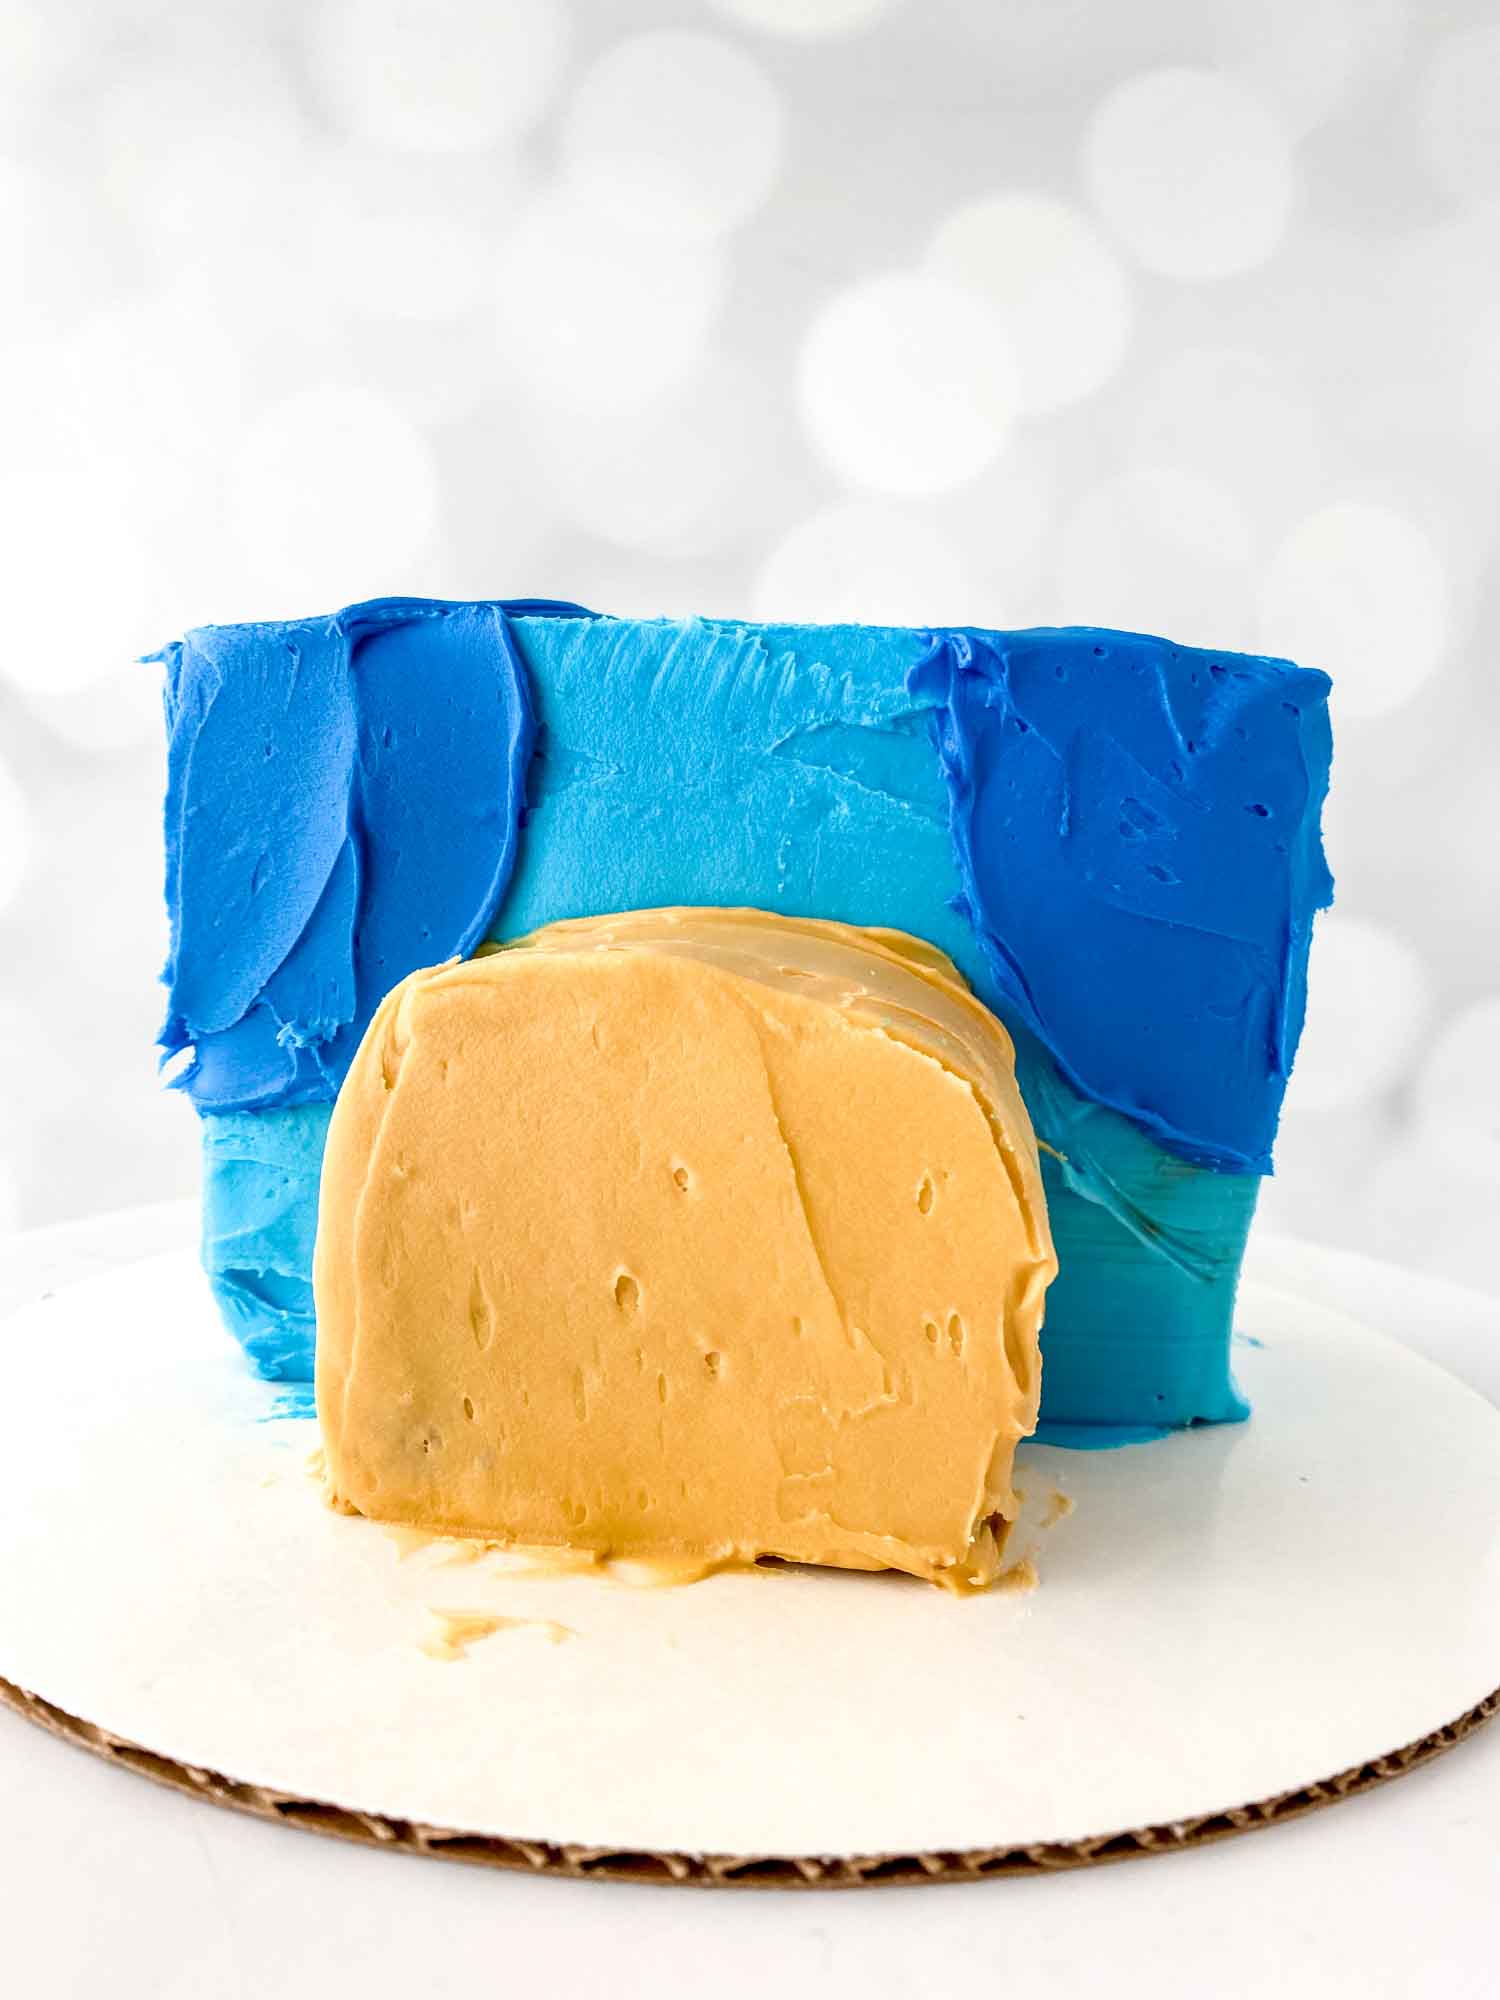
Add a dollop of buttercream to your cake board and position the squared-off cake upright on it, leaving space in front for the nose. Apply the sky blue buttercream generously using a piping bag or offset spatula — more than you think you need. Use your frosting smoother to remove excess and create as even a surface as possible.
Now the Viva paper towel method: once the frosting has crusted enough that you can touch it lightly without it sticking to your finger, lay a plain white Viva paper towel (no print, no texture — this brand specifically) flat against the frosted surface and smooth it gently with your palm using circular motions. The paper towel pulls up any ridges without disturbing the frosting underneath. Work in sections. This step is what gives the cake its clean, smooth finish.
Refrigerate 15–20 minutes to firm up before adding the ears.
Step 4 — Attach the nose
Take the middle carved piece and press it against the front of the head where the nose should go. Frost it entirely with the ivory buttercream, being careful to keep it off the blue frosting. Smooth it down.
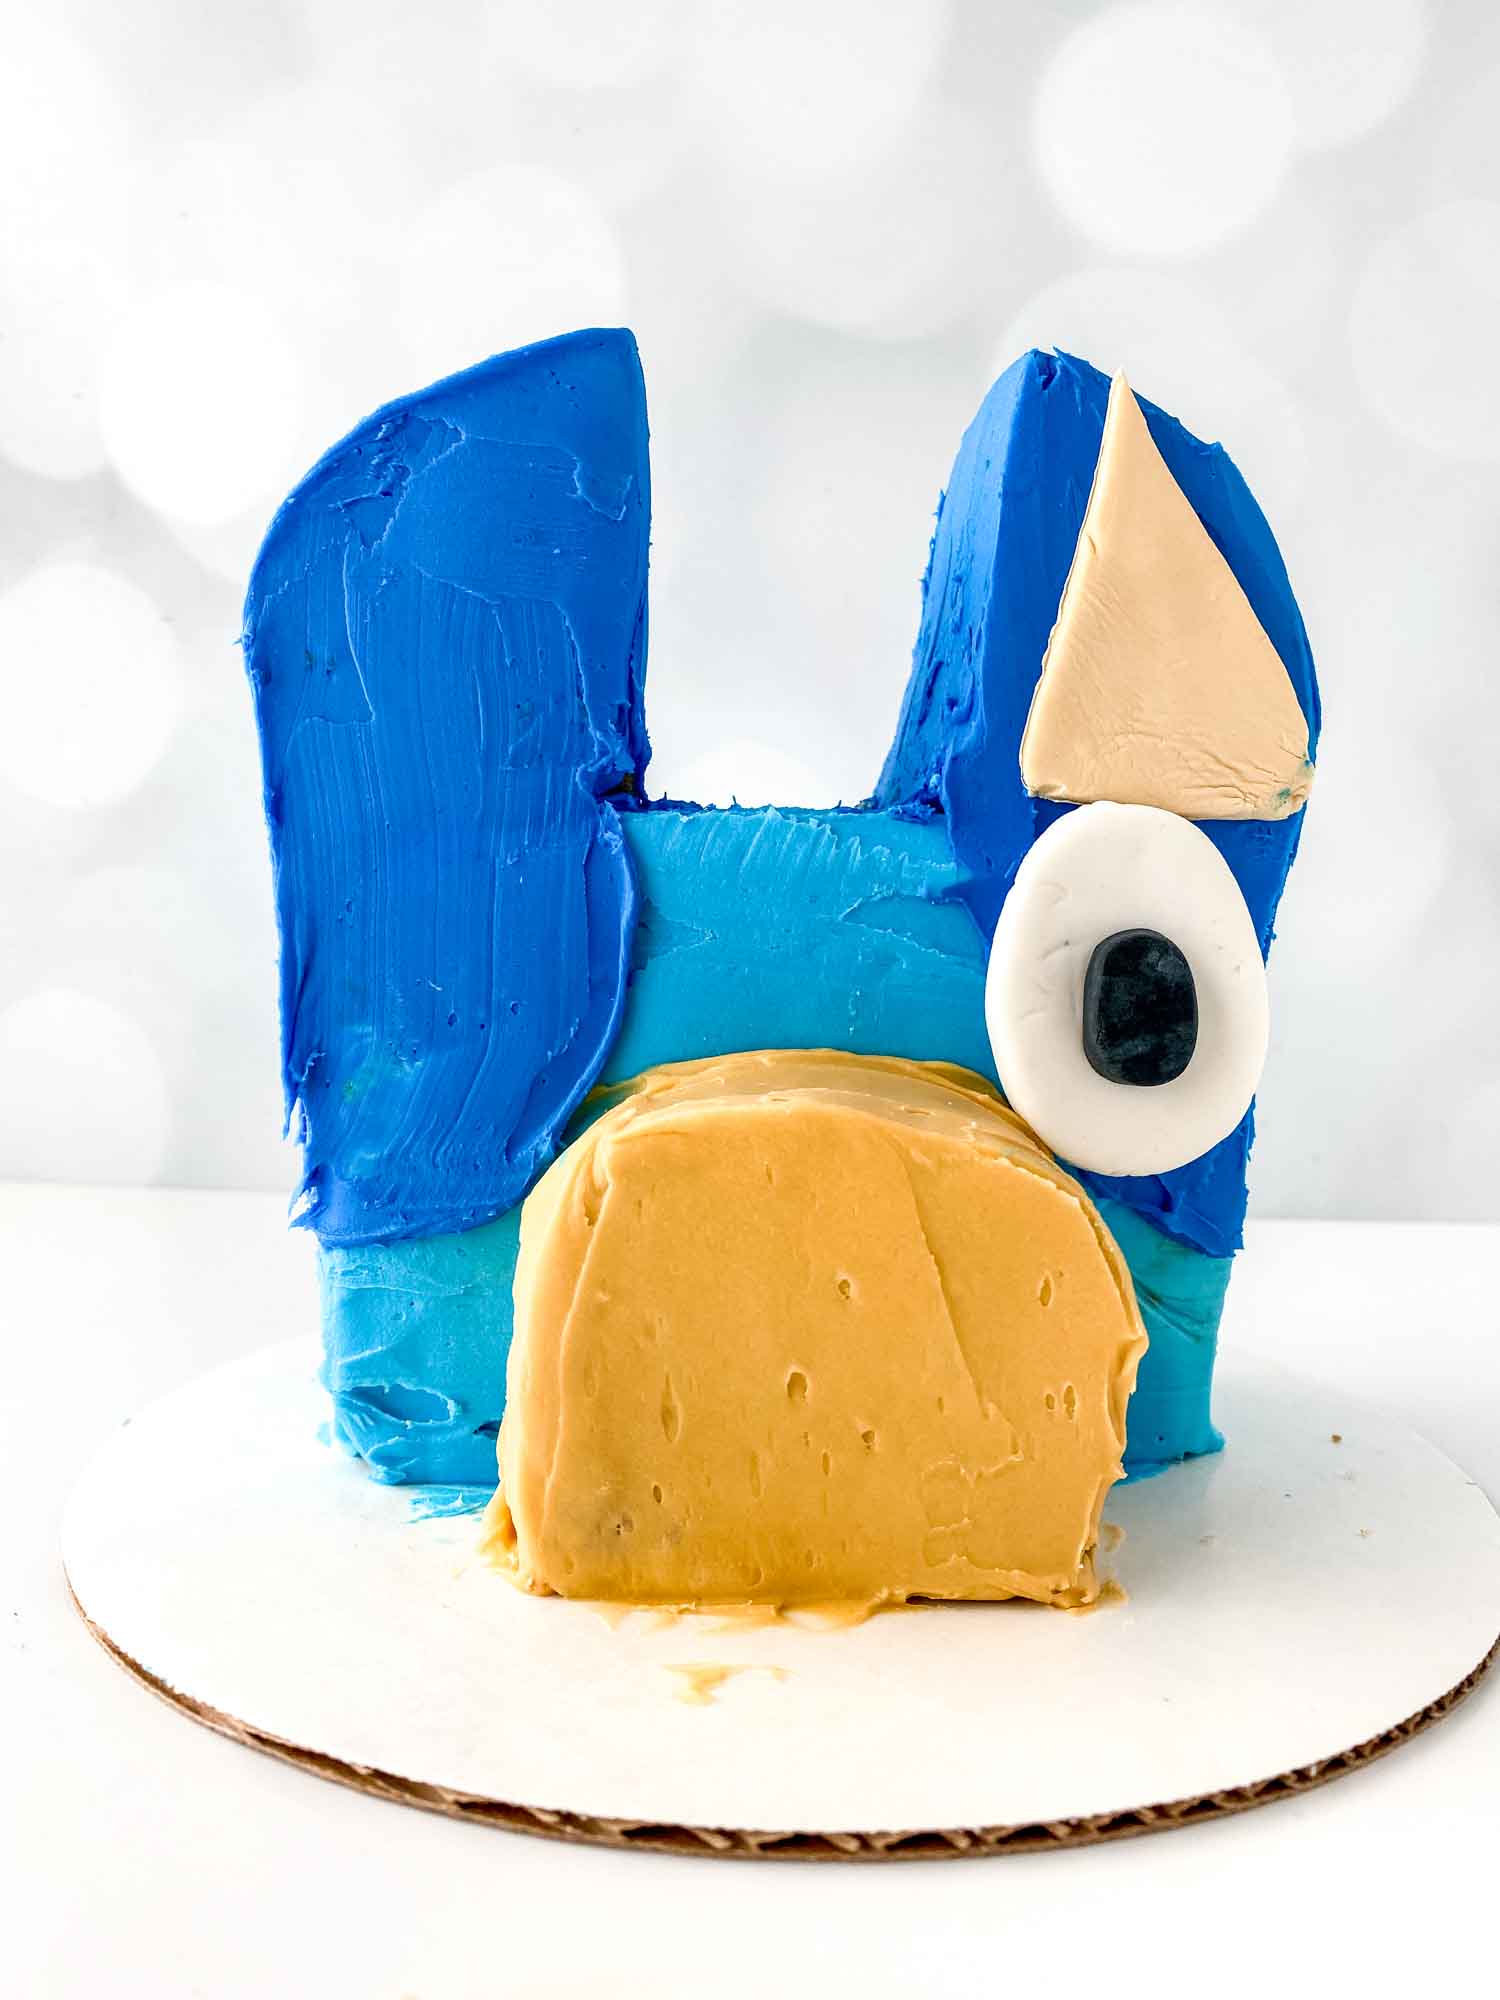
Step 5 — Add the ears
Take your remaining white buttercream and dye it royal blue — deeper than the sky blue, this is Bluey’s ear color. Remove the frozen ear pieces from the freezer. Position them on either side of the head where the ears should sit, then insert a skewer behind each one to hold them in place while the frosting sets. Frost both ears with the royal blue buttercream. Smooth. Return the whole cake to the refrigerator while you make the fondant pieces.
Step 6 — Make the fondant accents
For the eyes: knead the white fondant until smooth and pliable. If sticking, dust your hands and surface with cornstarch or powdered sugar. Roll to approximately ½ inch thickness and cut out two oval or egg shapes with your cookie cutter — compare them against the cake face before committing to the size. For the pupils: roll out the black fondant and use the open end of a small piping tip to punch out two black circles. Lightly moisten the back of each black circle with a damp paper towel and press onto each eye. Let dry 2–3 minutes before moving.
For the nose dot: roll out a thicker piece of black fondant and use the open end of a large piping tip to cut a circle. Gently press the sides with your fingers to shape it into a soft triangle.
Step 7 — Final assembly
Remove the skewers from the ears. Frost the backs of the ears to help them adhere. Press the fondant eyes and nose dot into their positions on the frosted cake. If they won’t stick, add a tiny amount of water to the fondant back as adhesive. Step back and admire your work.
TIPS
Freeze the ears before attaching. This is non-negotiable. Unfrozen carved cake is fragile and crumbles when handled. Even 20 minutes in the freezer makes a huge difference.
Viva paper towels only. Other brands have texture patterns that will imprint on your frosting. Only the plain white Viva works for this method. Buy them before you start.
Dye sky blue first, then deepen to royal blue. You can always add more color to deepen a shade; you cannot lighten it. Start with sky blue for the head, then use the leftover sky blue frosting as the base to build up to royal blue for the ears.
Buttercream must crust before you use the paper towel. If it’s still wet/tacky the paper towel will stick and tear the surface. Wait until a light finger-touch leaves no residue.
The vodka trick is your safety net. Keep a small cup of vodka and a clean paintbrush nearby while assembling. If any color bleeds or you make an error on the fondant pieces, a light application of vodka on the brush will lift it. It evaporates completely — no taste, no effect on the cake.
Marshmallow alternative for the eyes: Large jumbo marshmallows (not standard mini or regular size — they’re too small) can substitute for white fondant eyes, with chocolate chips or candy-coated chocolates pressed in for pupils. This works especially well if you don’t have fondant on hand.
Equipment Needed To Make This Bluey Cake
Serrated Knife
Fondant Rolling Pin
Cake Board or Cake Drum
Offset Spatula
(2) Small Bowls
Spoons
Paint Brush or Wet Paper Towel
Viva Paper towel (non printed)
Frosting Smoother
FAQs
Any flavor works — vanilla, chocolate, funfetti, or box mix. The base cake should be an 8-inch round, baked in two standard layers and stacked, so you have enough height for carving. It must be completely cooled before decorating.
It’s a cake smoothing technique used by decorators to get a perfectly flat, clean frosting surface. Once the crusting buttercream sets slightly, you lay a plain white Viva paper towel against the frosted surface and smooth it with your palm. The paper lifts ridges without disturbing the frosting underneath. It only works with crusting buttercream — not store-bought frosting.
No — store-bought frosting doesn’t crust, so the Viva paper towel method won’t work and you won’t get a smooth finish. You need a crusting buttercream: American-style, Swiss meringue, Italian, mock buttercream, or royal icing all work.
The decorated cake keeps at room temperature for up to 24 hours. For longer storage, refrigerate for up to 3 days. Bring to room temperature before serving. The fondant pieces can be made 1–2 days ahead and stored in an airtight container.
Yes — use jumbo marshmallows for the white eye shapes with chocolate candies pressed in for pupils. For the nose dot, a small piece of dark chocolate or a black candy melt works well. The result is slightly less precise but still recognizable and delicious.
This is a beginner-to-intermediate level tutorial. If you’ve frosted a layer cake before, you have the foundational skills. The carving and Viva paper towel steps take patience but not professional training. Follow the steps in order, don’t rush the chilling times, and the result will surprise you.
It’s used as a brush-on solution to clean up any color bleeding on the fondant or frosting. The alcohol (or high-proof extract) dissolves surface mistakes without damaging the cake. It evaporates completely within minutes — there’s no taste and no effect on children.
What is the difficulty level of this Bluey Tutorial?
This Bluey Cake Tutorial is a beginner/intermediate level tutorial. With the right supplies and step-by-step instructions, anyone can create this wonderful 3D cake! So gather your supplies and get ready for some fun!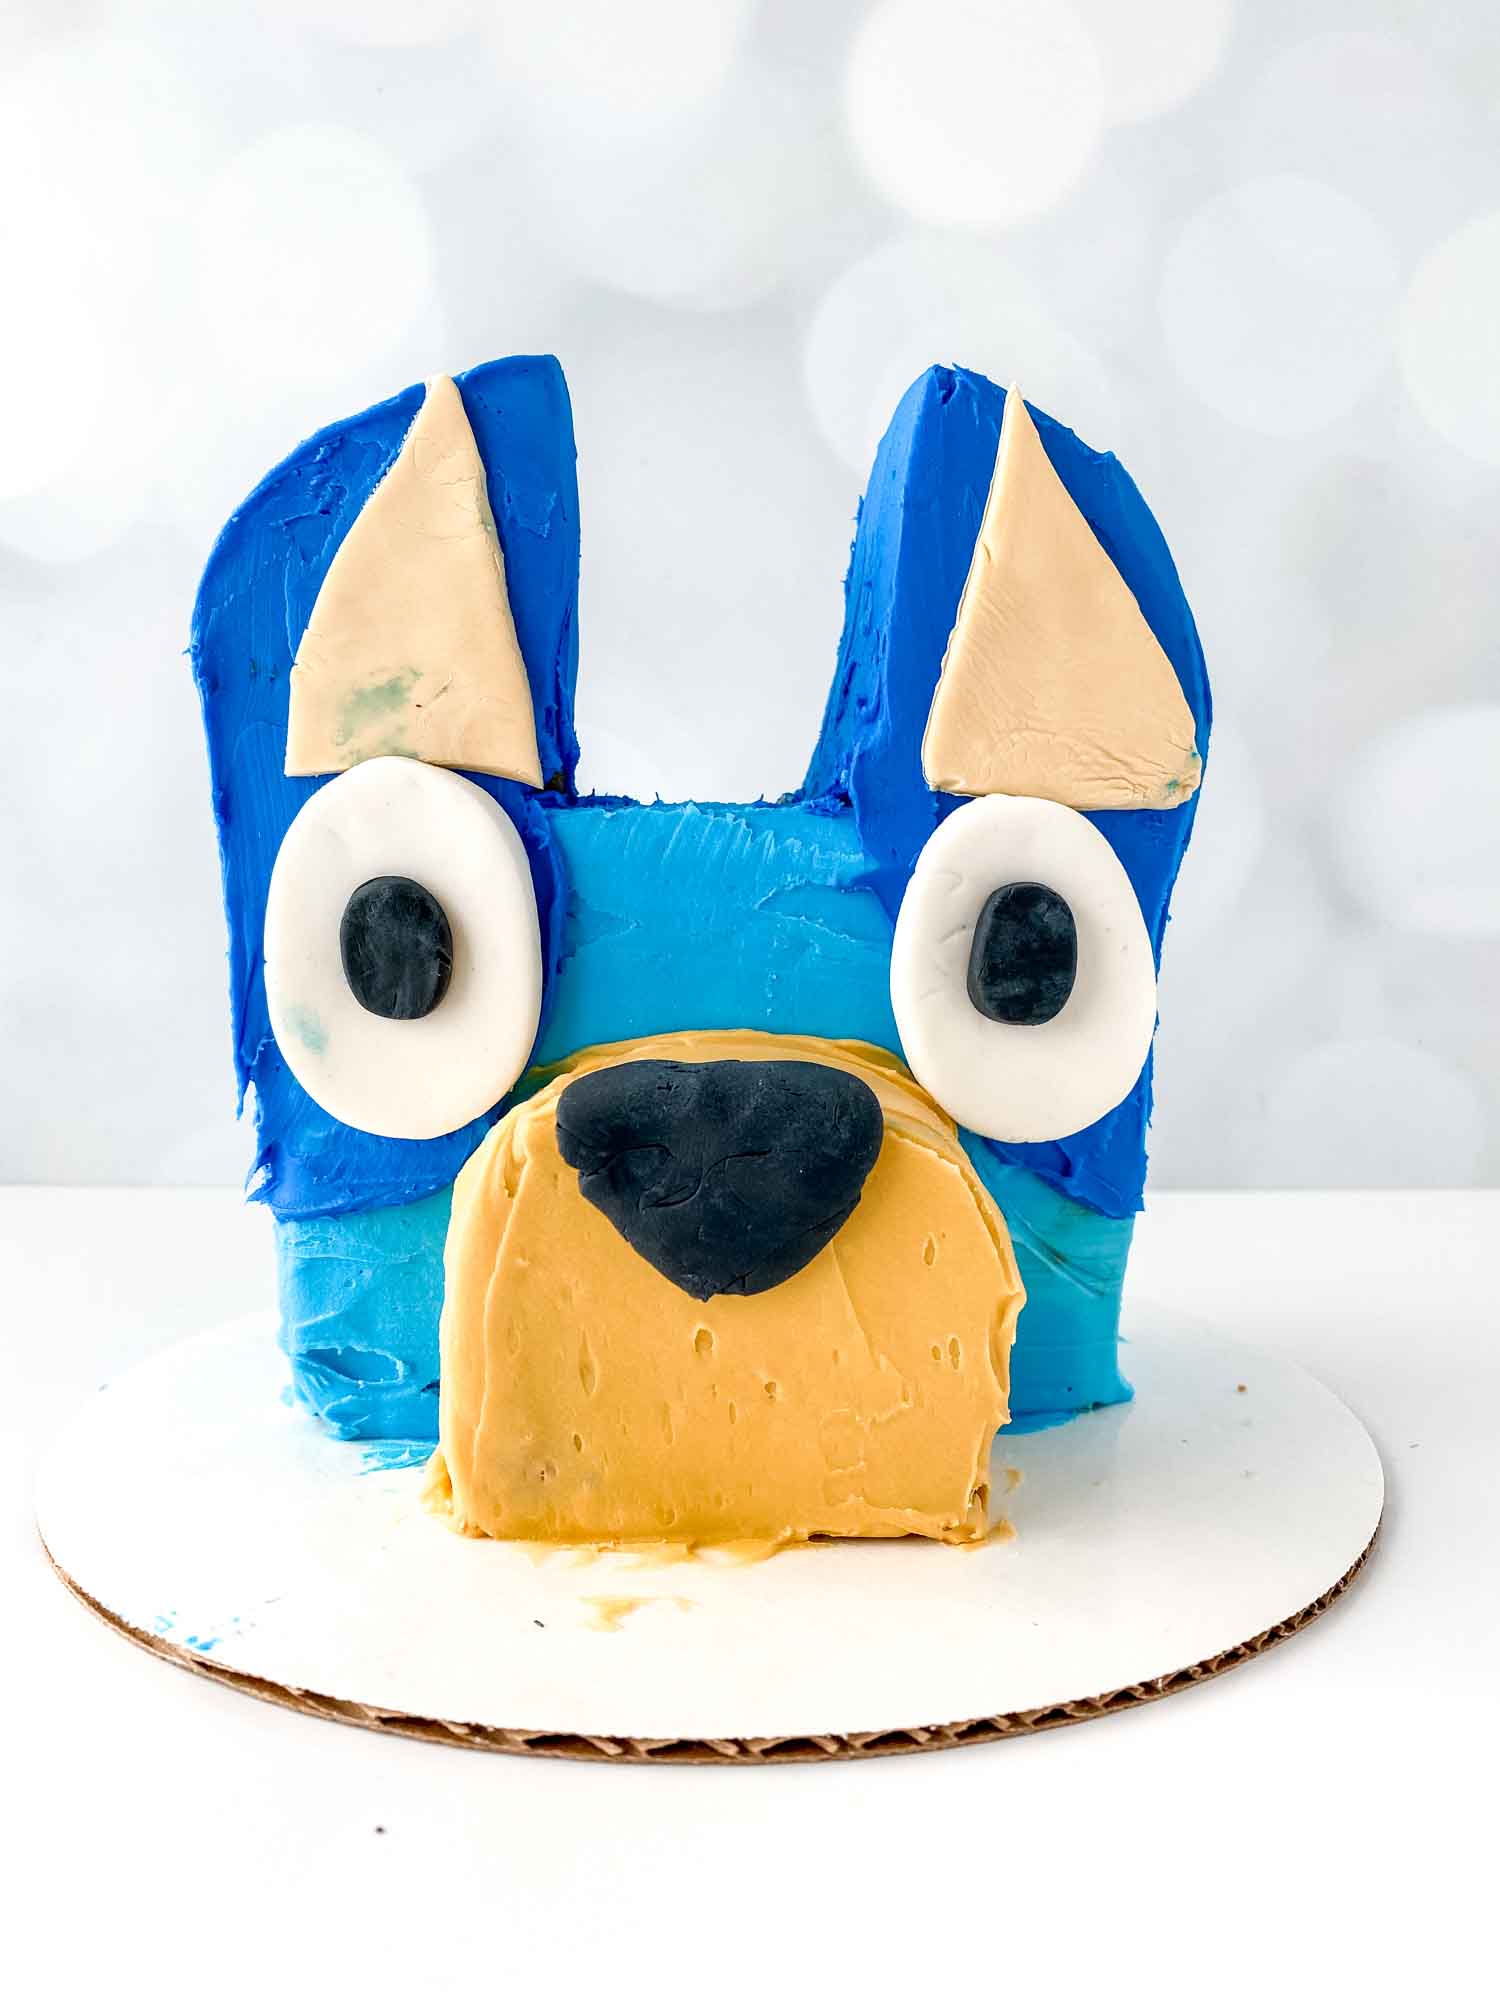
My daughter still talks about that birthday party. She’s well past her Bluey phase now but the photos of that cake are still some of my favorites — her face when she saw it is exactly why I make these cakes from scratch.
If you make this, tag me on Instagram so I can see it. And if your kid’s next party needs a cake, check out the Ninja Turtle and Barbie tutorials linked below — same skill level, same approach, just a different character face.
What are some other fun treats to make for birthday parties?

For more cake ideas be sure to check out this comprehensive list: The Most Delicious Cake Recipes For Dessert
How To Make A Bluey Cake – Easy Tutorial
This Bluey Cake Tutorial is so great for birthday celebrations and more fun!
Ingredients
- 1 oz Black Fondant
- 1.5 oz White Fondant
- Small Egg or Oval Shaped Cookie Cutter
- Large Piping Tip
- 2 long Skewers
- Sky Blue Gel Food Color
- Royal Blue Gel Food Color
- Ivory Gel Food Color
- White Buttercream
- 8 inch cake
- 1-2 tbsp vodka or lemon extract, optional
Instructions
Instructions
- Using a serrated Knife cut off the “dome” of the cake, while still in the pan (cooled)
- Cut off 1.5 inches of cake and then cut it into 3 pieces for the (2) ears and nose
- Square off the remaining cake (use the scraps for cake pops!)
To make the ears:
- The two outer pieces of cut cake will be the ears.
- Make sure they are the same size and notice the direction they are in.
- Freeze them while you work on the cake.
Dye the frosting
- Use two cups of buttercream frosting and dye it with 1-2 drops of sky blue color. Mix it well before adding more.
- Use 1/2 cup of buttercream for the nose and dye it with 1 drop of ivory gel food coloring.
- Note: the buttercream needs to be VERY soft, if its not pop it in the microwave for 4 seconds
Assemble the head
- Add a dollop of buttercream to the cake board where you want the head to be positioned leaving space for the nose.
- Place the squared-off cake upright onto the board.
- Frost with the sky blue buttercream, add more than you think you need (using a piping bag is helpful)
- Use the icing smoother to remove any excess frosting
- For the best smooth result, use a plain white Viva paper towel (no other brand works)
- Once the frosting has crusted (you can touch it with your hands without frosting being on it), you can gently lay the paper towel on it and smooth it out with your hand by gently rubbing the paper towel.
- Place in fridge to cool for 15-20 mins
- Or (without paper towel method)
- Pop the freshly frosted cake into the fridge and let it chill for 15-20 mins.
- Remove from the fridge and use your hand to smooth out the frosting. It doesn’t have to be perfect as we need to add more frosting, but as smooth as possible.
For the nose
- Place the middle piece of cake up against the square to create the nose.
- Add the ivory buttercream all over the nose, careful not to get it onto the blue.
- Smooth it down.
For the ears
- Dye the leftover sky blue frosting royal blue. If you need to add more buttercream so you have enough to complete the eyes and ears, do so before adding the royal blue.
- This is a two-toned coloring method. You must dye it the lighter blue first then the darker blue to get the deeper shade.
- First, add frosting to where the eyes will be.
- Position the ears where you’d like them to go, then add the skewers behind them to hold in place.
- Frosting the ears with the darker blue frosting, again, adding more than you need.
- Use the frosting smoother to clean up the rough edges and smooth the cake out.
- Place the cake in the fridge while making fondant pieces
Fondant accents
- Be mindful that when working with fondant you may want to use plastic gloves.
- Knead the white fondant until smooth and no longer sticky. If its sticking to your hands, dust them with 1 tbsp cornstarch or powdered sugar.
- Dust your surface with 1 tbsp cornstarch or powdered sugar and roll out the white fondant to ½ inch thickness.
- Cut out two eyes with either a small egg or an oval cookie cutter. A circle cutter will also work, just compare the size to the cake before continuing.
- Once the eyes are cut out, knead and roll out the black fondant.
- Use the open end of a small piping tip to create the black dot for the eyes.
- Use a lightly moistened paper towel and rub it against the back of the black dot.
- Position it on the eye and let dry for 2-3 mins before moving.
- Re-roll the black fondant and roll out a thick piece. Use a large piping tip to cut out the circle for the nose.
- Use your fingers to lightly press in the sides creating a triangle for the nose.
Assembly
- Remove the skewers from the head.
- Frost the back of the ears.
- Press the eyes and nose into place. (if they won't stick, add a small amount of water to the fondant).
- Tada! You’ve made Bluey’s head!
Notes
You could use the Smores Style marshmallows for the eyes with chocolate candies for the pupils. (large marshmallows won't be large enough, you need a jumbo one).
If you accidentally have an issue with colors bleeding, you can use vodka and a paintbrush to rub it off (make sure the brush stays clean.
The vodka will evaporate within minutes, nothing will taste like alcohol nor does it have any effects on children.
Do not try and use store frosting you need buttercream from the cake decorating item - it's different. You can also make Swiss, Italian, French, Royal Icing, American Crusting, or Mock Buttercream.
Nutrition Information
Yield
6Serving Size
1Amount Per Serving Calories 158Total Fat 5gSaturated Fat 2gTrans Fat 0gUnsaturated Fat 3gCholesterol 35mgSodium 57mgCarbohydrates 24gFiber 0gSugar 20gProtein 1g

Before you go, Grab Your Free Printable Recipe Kit!
Keep track of all your favorite recipes and ingredients with this free printable book!
Hi! I’m Nellie. I am an entrepreneur, a busy mama of 3 and a wife to my high school sweetheart. I have been sharing content for over 12 years about how to cook easy recipes, workout tips and free printables that make life a little bit easier. I have been featured in places like Yahoo, Buzzfeed, What To Expect, Mediavine, Niche Pursuits, HuffPost, BabyCenter, Mom 2.0, Mommy Nearest, Parade, Care.com, and more!
Get comfortable and be sure to come hang out with me on social. Don’t forget to grab your free fitness journal before you go!