Easy Pokemon Pikachu Birthday Cupcakes
Pokémon Cupcakes Recipe: A Fun Treat for Every Pokémon Trainer!
Are you ready to bring the excitement of Pokémon to your kitchen? These delightful Pokemon Cupcakes are not just a treat to the taste buds but also a feast for the eyes. Perfect for any Pokémon-themed birthday party or just to delight a little trainer in your life, these cupcakes are sure to impress.
The recipe involves decorating prebaked cupcakes with colorful fondant to resemble various Pokémon characters and the iconic Poké Ball. Get ready to create your very own pokémon birthday cake or pikachu cupcakes with this easy-to-follow guide!

Ingredients Needed:
- Prebaked Cupcakes
- Frosting (vanilla, chocolate, or red frosting)
- Yellow, Red, White, and Black Fondant
- Small Rolling Pin
- Xacto Knife
- Cookie Cutters (circle, square)
- Piping Tips
- Small cup of water
- Paper Towels
- Paint Brush
- Silicon Mat (optional)
- Powdered Sugar

Lightly dust your surface with powdered sugar
Roll out the yellow fondant to ¾ – ½ inch thick and cut out however many toppers you will need.
Cut out small yellow squares for the ears.
Using the small end of Tip 12 cut out red circles for the cheeks

Press with your finger to flatten and widen, place on the yellow circle
Use the small end of Tip 12 to cut out black circles for the eyes.
The eyes will also be pressed, but into the fondant.

Use the small end of Tip 12 to cut out a black circle this will be for the nose and mouth.
Use the small end of Tip 8 to cut out the nose from the circle in the previous step
The left over black fondant will become the perfect amount to make the mouth.

Roll the left over into a “snake” and shape it into the design of the mouth.
Once all of these pieces are cut out, use a small amount of water to adhere them to the face.
Lastly make the ears.

Cut the squares in half, then trim the triangles into the shape of an ear.
Add a small amount of water to the top of the ear and add black fondant.

Trim off any excess.
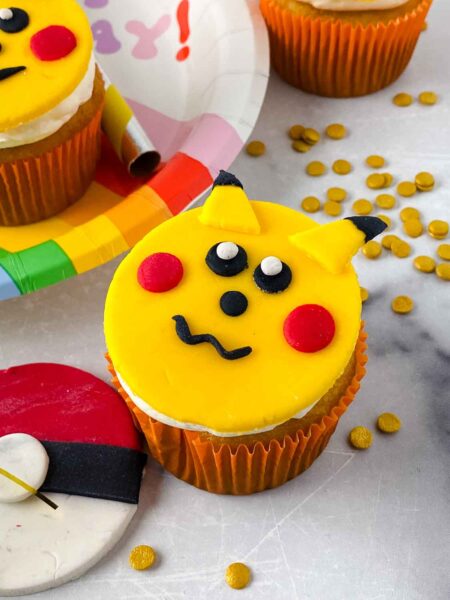
Lightly dampen the top of the circle and place the ears, gently pressing them into the topper.
Pressing them in, help perk them up so they don’t droop! This is why the fondant should stiffen between each step.

Frequently Asked Questions
Q: Can I use a boxed mix for the cupcakes?
A: Absolutely! For a quick and easy option, a boxed mix works perfectly. Feel free to choose your favorite cupcake flavor – red velvet and vanilla are always hits!
Q: Do I need any special tools?
A: Basic decorating tools like a small rolling pin, Xacto knife, cookie cutters, piping bags, and tips are needed. A silicon mat is optional but helpful.
Q: Is it difficult to work with fondant?
A: It can be a bit tricky for beginners, but with some practice and patience, you’ll get the hang of it. Ensure the fondant stays soft and pliable for easier handling.
Tips and Tricks
- Use powdered sugar to prevent fondant from sticking to surfaces.
- Roll fondant into thin sheets for easier cutting and a more refined look on the cupcakes.
- To adhere fondant pieces, use a bit of water with a small paintbrush.
- Keep paper towels handy for quick cleanups.
Variations
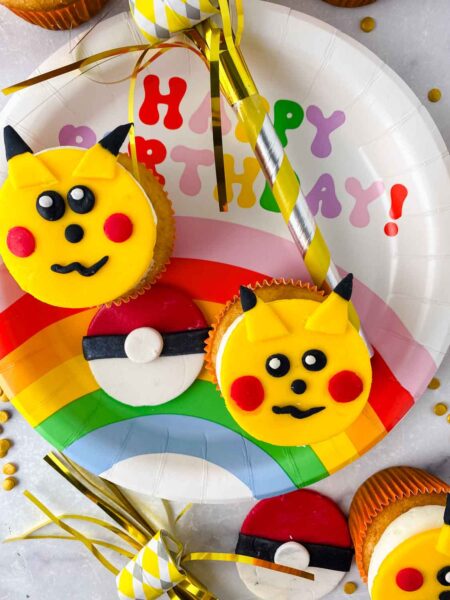
- Pikachu Cupcakes: Use yellow fondant for Pikachu’s ears and black strips for the details.
- Pokeball Cupcakes: Red and white fondant to create the iconic Poké Ball design on top of each cupcake.
- Assorted Pokémon Characters: Get creative and design cupcakes based on various favorite Pokémon.
Where to Serve
- Birthday Parties: Ideal for a Pokémon-themed birthday party.
- Special Occasions: Surprise a pokémon fan or a little trainer on any special occasion.
- Pokémon Party: Enhance a Pokémon party with these adorable cupcakes.
Storage
- Store in an airtight container to keep them fresh.
- Avoid refrigerating fondant-covered cupcakes as moisture can affect the fondant.
Common Problems and How to Avoid Them
- Fondant Drying Out: Keep unused fondant covered to prevent it from drying.
- Fondant Cracking: If the fondant cracks, knead it with a bit of shortening.
- Misshapen Figures: Use cookie cutters for precise shapes like circles and squares.
Tips for Making This Recipe with Kids
- Let kids help with rolling and cutting the fondant.
- Kids can assist in assembling the fondant pieces on the cupcakes.
- Supervise the use of tools like Xacto knives.
Topping Options
- Classic Pokémon Designs: Use fondant to create various Pokémon characters and Poké Balls.
- Rainbow Sprinkle: Add a dash of rainbow sprinkles for a fun twist.
- Frosting Techniques: Use different piping tips for creative frosting designs.

Why This Pokemon Cupcakes Recipe Works
This recipe is a perfect blend of creativity and flavor. The fondant allows for versatile designs, from poké ball cupcakes to Pikachu’s face. The base can be your favorite recipe, be it a homemade batter or a convenient boxed mix. The decoration part is not only fun but also an excellent activity to engage kids and Pokémon fans alike.
Create your own Pokémon theme cakes and share your favorite Pokémon cupcake ideas with us. Whether it’s a special occasion like a birthday party or just a fun weekend project, these cupcakes are sure to bring a smile to any Pokémon fan’s face.
Here are some more fun cartoon cupcakes to try:


Easy Pikachu Pokemon Cupcakes
Bring the world of Pokémon to your kitchen with these easy and creative Pokémon Cupcakes, perfect for any birthday party or special occasion. Decorate prebaked cupcakes with colorful fondant to resemble various Pokémon characters, and watch the delight in every Pokémon fan's eyes.
Ingredients
- Prebaked Cupcakes
- Frosting
- Yellow Fondant
- Red Fondant
- White Fondant
- Black Fondant
- Small Rolling Pin
- Xacto Knife
- 2 inch cookie cutter
- ½ inch square cutter
- Tip 12
- Tip 8
- Small cup of water
- Paper Towels
- Paint Brush
- Silicon Mat, optional
- Powdered Sugar
Instructions
- Lightly dust your surface with powdered sugar
- Roll out the yellow fondant to ¾ - ½ inch thick and cut out however many toppers you will need.
- Cut out small yellow squares for the ears.
- Using the small end of Tip 12 cut out red circles for the cheeks
- Press with your finger to flatten and widen, place on the yellow circle
- Use the small end of Tip 12 to cut out black circles for the eyes.
- The eyes will also be pressed, but into the fondant.
- Use the small end of Tip 12 to cut out a black circle this will be for the nose and mouth.
- Use the small end of Tip 8 to cut out the nose from the circle in the previous step
- The left over black fondant will become the perfect amount to make the mouth.
- Roll the left over into a “snake” and shape it into the design of the mouth.
- Once all of these pieces are cut out, use a small amount of water to adhere them to the face.
- Lastly make the ears.
- Cut the squares in half, then trim the triangles into the shape of an ear.
- Add a small amount of water to the top of the ear and add black fondant.
- Trim off any excess
- Lightly dampen the top of the circle and place the ears, gently pressing them into the topper.
- Pressing them in, help perk them up so they don’t droop! This is why the fondant should stiffen between each step.
Nutrition Information
Yield
12Serving Size
1Amount Per Serving Calories 124Total Fat 2gSaturated Fat 1gTrans Fat 0gUnsaturated Fat 2gCholesterol 1mgSodium 38mgCarbohydrates 26gFiber 0gSugar 23gProtein 0g
Hi! I’m Nellie. I am an entrepreneur, a busy mama of 3 and a wife to my high school sweetheart. I have been sharing content for over 12 years about how to cook easy recipes, workout tips and free printables that make life a little bit easier. I have been featured in places like Yahoo, Buzzfeed, What To Expect, Mediavine, Niche Pursuits, HuffPost, BabyCenter, Mom 2.0, Mommy Nearest, Parade, Care.com, and more!
Get comfortable and be sure to come hang out with me on social. Don’t forget to grab your free fitness journal before you go!