Calendar Birthday Cake for Family Birthday Season (Easy Tutorial)
Are you ready to turn your ordinary birthday cake into a personalized masterpiece? Today, we’re creating a fabulous Calendar Birthday Cake that’s perfect for celebrating those special dates in style. This is a great option especially if you have a lot of birthdays in a short time period!

My family has a birthday problem. Not a sad one — a logistical one. Between my kids and close family, we have multiple birthdays hitting within the same few weeks every year. Individual cakes for everyone sounds nice in theory. In practice, it means I’m baking something every other weekend and nobody is particularly impressed anymore.
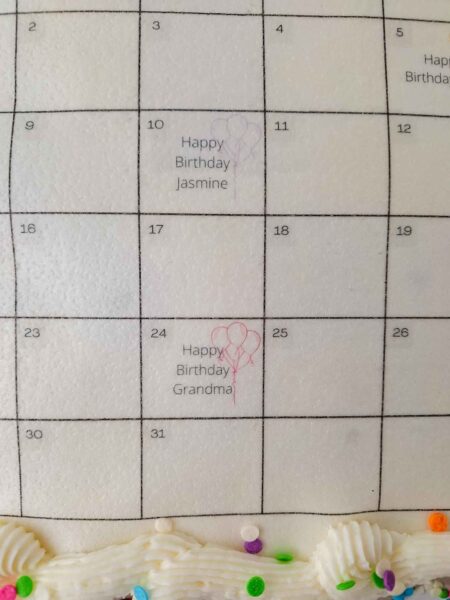
The calendar cake solved this. One 9×13, enough space for every name and every date, and it actually gets more of a reaction than separate cakes ever did. People want to come look at it up close. They want to find their birthday on it. It becomes a conversation piece before anyone even cuts into it.
The concept is simple: you design a calendar in Canva, print it onto an edible wafer sheet or sugar sheet, and lay it on top of a frosted cake. The hardest part is getting your buttercream smooth enough for the sheet to sit flat. Everything else is just decorating.
One thing before we get into it: if you’re printing at home with a regular inkjet printer, the ink is not food-safe even if it’s technically non-toxic. Remove the wafer paper calendar before you serve the cake. It’s a decoration, not a topping. If you want fully edible printing, you’ll need either a dedicated edible ink printer or to order the printed sheet from a bakery supply service. I’ll explain both options below.
⚠️ Important: Wafer Paper Printing and Food Safety
Standard home inkjet printers use ink that is non-toxic but not designed or approved for food contact. If you print your Canva calendar at home with a regular printer, remove the wafer paper from the cake before cutting and serving. It functions as a decoration only.
If you want a fully edible printed image, you have two options:
Option 1 — Order it printed. Bakery supply websites like Walmart Photo, Edible Prints On Cake, or your local cake decorating supply store can print custom designs on edible sugar sheets using food-safe edible ink. You upload your Canva design as a PNG or PDF, they print it, and ship it to you. This is the most practical option for most people.
Option 2 — Edible ink printer at home. Dedicated edible ink printers use food-safe cartridges. They’re an investment (typically $150–300+) and mainly worth it if you decorate cakes regularly.
Also note: Once the edible image is on the cake, do not refrigerate. The moisture from the fridge will cause the wafer paper to dissolve and the image to run. Frost the cake, store it at room temperature, and add the calendar image the day you plan to serve it.
FAQs
No — you can print on wafer paper with a regular home inkjet printer. However, the ink from a standard printer is not food-safe, so the printed calendar must be removed from the cake before serving. For a fully edible version, order from a bakery supply printing service or use a dedicated edible ink printer.
Wafer paper is thin, slightly translucent, and flexible — it works in standard home printers and is lighter on the cake. Sugar sheets are thicker, more opaque, and have a white backing that makes colors appear more vivid. Sugar sheets are designed for edible ink printers. If you’re ordering from a print service, sugar sheets typically give a crisper result on colored frosting.
No — refrigerator moisture will dissolve the wafer paper and cause the image to run. Add the edible calendar the day you plan to serve the cake and store the decorated cake at room temperature. If you need to make the cake ahead, frost it and refrigerate, then add the calendar the morning of the party.
American crusting buttercream is the best option because it dries to a firm surface the edible sheet can lay flat on. Non-crusting buttercreams stay soft, which can cause the paper to shift or sink. If you want to use non-crusting buttercream or colored frosting, use the fondant backing method described in the steps above.
Apply a crumb coat, chill for 15–20 minutes, then apply your final coat using an offset spatula and a turntable. Spin the cake slowly while holding the spatula at a consistent angle against the surface. Let the buttercream crust completely before laying the calendar down — it should feel dry, not tacky.
Bake the cake up to 2 days ahead (wrap and store at room temperature). Frost it up to 1 day ahead (refrigerate without the edible image). Apply the calendar the morning of the party and store at room temperature until serving.
Ingredients

- Prebaked and cooled 9×13 cake (Here is a great recipe if you want to bake one from scratch!)
- American Crusting Buttercream (You can use my recipe!)
- Sprinkles or other cake decorations
- Printed Canva calendar on edible wafer sheets
Why Each Ingredient is Needed

- Prebaked and cooled 9×13 cake: This is your canvas! It’s the base of your delicious creation.
- American Crusting Buttercream: This buttercream holds its shape well and provides a smooth surface for your calendar design.
- Sprinkles or other cake decorations: These add color, texture, and fun to your cake, making it visually appealing and festive.
- Printed Canva calendar on edible wafer sheets: The star of the show! This edible calendar turns your cake into a unique, personalized centerpiece.
Here is what you need to make the cake:
Wafer paper sheets (link) — Thin, translucent, and flexible. Better for home printers since they feed through without jamming. Must be removed before serving if printed with regular ink. Don’t get them wet.
Sugar sheets (link) — Thicker, more opaque, white backing so the calendar design shows crisply on colored frosting. Designed for edible ink printers. Less likely to tear during handling. If you’re ordering from a print service, request sugar sheets for cleaner results on dark or colored buttercream.
Turntable — Makes getting a smooth buttercream surface dramatically easier. You spin the cake slowly while holding an offset spatula at a consistent angle. Without one, getting the top flat enough for the edible sheet is difficult.
Offset spatula — The angled blade lets you smooth frosting without your hand dragging through the surface. Essential for a clean, flat top.
Piping bag + Tip 1A or 4B — Large round or large star tip. Used to pipe the border that hides the edges of the calendar sheet. 4B gives you a star border with texture; 1A gives you a clean round dot border.
Cake board — Gives you a stable surface to move and display the finished cake.
How To Make It:
Step 1: Design your calendar in Canva Open Canva and search “blank calendar” in templates. Choose a layout that matches the month you want to display — or use a generic layout and fill in your own dates. Add a text box to each birthday date and type the person’s name, age, or any note you want to include. You can also add small graphics, clip art, or change colors to match your party theme. Keep the font large enough to be readable once printed at cake size.
When you’re done, download the design as a high-resolution PNG (at least 300 DPI if Canva gives you the option). A blurry print will look blurry on the cake.
Step 2: Print the calendar If printing at home on a regular printer: load wafer paper into the printer sheet tray and print using the highest quality setting. Test with a plain sheet of paper first to make sure the orientation is correct before loading the wafer paper. Remember — this image must be removed before the cake is served.
If ordering from a print service: upload your PNG to the service’s website and specify the size you need (slightly smaller than a 9×13 cake top, roughly 12×8 inches). Order in advance — most services ship within 2–5 days.
Once printed, keep the sheet flat and away from moisture until you’re ready to use it. Even a small amount of humidity will start to dissolve the edges.
Step 3: Bake and cool your cake Your 9×13 cake needs to be fully baked, cooled completely, and leveled if needed before frosting. A warm cake will melt the buttercream and nothing will lay flat. If you made your cake the day before, wrap it in plastic wrap and store at room temperature overnight.
Step 4: Make your buttercream and frost the cake American crusting buttercream is strongly recommended because it dries to a firm surface — the edible sheet lays flat on it rather than sinking in. Apply a crumb coat first (thin layer, refrigerate for 15–20 minutes to set), then apply the final coat and smooth the top as flat as possible using an offset spatula and turntable. The top of the cake needs to be as level and smooth as you can make it — any ridges or bumps will show through the wafer paper.
Let the buttercream crust fully before applying the calendar (20–30 minutes at room temperature). It should feel dry to the touch, not tacky.
Step 5: Apply the edible calendar Position the printed calendar face-up in the center of the cake top, leaving a border of frosting visible around all four edges — this is where your piped border will go. Gently press the sheet down starting from the center and smoothing outward to avoid air bubbles. Don’t drag it once it touches the frosting.
If using a fondant backing (for colored frosting): Roll white fondant to approximately the size of your calendar. Lightly dampen the surface of the fondant with a barely-wet paper towel to make it tacky. Lay the edible image on the fondant and use an X-Acto knife to trim away excess. Let this dry completely on a clean surface (at least 15–20 minutes, longer is better) before placing on the cake.
Step 6: Pipe the border Load your piping bag with buttercream and your large tip. Pipe a continuous border around the perimeter of the calendar sheet — this hides the edges of the paper and frames the calendar. Pipe a second border around the edge of the cake board if you’re displaying on a board.
Step 7: Add decorations and serve Sprinkles, edible glitter, or candles around the border. Take your photos. When it’s time to cut and serve — if you used a regular inkjet printer — remove the wafer paper calendar first. Peel it off gently from one corner.
Fun Ways To Switch This Cake Up A Bit
VARIATIONS — ADD THIS
Different occasions: This technique works for any calendar event — holidays, countdowns, school year schedules, family reunion dates. It doesn’t have to be birthdays.
Multiple months: If your birthday season spans two months, design a two-month spread in Canva and have it printed as one image sized to fit your cake.
Colored frosting: If you want a color other than white underneath the calendar, use the fondant backing method. White fondant gives the calendar a clean surface to sit on regardless of what’s underneath.
Photo version: Canva lets you drop photos into calendar squares. If you want each person’s photo next to their birthday date, you can do that — just keep images small enough to be recognizable at print size.
Cupcake version: Scale the Canva design to cupcake-top size (approximately 2 inches) and print multiple small calendar squares. One cupcake per birthday person, each with their date circled.

There you have it! A fun, unique, and totally Instagram-worthy Calendar Birthday Cake. Happy baking, and may your celebrations be as sweet as your creations!

This cake started as a solution to a family birthday problem and turned into the most-talked-about dessert I’ve made. There’s something about seeing your name on a cake — not just your name on a generic birthday cake, but your specific date, circled, on a calendar that shows everyone’s birthdays — that lands differently. Make it once and you’ll understand why people crowd around it before it’s even cut. Drop a comment and tell me whose birthdays you’re putting on yours. And if you want more cake tutorials, my Bluey Cake tutorial and How To Make A Barbie Cake tutorial are both worth a look.
Here are some more fun birthday cake options to try:


Calendar Cake Tutorial
Create a personalized Calendar Birthday Cake that’s as memorable as it is delicious, with an edible calendar to highlight special dates!
Ingredients
- Prebaked and cooled 9*13 cake
- 2 cups of American Crusting Buttercream
- Sprinkles or other cake Decorations
- 1 Printed Canva Calendar
Instructions
- Log into Canva and search for blank calendar
- Pick the one you like the best
- Add a text box to the squares you want to add a birthday too
- Add names/graphics/ages
- Print the calendar onto the edible wafer paper or sugar sheet*(see notes)
- Frost the cake making the top as smooth as possible.
- Using a crusting buttercream works best because it will “crust over” or dry and you can lay the sugar sheet on top.
- If using a non crusting buttercream see the notes section for fondant backing instructions.
- Once the calendar is positioned in the center of the cake, add frosting to piping bag with a large star tip and pipe a border around the calendar to conceal the edges.
- Add a border around the board.
- Top with sprinkles and have a great party!
Notes
Wafer paper will not tear up your printer like a sugar sheet will due to the material.
Sugar sheets are much thicker so they do not rip as easily and will not have a see through back.
Sugar sheets are mainly designed for an edible printer
***While the ink is non toxic from your printer it is BEST TO REMOVE the wafer paper calendar PRIOR to serving***
Do not set down the wafer paper near anything wet it will begin to dissolve.
Do not place the cake in the fridge after the edible image is on top
If you are doing a colored frosting or want the calendar to stand out more, roll out a thin piece of white fondant, lightly wet a paper towel and rub it across the fondant to make it tacky.
Place the edible image on top, use an xacto knife to cut away excess fondant.
Flip it upside down on a clean surface and let it dry (15-20 or longer) before adding it to the top of the cake.
Again remove before serving
Cake pictured does not have fondant on it
Nutrition Information
Yield
20Serving Size
1Amount Per Serving Calories 299Total Fat 14gSaturated Fat 5gTrans Fat 0gUnsaturated Fat 8gCholesterol 50mgSodium 128mgCarbohydrates 42gFiber 0gSugar 35gProtein 2g

Before you go, Grab Your Free Printable Recipe Kit!
Keep track of all your favorite recipes and ingredients with this free printable book!
Hi! I’m Nellie. I am an entrepreneur, a busy mama of 3 and a wife to my high school sweetheart. I have been sharing content for over 12 years about how to cook easy recipes, workout tips and free printables that make life a little bit easier. I have been featured in places like Yahoo, Buzzfeed, What To Expect, Mediavine, Niche Pursuits, HuffPost, BabyCenter, Mom 2.0, Mommy Nearest, Parade, Care.com, and more!
Get comfortable and be sure to come hang out with me on social. Don’t forget to grab your free fitness journal before you go!