Easy Homemade Baskin Robbins Ice Cream Cake Recipe
Baskin Robbins birthday cakes are one of those things that feel like a non-negotiable part of a kid’s birthday — the pink and white frosting, the ice cream layer, the way the whole thing shows up in that pink box. My kids have strong feelings about birthday cake and ice cream cake wins every time.
The problem is the price. A Baskin Robbins cake runs anywhere from $35 to $60 depending on size, and you’re locked into whatever flavors they have that day. Making it at home costs a fraction of that, takes about 20 minutes of active work (plus freeze time), and you can use whatever ice cream flavor your kid actually wants.
This recipe uses a box white cake mix for the base, a carton of your ice cream of choice for the middle layer, and store-bought frosting in pink and white to get that signature BR look. The whole thing needs about 7–8 hours of freeze time total, so plan to start the day before or first thing in the morning on the birthday. Once you’ve done it once, it becomes the birthday cake move every single year.

WHAT MAKES THIS TASTE LIKE BASKIN ROBBINS
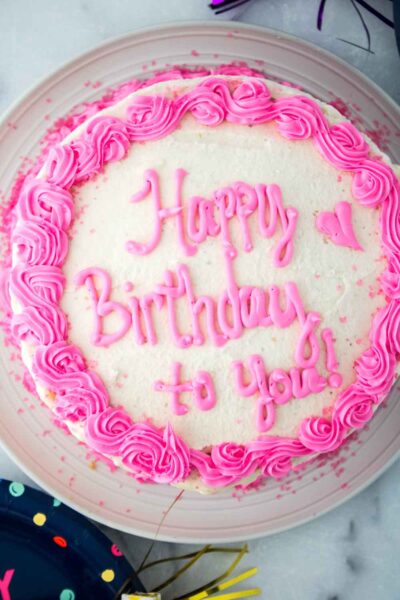
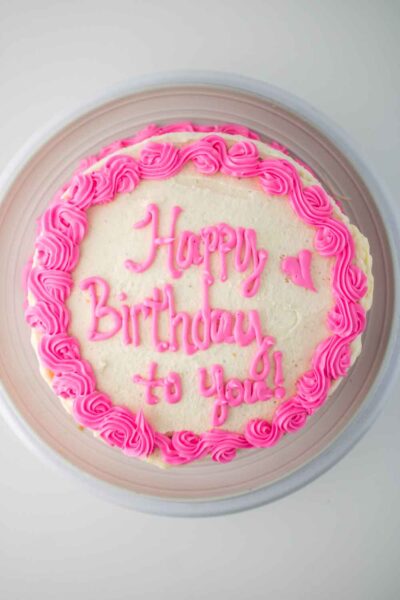
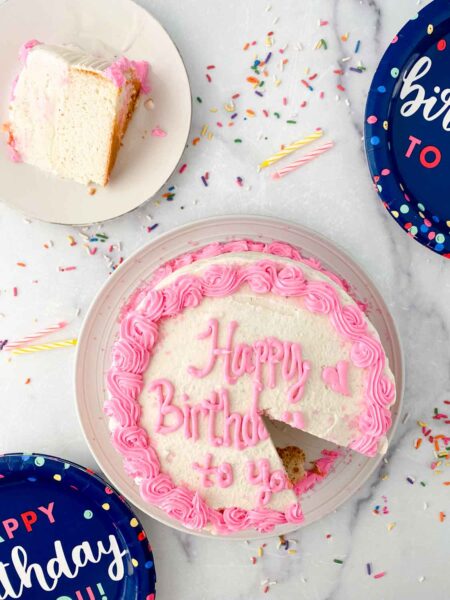
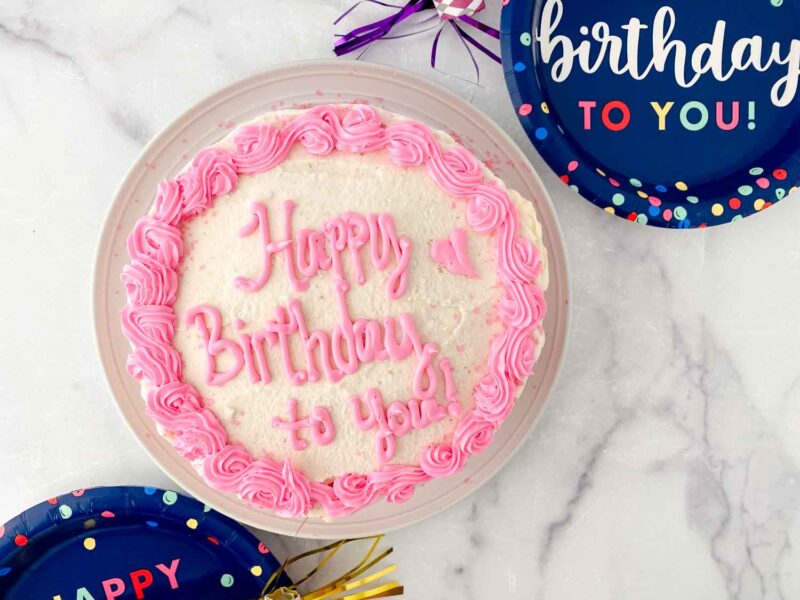
The original Baskin Robbins ice cream cake has three components that make it distinctive: a white cake layer on the bottom, a thick ice cream layer in the middle, and that smooth pink and white frosted exterior with piped rosette border on top.
This copycat hits all three. White cake mix makes the cake layer straightforward — any standard brand works, and adding a teaspoon of vanilla to the box mix gives it a slightly more homemade flavor. For the ice cream, you’re using a 1.5-quart rectangular carton, which gets cut open, pressed into a springform pan, and frozen solid before assembly. The frosting is store-bought (16 oz white + 16 oz pink), which keeps this approachable and gives you the right smooth consistency for using a cake comb.
The result looks exactly like the real thing and costs about a third of the price.
Ingredients
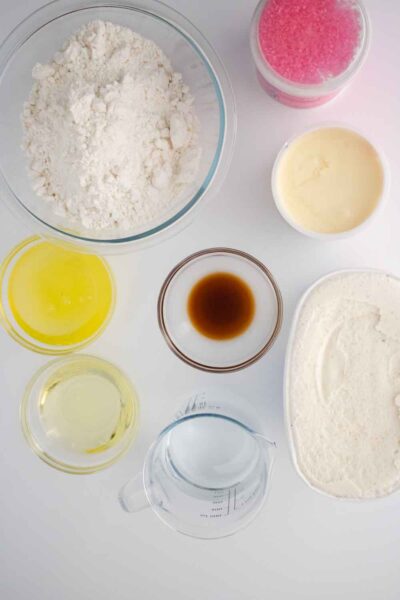
- 1 box white cake mix
- 11/4 cups water
- 1/3 cup vegetable oil
- 3 egg whites
- 1 tsp vanilla
- 1.5 quart box Vanilla ice cream
- 1 12-ounce container white frosting
- 1 12-ounce container pink frosting

INGREDIENT NOTES
White cake mix (1 box). Any standard brand works — Betty Crocker, Duncan Hines, or Pillsbury are all fine. The box mix calls for water, oil, and egg whites (not whole eggs, which would make it yellow cake). Adding 1 teaspoon of vanilla extract bumps the flavor.
Vanilla ice cream (1.5-quart carton). Buy the rectangular cardboard carton, not a round container. The rectangular carton is what you’ll cut open and press into the springform pan. Any flavor works — vanilla is classic BR, but chocolate, strawberry, or cookies and cream all work. Make sure it’s a standard 1.5-quart size so it fits the 8-inch springform.
White frosting (one 16-oz container) + pink frosting (one 16-oz container). Store-bought Betty Crocker or Pillsbury frosting. The white goes on as the base coat; the pink goes in the piping bag for the border. If you can only find one color, you can tint white frosting with a drop of pink or red gel food coloring.
Instructions

DAY BEFORE (or morning of, 8+ hours ahead):
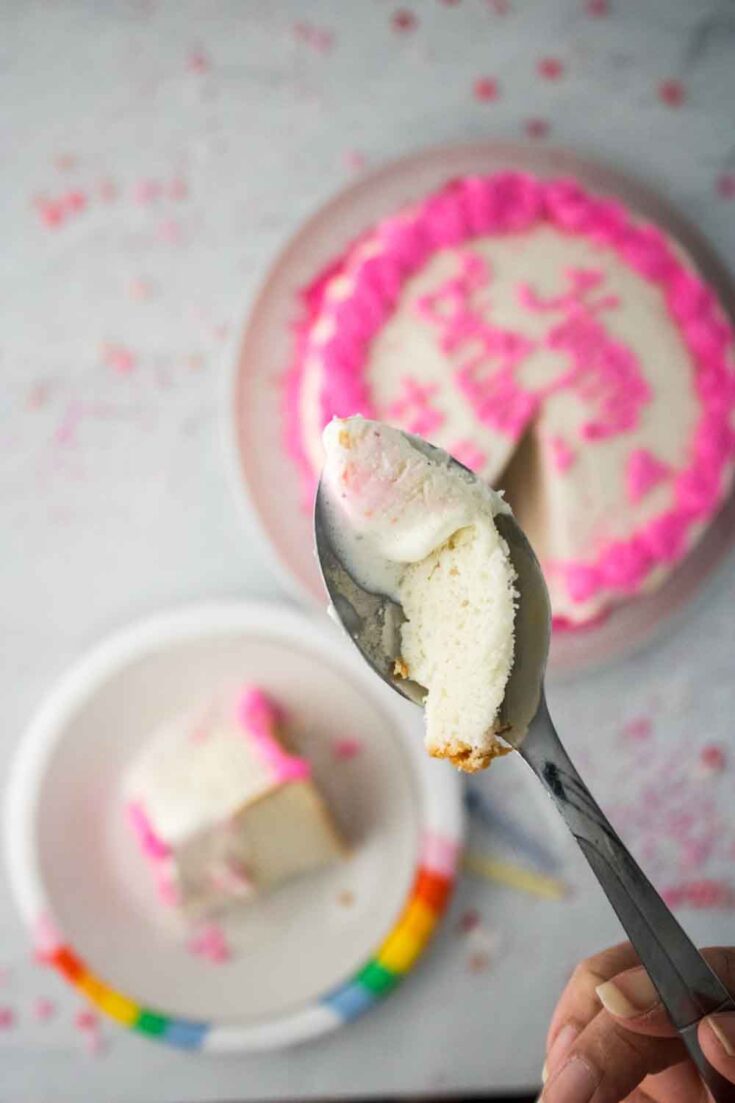
Step 1: Bake the cake. Preheat oven to 350°F. Spray an 8-inch round cake pan generously with baking spray. In a stand mixer or large bowl, combine the cake mix, 1¼ cups water, ⅓ cup vegetable oil, 3 egg whites, and 1 teaspoon vanilla. Mix for 3–4 minutes until smooth. Pour into the prepared pan and bake for 35–40 minutes, until a toothpick inserted in the center comes out clean. Remove and let cool completely on a wire rack — at least 1 hour. Do not rush this. A warm cake will melt the ice cream on contact.
Step 2: Prepare the ice cream layer. While the cake cools, take the 1.5-quart rectangular ice cream carton out of the freezer and let it soften slightly at room temperature for 5 minutes — just enough that it’s pliable, not melting. Using a serrated knife, cut the cardboard carton open along all sides. Place the ice cream block into the 8-inch springform pan and press it evenly to fill the pan. If it doesn’t fill perfectly, press it into the edges. Cover tightly with plastic wrap and return to the freezer for at least 1–2 hours until completely solid.
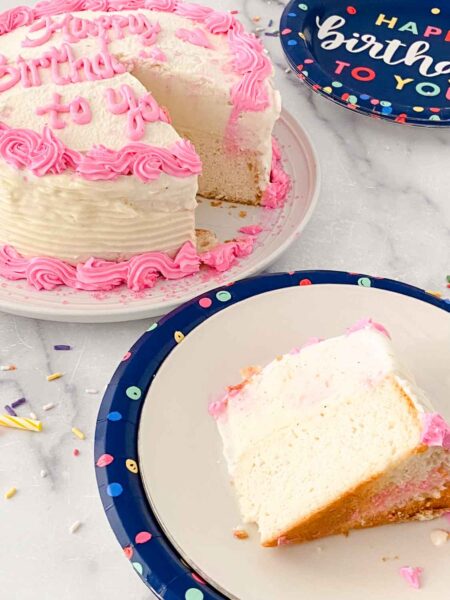
Step 3: Level the cake. Once the cake is fully cooled, place it on a flat surface. Hold a serrated knife at the same height as the lowest edge of the dome, then slowly rotate the cake (using a turntable if you have one) while keeping the knife steady to shave off the domed top. The goal is a flat, even surface — this is what allows the ice cream layer to sit flush on top without gaps. Discard the trimmed top or eat it as a snack.
Step 4: Assemble the layers. Spread a thin layer of white frosting on the flat top of the leveled cake — this acts as a “glue” between the cake and ice cream layers. Remove the ice cream from the freezer. Run a thin knife around the inside edge of the springform to loosen, then open and remove the ring. Working quickly, flip the ice cream disc upside down and place it centered on top of the frosted cake layer. If the ice cream extends beyond the cake edge, hold a serrated knife vertically at a 90-degree angle flush against the cake side and trim the excess in a single continuous motion. Smooth the joint between the cake and ice cream with an offset spatula. Return immediately to the freezer for a minimum of 6 hours, or overnight. You need this completely solid before decorating.
DECORATING DAY:
Step 5: Frost the exterior. Remove the cake from the freezer. Work quickly — you have about 10–15 minutes before the ice cream softens too much. Apply white frosting to the sides and top using an offset spatula, then drag a cake comb around the sides in one continuous motion to create the ridged lines characteristic of a BR cake. Smooth the top.
Step 6: Add the pink border. Fill a piping bag fitted with a 1M star tip with pink frosting. Pipe rosettes or a shell border all the way around the top edge of the cake. Add any additional writing or decoration.
Step 7: Return to freezer. Place back in the freezer until ready to serve. Remove 5–10 minutes before serving to allow slightly easier slicing.
TIPS
Start this the day before. The two freeze stages (ice cream layer: 1–2 hours; assembled cake: 6+ hours) plus cake cooling time add up to a full day. First-time makers who start the morning of a birthday party often run out of freeze time. Day-before assembly is the safest approach.
The springform pan must match the cake pan size. If your springform is significantly larger than your 8-inch cake pan, the ice cream layer will overhang too much and trimming becomes messy. Get as close to the same 8-inch diameter as possible.
Work fast during assembly. Ice cream goes from solid to soupy faster than you’d expect once it’s out of the freezer. Have everything staged and ready before you take the ice cream out. If it starts softening while you’re working, pop everything back in the freezer for 15 minutes and continue.
Don’t skip the leveling step. A domed cake top creates an uneven gap between the cake and ice cream layers that shows on every slice. Leveling takes 2 minutes and makes the finished cake look professional.
Warm water for clean slices. To serve, run a long sharp knife under warm water, wipe it dry, and slice in one clean downward motion. Repeat the warm water step between slices for clean cuts that don’t drag.

VARIATIONS
Chocolate cake base. Swap the white cake mix for chocolate for a more classic flavor combination — chocolate cake + vanilla ice cream is a crowd-pleaser and looks great with the pink frosting exterior.
Strawberry ice cream version. Use strawberry ice cream instead of vanilla for a more explicitly BR-flavored result. Strawberry + white cake + pink frosting also makes a beautiful color story when sliced.
Add an Oreo crunch layer. Spread a thin layer of hot fudge on the leveled cake top before adding the ice cream, then press a layer of crushed Oreos onto it. The Oreo crunch layer between cake and ice cream is the signature element of the actual Baskin Robbins Oreo Cookies & Cream cake.
Neapolitan version. Use Neapolitan ice cream (the rectangular carton works perfectly) for a chocolate/vanilla/strawberry layer that looks dramatic when sliced.
Mini individual version. Use a muffin tin lined with plastic wrap to make individual single-serving ice cream cakes — great for kids’ parties where portion control matters and slicing a full cake is chaotic.
FAQs
You can make it up to 3 days ahead. Once fully assembled and frozen, wrap tightly in plastic wrap and keep frozen until ready to serve. Add the piped decorations no more than 24 hours before serving so they stay sharp.
An 8-inch springform pan to match the 8-inch round cake pan. The ice cream layer and cake layer need to be the same diameter so they align cleanly.
Yes — any flavor in a standard 1.5-quart rectangular carton works. The rectangular carton shape is what makes this technique possible. Avoid ice cream in round tubs.
This usually happens when the ice cream wasn’t cold enough when pressed into the springform, or it melted slightly during assembly. Make sure the ice cream is very firm (not soft-serve consistency) when you press it in, and return it to the freezer immediately after pressing.
Run a long sharp knife under warm water, wipe it dry, then slice in one clean downward motion without sawing. Rewarm the knife between slices. Letting the cake sit at room temperature for 5–8 minutes before slicing also helps.
Yes — a standard American buttercream (butter + powdered sugar + heavy cream) works well. Make it slightly stiffer than you would for a regular cake so it holds its shape against the cold surface. Tint with pink gel food coloring for the border.
Up to 2 weeks well-wrapped. After that, the cake layer can become slightly dry and the ice cream may develop ice crystals. Best within the first week.
If you are looking for some more amazing cake recipes be sure to check out this comprehensive list: The Most Delicious Cake Recipes For Dessert
Once you’ve done this once you’ll never pay $50 for a Baskin Robbins cake again. The technique takes a little practice — the leveling, the flip, working fast before the ice cream softens — but by the second time it’s genuinely easy.
Make it the night before, pull it out of the freezer 8 minutes before the birthday song, and watch your kid’s face when they see it. That’s the whole point! Have a great time.
Here are some more amazing ice cream recipes to try:


If you are looking for some more amazing ice cream recipes be sure to check out this comprehensive list: The Best Homemade Ice Cream Recipes
Homemade Baskin Robbins Ice Cream cake
This delicious Baskin Robbins Ice Cream cake is made right at home for birthdays or any occasion!
Ingredients
- 1 box white cake mix
- 11/4 cups water
- 1/3 cup vegetable oil
- 3 egg whites
- 1 tsp vanilla
- 1.5 quart box Vanilla ice cream
- 1 12-ounce container white frosting
- 1 12-ounce container pink frosting
Instructions
- Preheat the oven to 350
- Spray 8 inch cake dish with baking spray and set aside
- Add cake mix, oil, water, egg whites and vanilla to a large bowl or a stand mixer.
- Mix until combined (3-4 min)
- Pour batter into the prepared pan and bake for 35-40 mins or until done.
- Use a tooth pick, knife or skewer to test for doneness in the center of the cake.
- Remove cake from oven and let cool.
- Using a serrated knife cu the box of ice cream open and then place into the Springform pan.
- Press evenly in the pan then cover with plastic wrap to refreeze (1-2) hours
- Once cake is cooled, cut off the top.
- To torte the cake, spin it as you cut, do not try cutting straight across.
- Place a thing layer of buttercream on the top.
- Remove Ice-cream from freezer, go around it with a knife to loosen the ice-cream from the sides.
- Open the springform and place upside down on top of the cake
- Remove the top *work quickly so it doesn’t melt*
- If your spring form is larger than the cake, use a serrated knife to cut off the excess ice-cream.
- Hold the knife at a 90-degree angle, flushed against the cake, do not tilt it.
- Smooth out the ice cream and the cake, then place back in the freezer for 6 hours.
- You want to work with a SOLID cake to decorate.
- To Decorate:
- Apply a layer or vanilla frosting and use a cake comb to create the lines around the side of the side of the cake.
- Add the prink frosting to the piping bag and decorate all around the top edge of the cake.
- Then let your imagination soar!
- Use different colored frostings, or different piping tips to add inspired artistic decoration and writing on the cake. Return to freezer until ready to serve!
Notes
To process of cutting off the hump on the cake or the top of it is called torte and level
For a LARGER cake – use all the same ingredients but use a 9*13 pan. This will give you a thinner layer of cake and more servings
Nutrition Information
Yield
15Serving Size
1Amount Per Serving Calories 354Total Fat 19gSaturated Fat 7gTrans Fat 0gUnsaturated Fat 12gCholesterol 23mgSodium 154mgCarbohydrates 44gFiber 1gSugar 39gProtein 3g

Before you go, Grab Your Free Printable Recipe Kit!
Keep track of all your favorite recipes and ingredients with this free printable book!
Hi! I’m Nellie. I am an entrepreneur, a busy mama of 3 and a wife to my high school sweetheart. I have been sharing content for over 12 years about how to cook easy recipes, workout tips and free printables that make life a little bit easier. I have been featured in places like Yahoo, Buzzfeed, What To Expect, Mediavine, Niche Pursuits, HuffPost, BabyCenter, Mom 2.0, Mommy Nearest, Parade, Care.com, and more!
Get comfortable and be sure to come hang out with me on social. Don’t forget to grab your free fitness journal before you go!