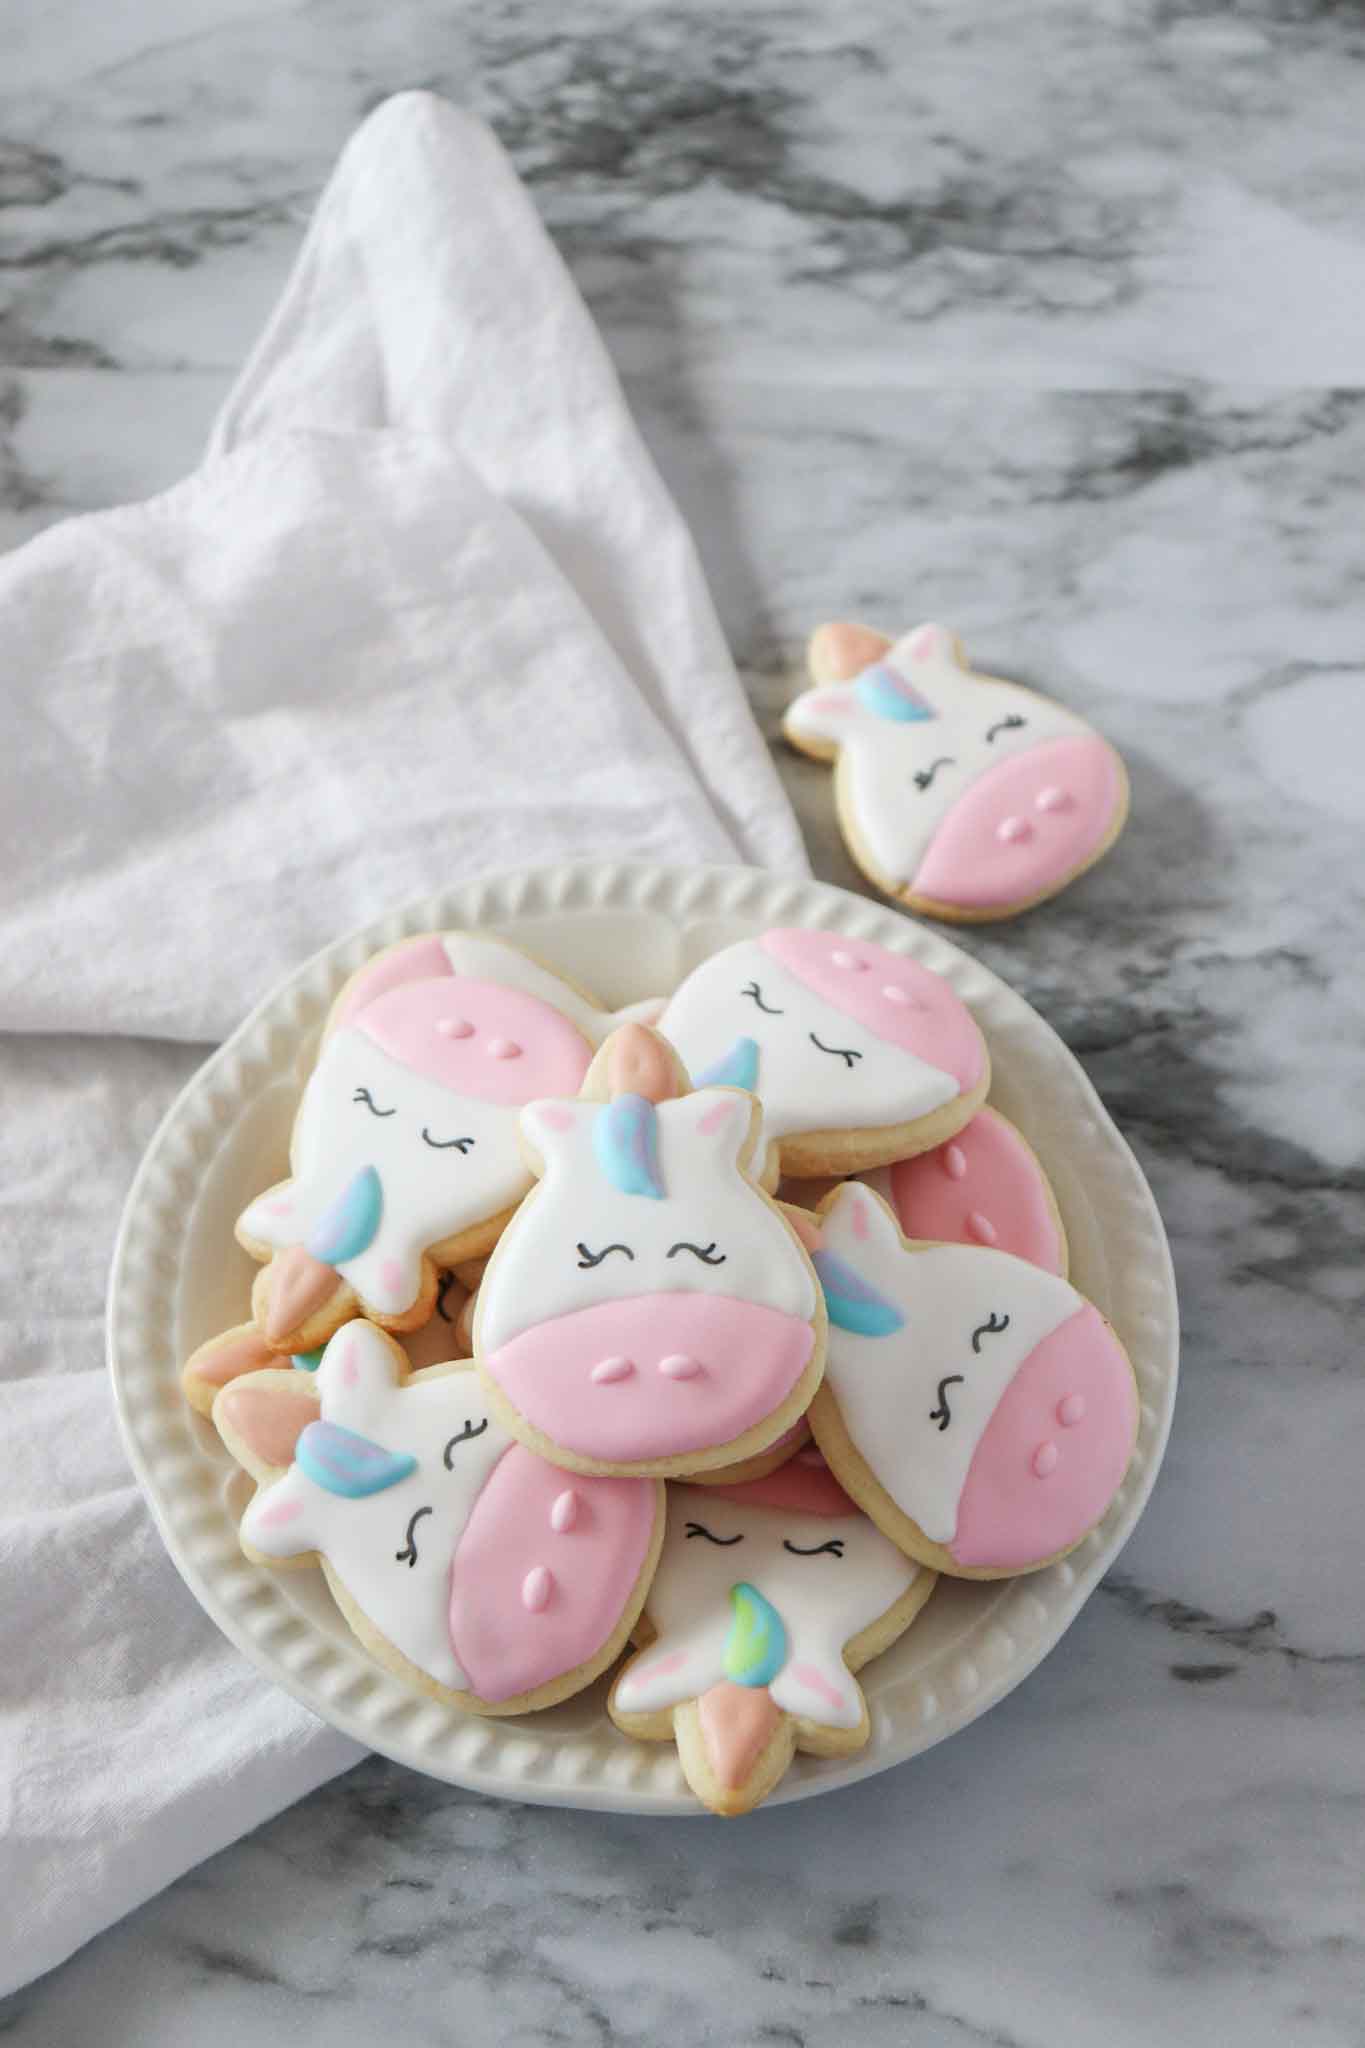
Unicorn Sugar Cookies with Royal Icing (Easy Decorating Tutorial)
These Unicorn Sugar cookies are so good and easy to make! These cookies are great for baby showers, birthday parties or anytime.

My daughter went through a unicorn phase that lasted approximately two and a half years. Unicorn backpack, unicorn water bottle, unicorn everything. So when her birthday came around, the cookies were not optional. They were a requirement.
What I didn’t expect was how much I’d actually enjoy making them. The cookie part is easy — I use Pillsbury sugar cookie dough because I’m not trying to add scratch dough to my party prep list, and it holds its shape well for cutouts. The royal icing is where it gets fun. Once you understand that the whole technique is really just two consistencies of the same icing — thick for borders, thin for flooding — everything else opens up. The polka dots, the zigzag, the plaid. You’re not doing five different things, you’re doing one thing five different ways.
The tutorial below walks through all of it. If it’s your first time working with royal icing, start with the flooding technique and add dots while it’s still wet. That combination alone looks finished and intentional without requiring any piping skill.

Understanding royal icing consistency — the one thing that matters most
Royal icing has two working states and everything you do with it depends on which state you’re in.
Outline consistency is thicker — it holds its shape when piped and doesn’t spread. This is what you use to draw the border around each cookie section before you flood it. Without a border, the flood icing runs off the edge of the cookie. To test: lift the whisk and let icing fall back into the bowl. It should hold a ribbon for 2–3 seconds before disappearing. If it disappears immediately, it’s too thin for outlining.
Flood consistency is thinner — it flows and self-levels to fill the outlined area smoothly. To test: drop a spoonful back into the bowl and count to 10. The surface should be smooth and flat by 10. If it takes longer, add water one drop at a time. If it flattens immediately and looks too liquid, add powdered sugar a teaspoon at a time.
The practical workflow: Make one batch of icing. Divide it. Use roughly one-third at outline consistency to pipe all your borders first, then thin the remaining two-thirds for flooding. This means you’re working with the same base icing — just adjusted at the end — rather than making two separate batches.
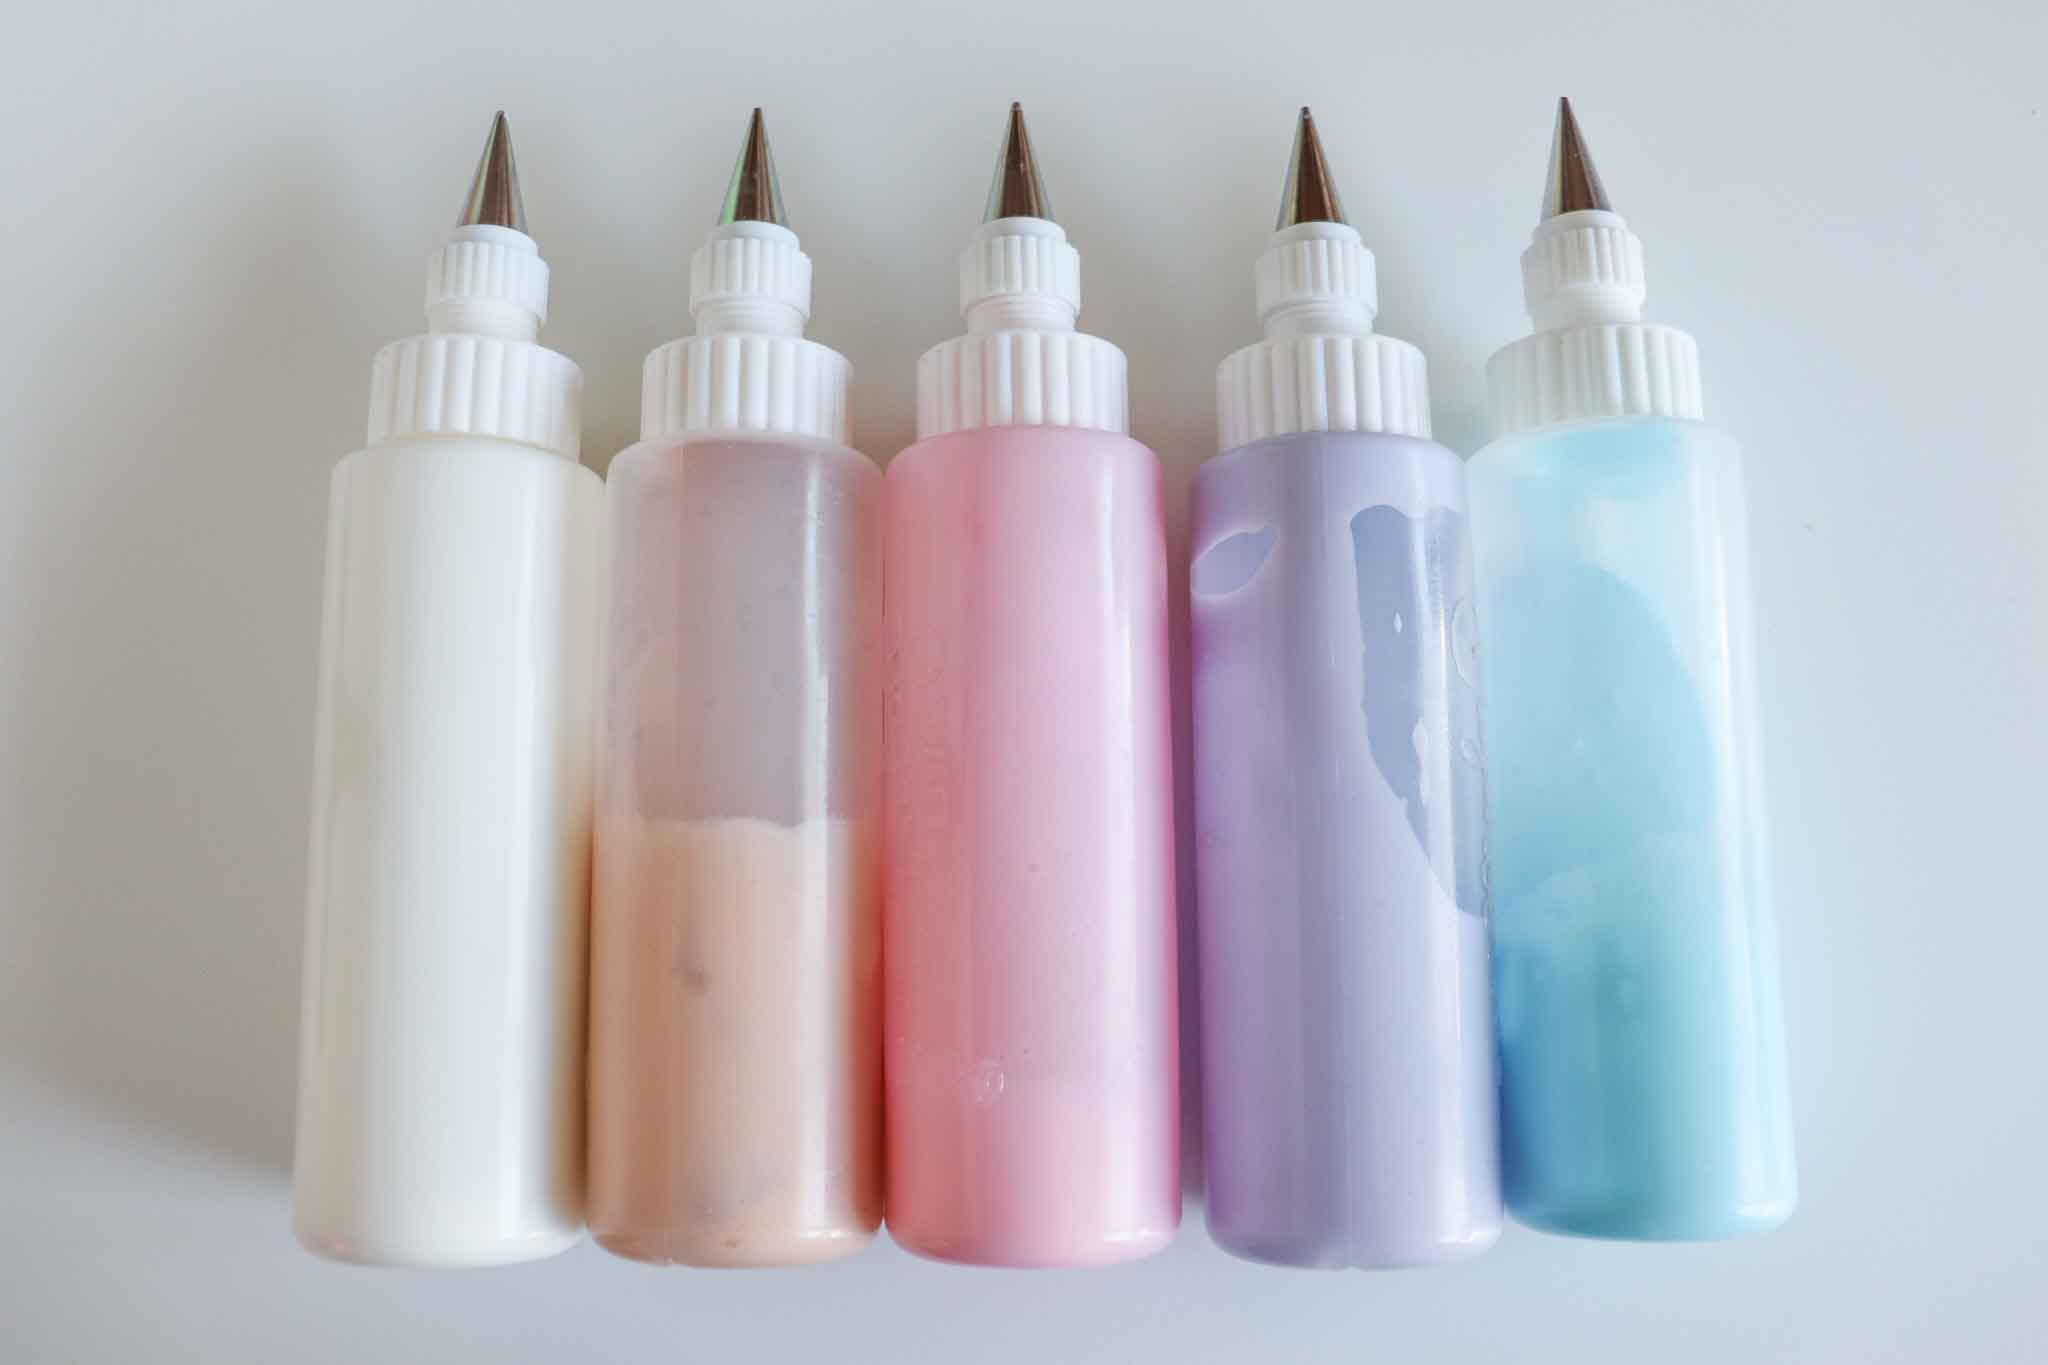
Gel food coloring only. Liquid food coloring adds too much water to the icing and throws off your consistency. Gel coloring is concentrated, so a tiny amount creates vibrant color without changing the icing texture. AmeriColor and Wilton gel colors are both widely available.
Work in stages. Royal icing needs time to set between layers. Flood the base color and let it dry until it’s no longer tacky — at minimum 30 minutes, ideally 1–2 hours — before adding details on top. Details added to wet icing will sink and blur. Details added to fully dried icing sit on top and stay crisp.
THE FIVE DECORATING TECHNIQUES — EXPANDED
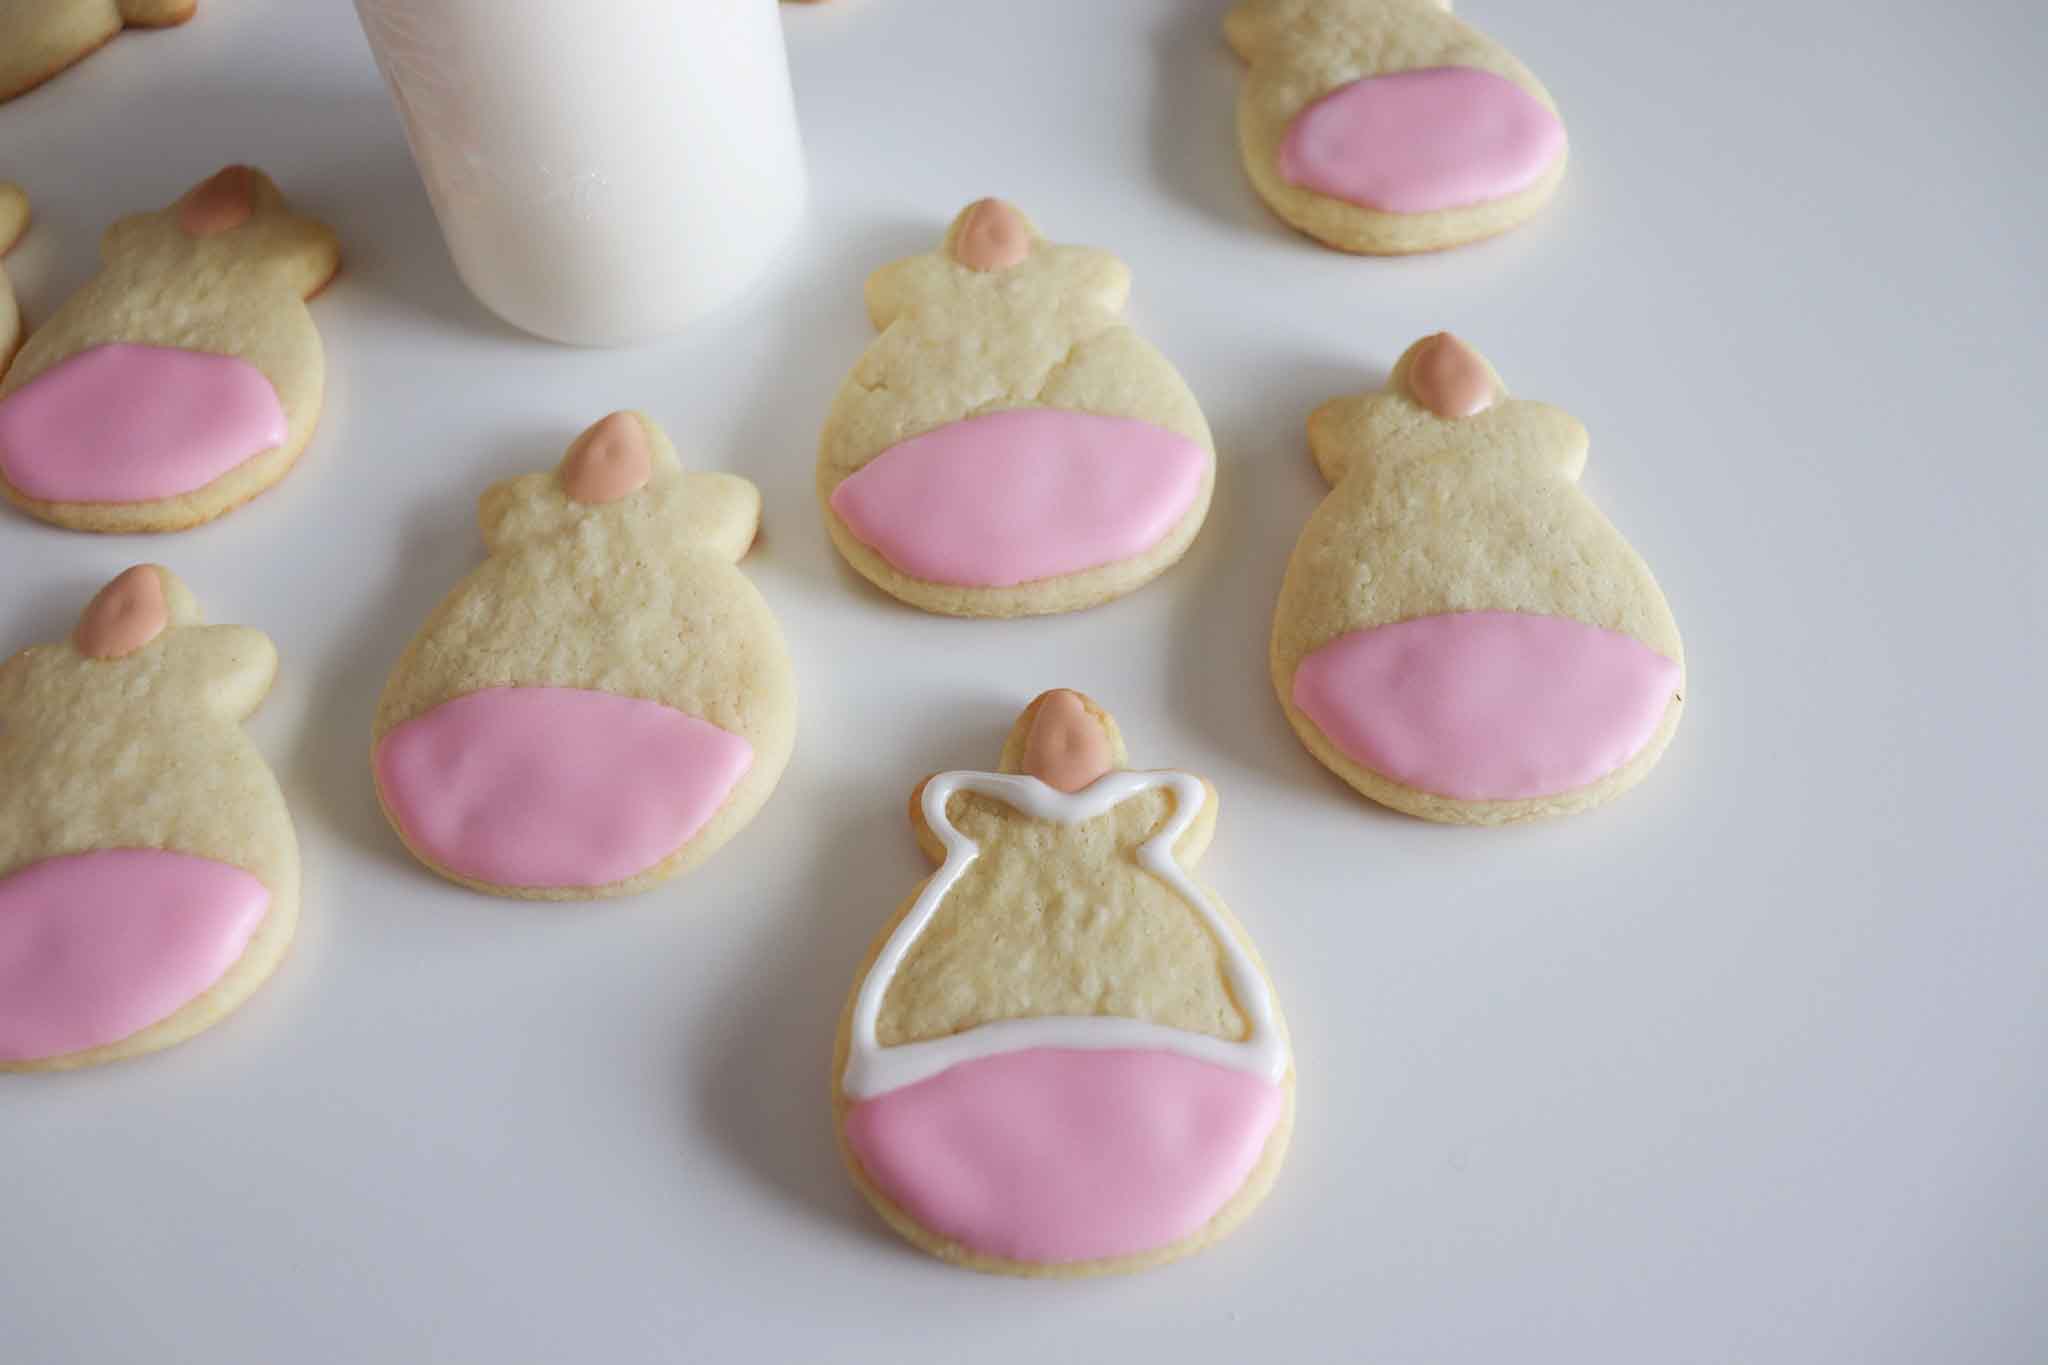
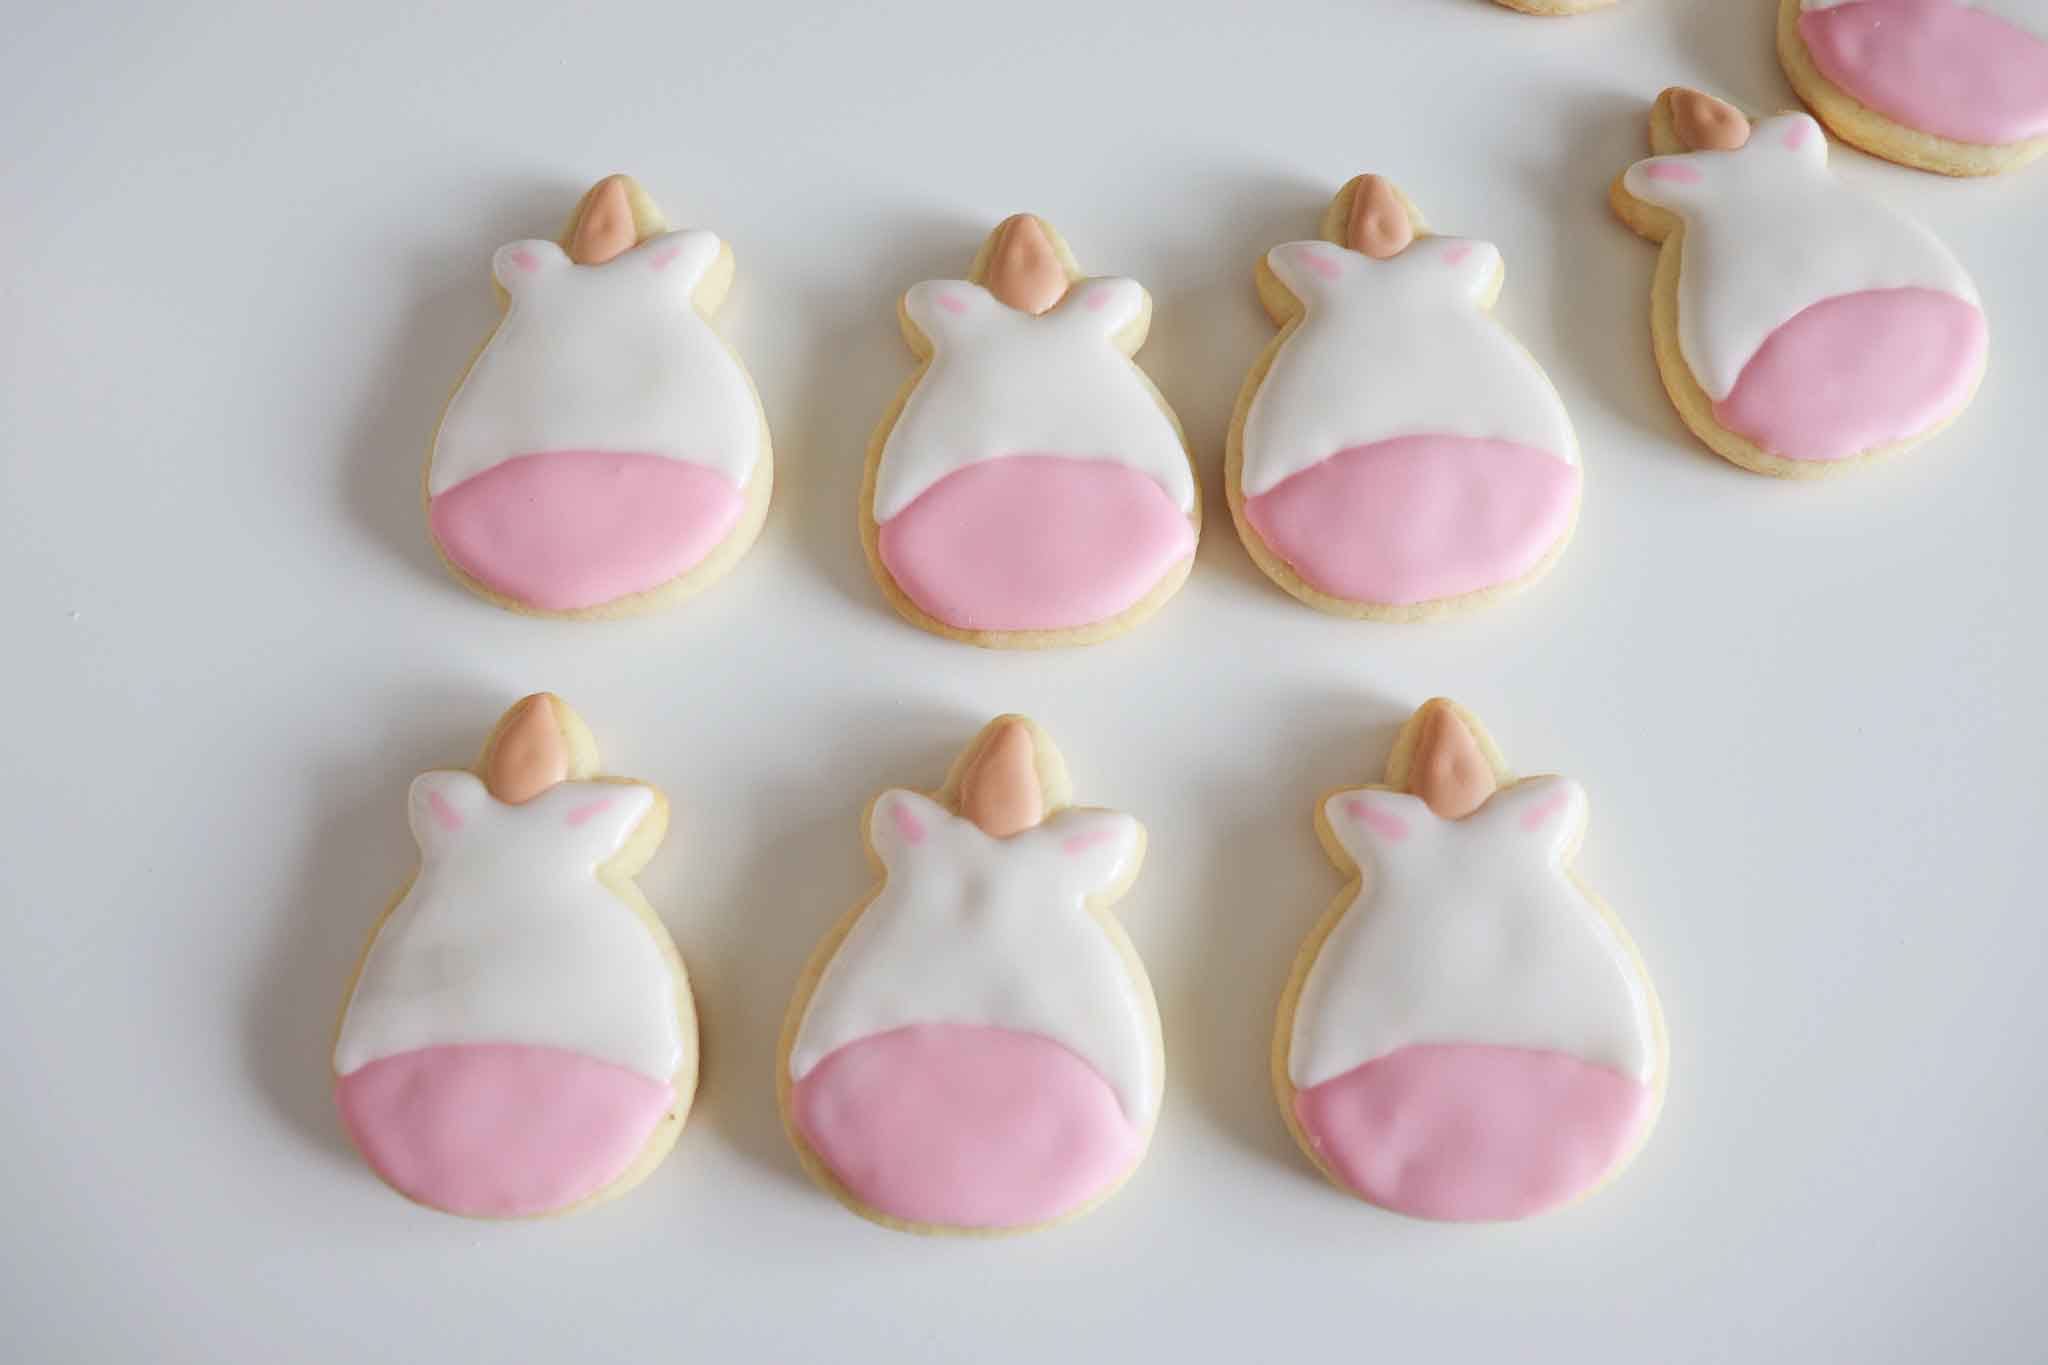
Technique 1: Flooding (the base for everything) Pipe an outline around the edge of the cookie shape using outline-consistency icing. Let the outline set for 5 minutes so it firms slightly — this creates a dam. Then flood the inside with flood-consistency icing using a piping bag, squeeze bottle, or even a spoon. Use a toothpick to guide the icing into corners and pop any air bubbles. Let the flooded area dry before adding any additional decoration on top.
Technique 2: Polka dots Flood the base color and while the icing is still completely wet, drop small dots of a contrasting color onto the surface using a piping bag with a small round tip or a toothpick dipped in icing. The dots will sink slightly into the wet base and settle flush with the surface as everything dries — this is what you want. If you wait until the base is dry, the dots sit on top and have a raised, separate look instead.
Technique 3: Zigzag (feathering) Flood the base color. While still wet, pipe parallel lines of a contrasting color across the surface. Immediately drag a toothpick perpendicular to the lines — alternating direction each pass — to create a feathered or marbled effect. Work quickly because the window before the base starts to set is about 60–90 seconds.
Technique 4: Plaid Let the flooded base dry completely — at least 4 hours, overnight is better. Then pipe parallel lines of a contrasting color in one direction. Let those lines set for 15–20 minutes until firm. Pipe a second set of parallel lines perpendicular to the first. The layered lines create a plaid effect.
Technique 5: Sprinkles Flood the area and immediately add sprinkles before any drying happens. The sprinkles need to land while the surface is wet so they embed instead of sitting on top and falling off when the cookie is handled. If you wait more than 60 seconds on a warm day or 90 seconds in a cool kitchen, the surface will have started to skin over and the sprinkles won’t adhere properly.
Bonus: Edible marker Let the icing dry completely hard — minimum 4 hours, ideally overnight. Then use an edible food marker to draw details, names, or designs directly on the surface. Testing on a dried scrap piece of icing first is worth it — marker pressure varies by brand and some bleed more than others.

TROUBLESHOOTING SECTION
This is the content that actually helps a first-time royal icer and the content that builds Nellie’s credibility with readers who have failed at this before.
The icing is too runny and won’t stay in the outlined border. Your flood consistency is too thin, or you flooded before the outline had a chance to set. Let the outline firm for at least 5 minutes before flooding, and thicken the flood icing with powdered sugar a teaspoon at a time.
The icing dried with air bubbles on the surface. Use a toothpick to pop bubbles immediately after flooding — you have about 60 seconds before the surface starts to skin over. For persistent bubbles, lightly mist the flooded surface from 6 inches away with a food-safe spray bottle of water and smooth with the toothpick.
The dots sank and disappeared. Flood icing consistency was too thin, or you waited too long and the base had already started to set. Thicken the dot icing slightly so it has more body, and add dots within the first 30 seconds of flooding.
The icing colors bled into each other. The base wasn’t dry enough before the second color was applied. For clean color separation, let the base dry until completely firm — tap it lightly, it should not indent at all — before adding adjacent colors.
The cookies spread in the oven and lost their shape. The dough wasn’t chilled before baking. Cut the shapes, place on the baking sheet, and refrigerate for 10 minutes before they go in the oven. This firms the fat in the dough and significantly reduces spread.
What ingredients do you need for these unicorn sugar cookies?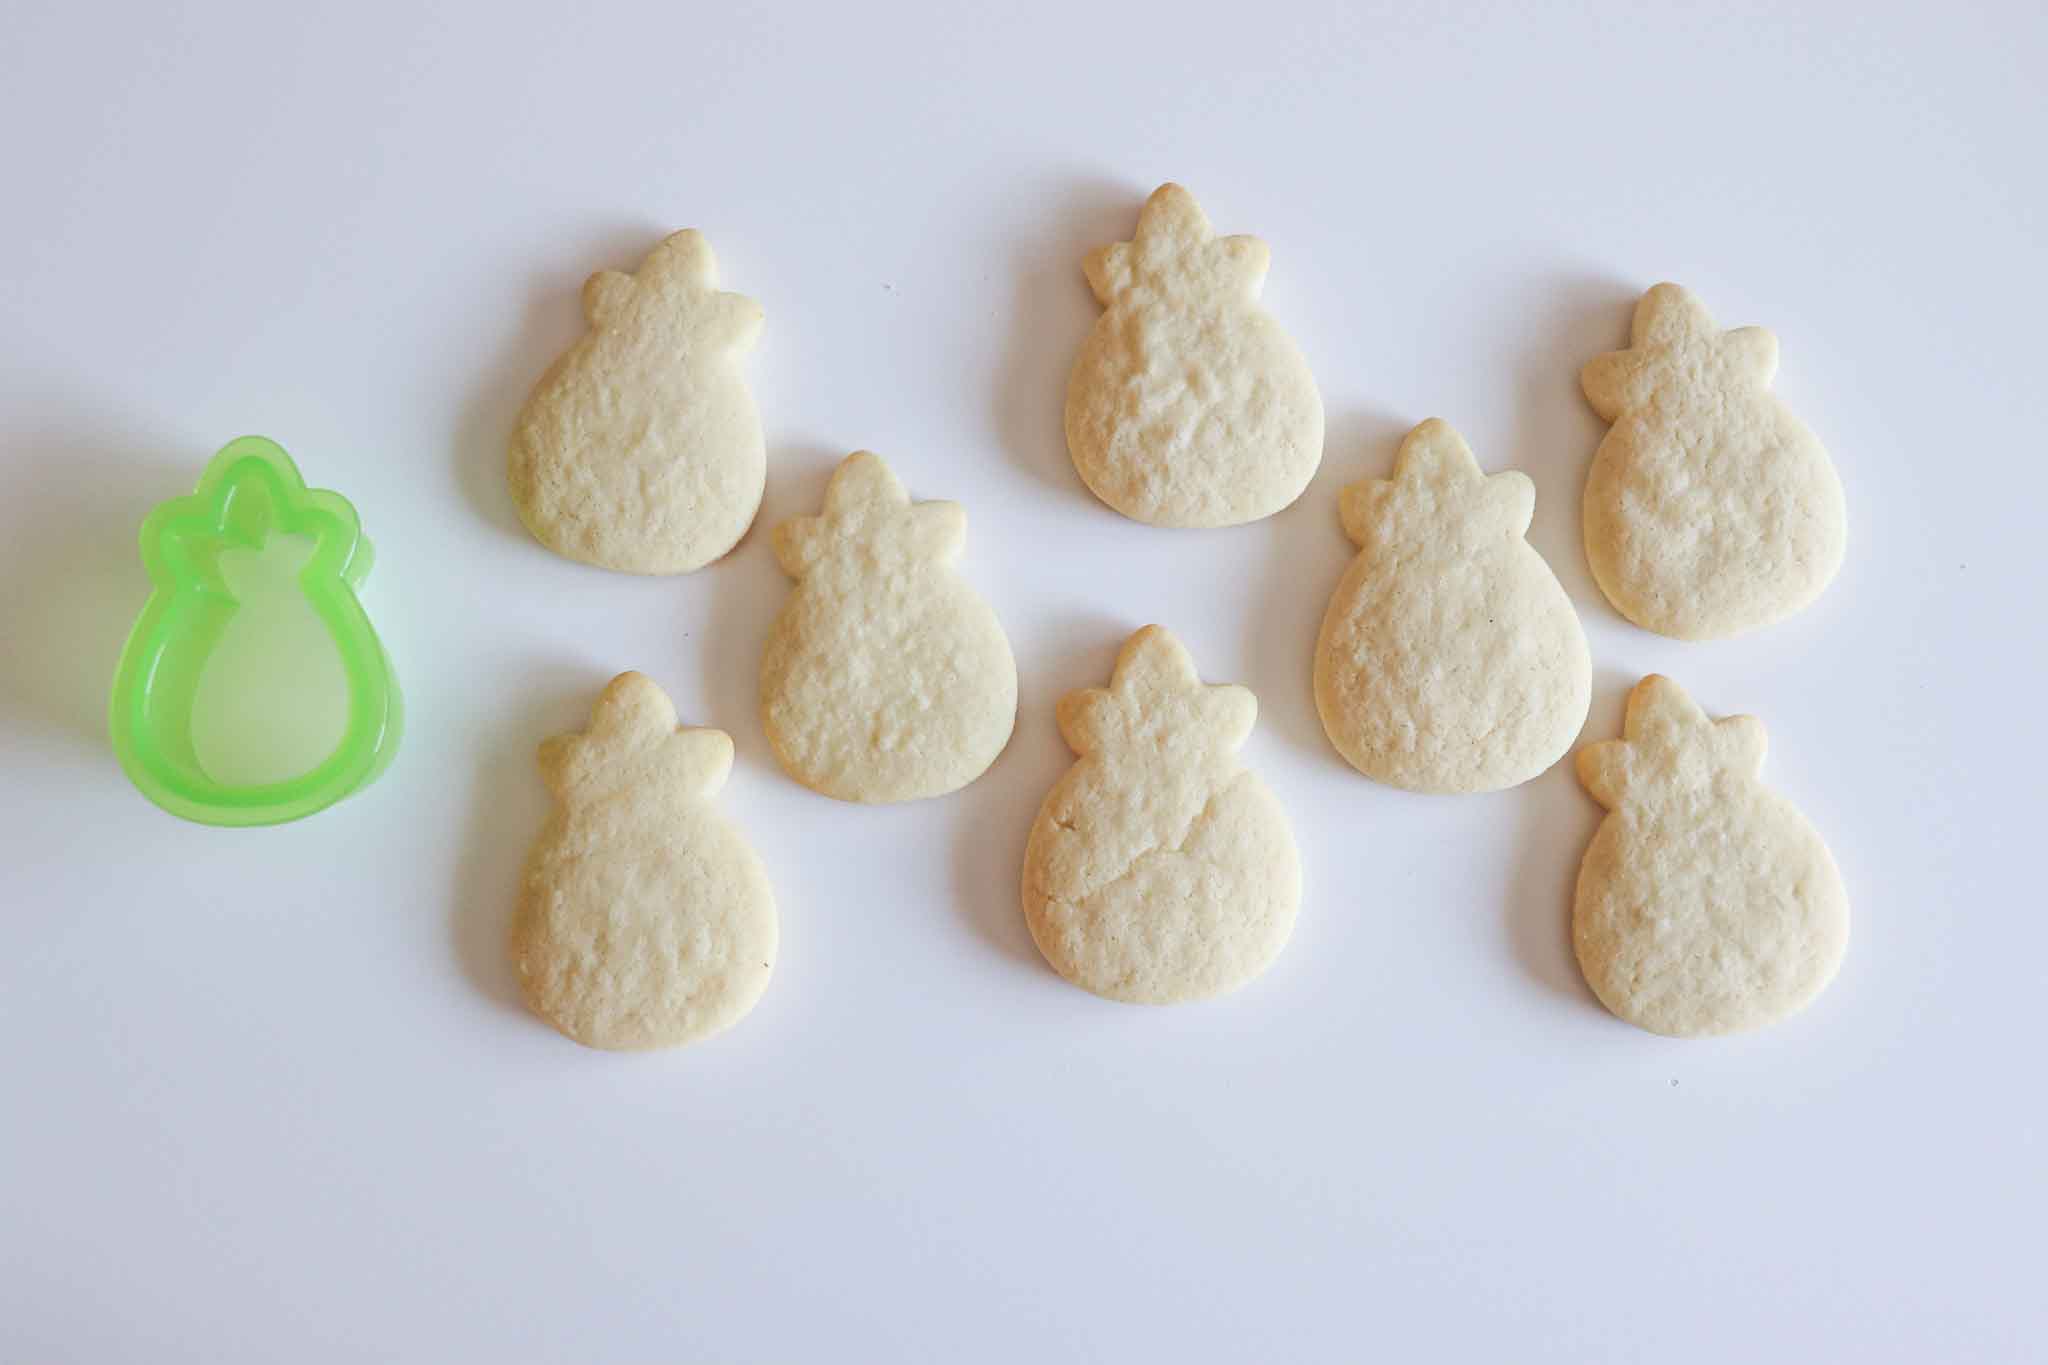
Cookie Ingredients:
- 1 package Pillsbury refrigerated sugar cookie dough
- ¼ cup all purpose flour
 Royal Icing Ingredients:
- 4 cups powdered sugar
- 3 tablespoons meringue powder
- 8-12 tablespoons room temperature water
- Gel food coloring
INGREDIENT NOTES
Pillsbury refrigerated sugar cookie dough: One standard package (typically 16.5 oz). Adding ¼ cup of flour to the package is the key step — refrigerated dough without the added flour is too soft and sticky to roll and cut cleanly. The flour firms it up to a workable consistency without changing the flavor. Don’t skip this.
Powdered sugar: Also called confectioners’ sugar. This is the base of the royal icing. Measure accurately — too much and the icing is stiff and hard to work with, too little and it won’t set properly.
FAQs
Yes — any sugar cookie dough that rolls and cuts cleanly works. Make sure it’s fully chilled before rolling and that your cookies chill again after cutting to prevent spreading. The ¼ cup extra flour step is specific to the Pillsbury refrigerated dough, which is softer than most homemade recipes.
You can, but the result will be different. Buttercream doesn’t dry hard, so you won’t get the clean flooded look or the ability to layer designs. It’s a good option if you want something simpler and faster, but the decorating techniques in this tutorial are designed specifically for royal icing.
Baked, undecorated cookies keep up to 5 days tightly wrapped at room temperature. Decorated cookies keep up to 1 week in an airtight container. For a party, baking 2 days ahead and decorating 1 day ahead is a manageable timeline.
Royal icing crusts over quickly when exposed to air. Keep each bowl covered with plastic wrap pressed directly onto the icing surface — not just draped over the bowl — whenever you’re not actively using it. Even a minute of air exposure can create a crust.
You can use pasteurized egg whites (3 tablespoons = 3 tablespoons meringue powder + water equivalent). Avoid raw egg whites for anything served to children, pregnant women, or elderly guests. Meringue powder is the safest and most consistent option.
Lightly tap the surface — it should feel completely hard with no give or indentation. The surface will be slightly shiny when wet and will turn matte as it dries. Full dry time is 4–6 hours at room temperature. In humid weather it can take longer. Don’t rush it — stacking cookies before the icing is fully hard will cause imprints and smearing.
 How can I store these cookies?
Meringue powder: This replaces raw egg whites in the royal icing, making it safe to eat without cooking. Wilton meringue powder is widely available at craft stores and Walmart. It’s what allows the icing to dry hard and shiny.
Water: Room temperature, added a tablespoon at a time. This is how you control icing consistency. Go slowly — there’s no way to thicken royal icing that’s become too runny without adding significantly more powdered sugar, which changes the flavor.
Gel food coloring: Not liquid. Gel coloring gives vibrant color without adding water volume that throws off icing consistency. A toothpick-tip of gel is usually enough for a small bowl of icing.
These cookies can be stored in an airtight container at room temperature for up to 1 week.
 If you want to make these cookies ahead of time, they can be frozen for up to 3 months. Just be sure to thaw them overnight in the refrigerator before decorating.
STORAGE
Decorated cookies: Store in a single layer in an airtight container at room temperature for up to 1 week. Once fully dried, the royal icing creates a protective shell that keeps the cookies fresh. Do not refrigerate — humidity softens and discolors royal icing.
Stacking: Only stack fully dried cookies (overnight dry time minimum) and place a sheet of parchment paper between each layer.
Undecorated baked cookies: Wrap tightly and store at room temperature up to 5 days, or freeze up to 3 months. Thaw at room temperature completely before decorating.
Freeze decorated? Not recommended — the icing can crack and colors can bleed when frozen and thawed.
If you’ve been intimidated by royal icing, this is a good starting point. The Pillsbury dough removes the scratch-baking variable, and once you understand the two-consistency system the decorating is more forgiving than it looks. Pin this tutorial for your next birthday party or baby shower project — and if you make them, I want to see. Tag me on Instagram so I can see what designs you came up with.
Here are some more fun unicorn recipes to try:


Unicorn Sugar Cookies: Easy Decorating Tutorial
These unicorn cookies are so adorable and great for any occasion such as baby showers, birthday parties or an afterschool snack!
Ingredients
- 1 package Pillsbury refrigerated sugar cookie dough
- ¼ cup all purpose flour
- 4 cups powdered sugar
- 3 tablespoons meringue powder
- 8-12 tablespoons room temperature water
- Gel food coloring
Instructions
Step 1: Prepare the cookie dough - Combine the Pillsbury dough with ¼ cup of all-purpose flour. Knead until the flour is fully incorporated — the dough should feel smooth and slightly firmer than it came out of the package. If it's still sticky, add flour one teaspoon at a time.
Step 2: Roll and cut - On a lightly floured surface, roll the dough to ¼-inch thickness — use rolling pin guides or rubber bands on the pin if you have them, for even thickness. Cut into unicorn shapes. Place on a parchment-lined baking sheet and refrigerate the cut cookies for 10 minutes before baking. This short chill helps them hold their shape in the oven.
Step 3: Bake - Bake at 350°F for 7–9 minutes. Pull the cookies when the edges are just barely starting to color and the centers still look slightly underdone — they'll firm up as they cool. Browned edges mean dry, hard cookies. Cool completely on the pan before moving to a wire rack. The cookies must be fully cooled before any icing goes on — even slightly warm cookies will melt the icing.
Step 4: Make the royal icing — outline consistencyIn a stand mixer with the whisk attachment, combine 4 cups powdered sugar and 3 tablespoons meringue powder. Add 8 tablespoons of water and beat on low for 1 minute, then medium for 3–4 minutes until the icing is thick, white, and glossy. Test: lift the whisk — the ribbon of icing should hold for 2–3 seconds before disappearing. This is your outline consistency. Transfer approximately one-third to a separate bowl and cover tightly.
Step 5: Make flood consistency - To the remaining icing in the mixer, add water one tablespoon at a time, mixing after each addition, until the icing flows freely and the surface self-levels within 10 seconds of dropping a spoonful back in. This is your flood consistency.
Step 6: Color the icing - Divide both consistencies into small bowls — one set for each color. Add gel food coloring a tiny amount at a time and mix until you reach the desired shade. Cover each bowl with plastic wrap directly touching the icing surface — royal icing crusts over quickly when exposed to air.
Step 7: Fill piping bags - Scoop icing into piping bags or squeeze bottles. For outline icing, a small round tip (Wilton #2 or #3) gives clean lines. For flood icing, a slightly larger opening or a squeeze bottle with a small tip gives good control.
Step 8: Decorate - Pipe the outline around the edge of the cookie shape using outline-consistency icing. Let set 5 minutes. Flood the interior. Apply any wet-on-wet decorating techniques (dots, zigzag, sprinkles) immediately. Allow to dry at least 30 minutes before layering additional colors, and at least 4 hours before using edible markers. Allow completed cookies to dry fully at room temperature — at least 4 hours, overnight preferred — before stacking or packaging.
Nutrition Information
Yield
24Serving Size
1Amount Per Serving Calories 86Total Fat 0gSaturated Fat 0gTrans Fat 0gUnsaturated Fat 0gCholesterol 0mgSodium 5mgCarbohydrates 21gFiber 0gSugar 20gProtein 0g

Before you go, Grab Your Free Printable Recipe Kit!
Keep track of all your favorite recipes and ingredients with this free printable book!
Hi! I’m Nellie. I am an entrepreneur, a busy mama of 3 and a wife to my high school sweetheart. I have been sharing content for over 12 years about how to cook easy recipes, workout tips and free printables that make life a little bit easier. I have been featured in places like Yahoo, Buzzfeed, What To Expect, Mediavine, Niche Pursuits, HuffPost, BabyCenter, Mom 2.0, Mommy Nearest, Parade, Care.com, and more!
Get comfortable and be sure to come hang out with me on social. Don’t forget to grab your free fitness journal before you go!