Red Velvet Christmas Wreath Cake For The Holidays
Christmas Red Velvet Wreath Cake – Festive, Fluffy, and So Much Fun to Make
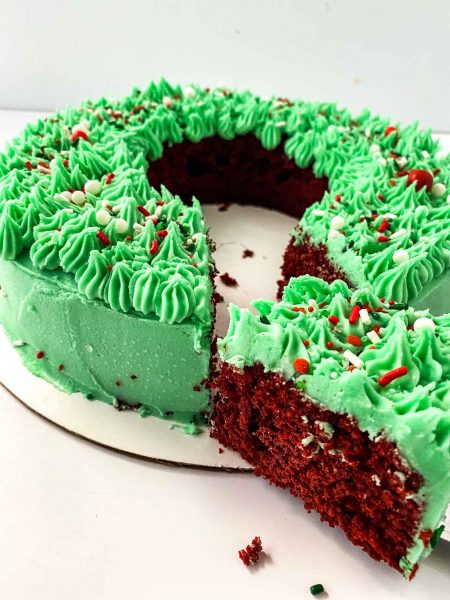
This Christmas Red Velvet Wreath Cake is as merry as it is delicious, with rich red velvet flavor, creamy frosting, and plenty of festive cheer. It’s the perfect holiday showstopper—bright, beautiful, and easy enough for even last-minute bakers to pull off.

This cake is a total crowd-pleaser and the perfect centerpiece for your holiday dessert table. Between the gorgeous wreath design and the creamy green frosting, it brings all the Christmas vibes without needing any fancy tools or pro baking skills. Plus, who doesn’t love red velvet during the holidays? (I LOVE IT! all the time really)
Ingredients
Red velvet cake mix keeps things simple while delivering that signature cocoa flavor and festive red color. Eggs bind everything together and make the cake rich and fluffy. Water adds moisture so the cake stays soft and tender. Vegetable oil gives the cake its perfect texture—it’s light, moist, and never dry. Vanilla extract deepens the flavor and gives that homemade touch that makes boxed cake mixes taste extra special.
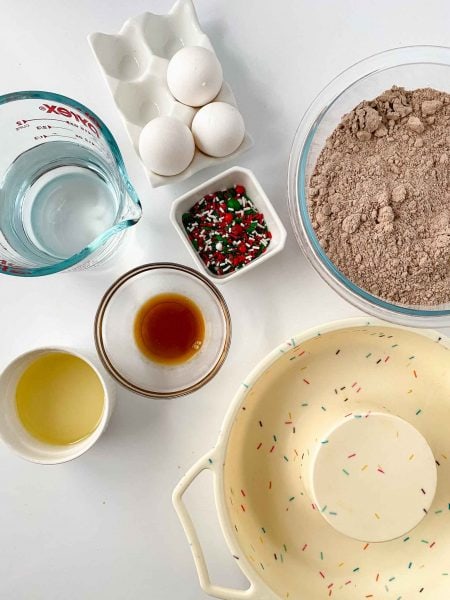
Vanilla or cream cheese frosting adds creamy sweetness that pairs perfectly with red velvet’s slight tang. Buttercream or store-bought icing makes decorating a breeze—no judgment if you take the shortcut (I do it all the time!). Green food coloring transforms your icing into the perfect Christmas green for your wreath design. Christmas sprinkles bring all the sparkle and joy. And for a fun finishing touch, a simple ribbon bow makes it look straight out of a holiday bakery window.
How to Make a Christmas Red Velvet Wreath Cake
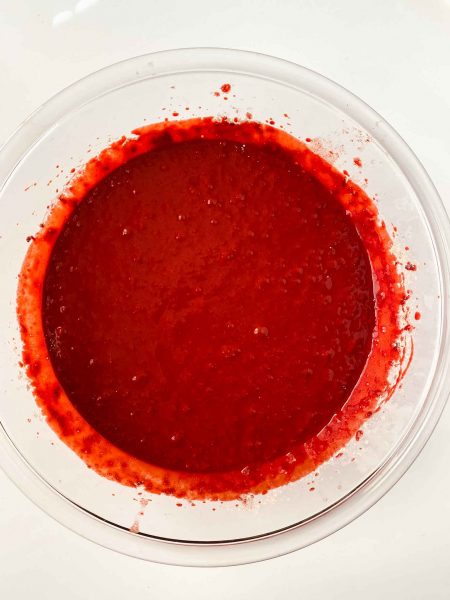
Start by preheating your oven to 350°F. Spray your cake pan generously with non-stick spray—this helps your cake release perfectly later. In a large mixing bowl, add your red velvet cake mix, eggs, water, vegetable oil, and vanilla. Mix everything together for about 3 to 4 minutes until smooth and creamy. The batter should be thick but pourable and that beautiful red color we all love.
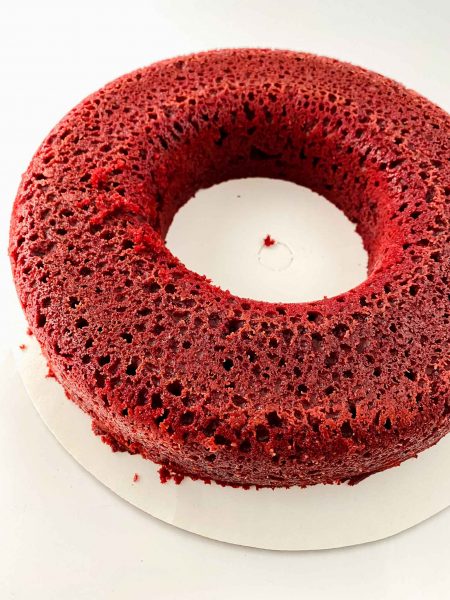
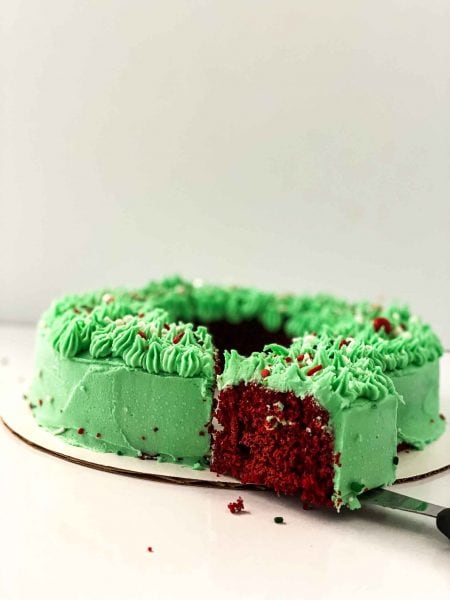
Pour the batter evenly into your prepared cake pan and bake for about 35 to 40 minutes, or until a toothpick inserted in the center comes out clean. Once baked, let the cake cool completely in the pan. When it’s cool, use a serrated knife to trim any excess cake so the top is even. This helps your icing layer go on smooth later.
Now, gently release the cake from the pan and wrap it in plastic wrap. Pop it in the freezer for 4 to 6 hours. Freezing the cake makes it easier to handle and decorate without crumbling—it’s one of my favorite baker’s tricks!
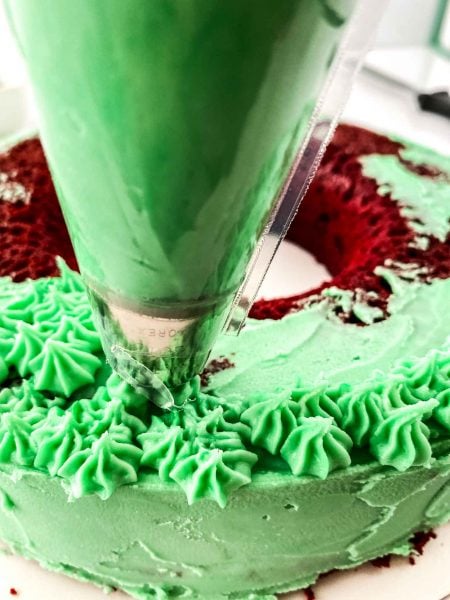
When you’re ready to decorate, unwrap the cake and place it on a cake board or serving plate. Dye your buttercream (or frosting) with green food coloring until you get your desired shade. Using an offset spatula, ice the sides of the cake evenly with the green buttercream. Then, fill a piping bag fitted with a triple star tip and pipe little star-shaped dollops all around the top of the cake. This gives it that beautiful wreath texture.
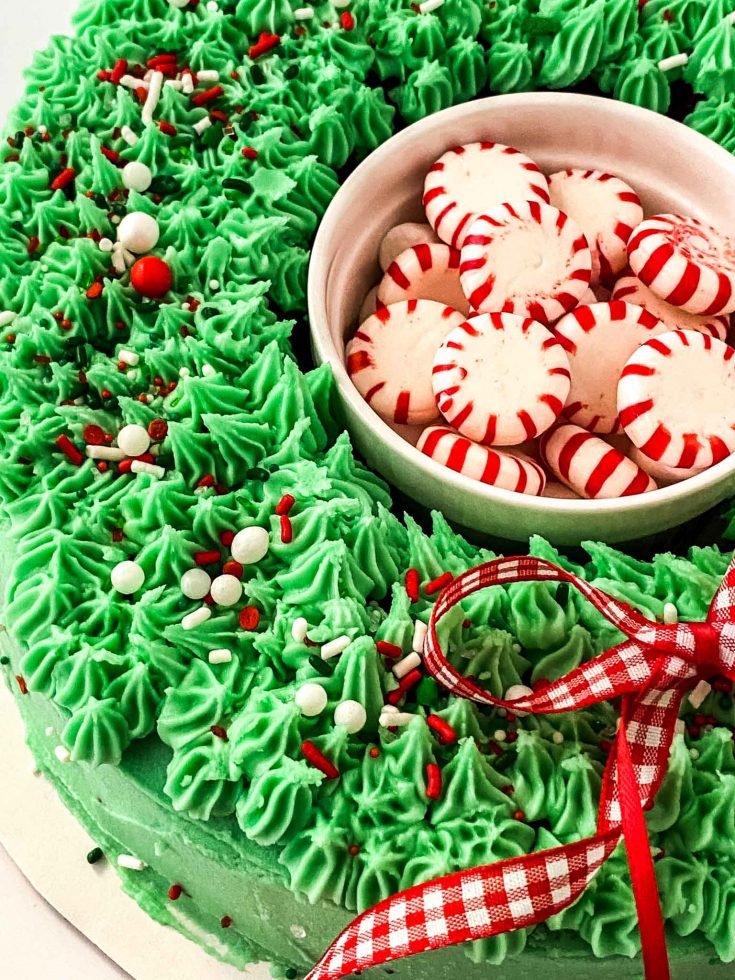
Sprinkle the top with Christmas sprinkles for extra sparkle. If you’re feeling festive, use a red ribbon to create a bow and attach it to the front of the cake using glue dots (just remember to remove it before serving). Serve and watch your family’s faces light up—this one’s a guaranteed holiday hit!
Every year, I try to make one dessert that really feels like Christmas, and last year, this wreath cake stole the show. My kids helped me mix the batter and sneak a few sprinkles, and my husband was in charge of tying the bow (which turned out surprisingly perfect). When we brought it to our family holiday dinner, everyone thought it was from a bakery. The best part? It tastes even better than it looks—moist, chocolatey, and perfectly festive. Now, it’s officially a tradition in our house to make this cake while blasting Christmas music and sipping cocoa.
FAQs About Christmas Red Velvet Wreath Cake
Can I use homemade red velvet cake instead of boxed mix? Absolutely! Just use your favorite recipe and bake it in the same pan.
Do I have to freeze the cake before decorating? You don’t have to, but freezing makes it much easier to ice and decorate without crumbs.
Can I use store-bought frosting? 100%! Just whip it for a minute or two to make it fluffier before adding the food coloring.
What if I don’t have a star piping tip? You can use any decorative tip—or even just spread the frosting with a spoon for a rustic, homemade look.
How should I store this cake? Keep it covered in the fridge for up to 3 days. Let it sit at room temperature for about 20 minutes before serving for the best flavor.

This cake is a total win because it combines the classic flavors of red velvet with the festive look of a holiday wreath. The box mix keeps it simple and consistent, while the homemade touches—like the green buttercream and sprinkles—make it feel special. It’s easy enough for beginners but impressive enough to wow your guests. Plus, decorating it with the family is half the fun—it’s not just dessert, it’s a holiday memory in the making.
Here are some more amazing Christmas recipes to check out!
Red Velvet Christmas Wreath Cake For The Holidays
This amazing Red Velvet Christmas Wreath Cake is great to make for the holidays and holiday parties.
Ingredients
- Red velvet mix
- 3 eggs
- 1 cup water
- 1/3 cup vegetable oil
- 1 tsp vanilla
- Vanilla or cream cheese frosting Non stick spray
- Buttercream or store bought icing
- Green Food Coloring
- Christmas Sprinkles
Instructions
- Spray cake pan with non stick spray and set aside Add cake mix, oil, water, eggs and vanilla to a bowl Mix until we’ll incorporated 3-4 min
- Bake at 350 for 35-40 mins
- Let cake cool completely. Cut off any excess cake with a serrated knife
- Release from cake pan, Wrap in plastic wrap and freeze for 4-6 hours
- Remove from freezer, unwrap and place cake on cake board
- Dye buttercream green.
- Ice the sides of the cake in green buttercream.
- Add remaining buttercream to a piping bag fitted with a triple star tip.
- Add star stop decoration around the top of the cake giving it texture.
- Add sprinkles
- Optional: for the bow. I used ribbon and glue dots to hold them together just for presentation. Remove before serving.
Notes
Be sure to freeze the cake to eliminate having crumbs in your icing. Add sprinkles immediately after piping stars to the top of the cake. This cake be done in any flavor
Nutrition Information
Yield
8Serving Size
1Amount Per Serving Calories 167Total Fat 13gSaturated Fat 2gTrans Fat 0gUnsaturated Fat 10gCholesterol 72mgSodium 46mgCarbohydrates 9gFiber 0gSugar 8gProtein 2g

Before you go, Grab Your Free Printable Recipe Kit!
Keep track of all your favorite recipes and ingredients with this free printable book!
Hi! I’m Nellie. I am an entrepreneur, a busy mama of 3 and a wife to my high school sweetheart. I have been sharing content for over 12 years about how to cook easy recipes, workout tips and free printables that make life a little bit easier. I have been featured in places like Yahoo, Buzzfeed, What To Expect, Mediavine, Niche Pursuits, HuffPost, BabyCenter, Mom 2.0, Mommy Nearest, Parade, Care.com, and more!
Get comfortable and be sure to come hang out with me on social. Don’t forget to grab your free fitness journal before you go!