3D Christmas Tree Gingerbread Cookies
3D Christmas Tree Gingerbread Cookies: The Star Of The Cookie Exchange
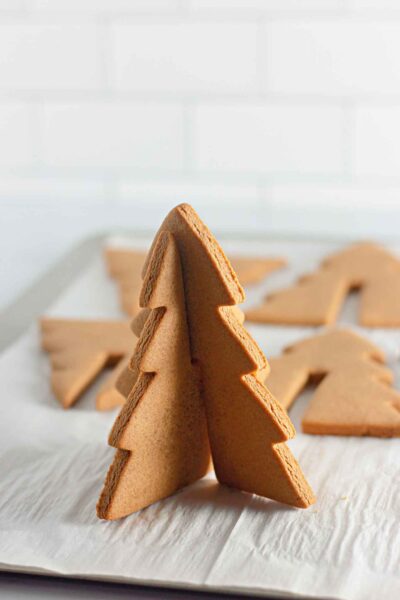
Imagine a Christmas tree that’s not just a feast for the eyes but also for the taste buds! Our 3D Christmas Tree Gingerbread Cookies are just that—a delightful blend of spices, sweetness, and holiday spirit, all in a three-dimensional form.

Made with a simple yet flavorful dough that includes butter, brown sugar, molasses, and a medley of spices, these cookies are as fun to make as they are to eat. Let’s dive into the nitty-gritty of making these festive treats.

FAQs
What kind of molasses should I use?
For a rich, robust flavor, go for dark molasses. Light molasses will work too but will yield a milder taste.
Can I use pre-made gingerbread cookie mix?
While you can, making the dough from scratch will give you a more authentic and richer flavor.
Do I need a special cookie cutter?
A set of star-shaped cookie cutters in different sizes will do the trick for creating the 3D effect.

Tips and Tricks
- Chill the Dough: Always chill the dough for at least 30 minutes. This makes it easier to roll and cut.
- Even Rolling: Use spacer bands on your rolling pin to ensure the dough is rolled out evenly.
- Bake in Batches: Don’t overcrowd the baking sheet. This ensures even baking and crisp edges.

Variations
- Spice It Up: Add a pinch of nutmeg or cloves for an extra kick.
- Go Nuts: Incorporate finely chopped almonds or pecans into the dough for a crunchy texture.
Where to Serve
These cookies make a stunning centerpiece for your Christmas dinner table. They’re also perfect for cookie exchanges, holiday parties, and as homemade gifts.
What Tools Do You Need For These 3D cookies?
- Wilton Cookie Cutter Set-Christmas Tree: https://amzn.to/3MdyGMH
- Satin Ice Merengue Powder: https://amzn.to/3S7ddZH
Storage
Store the cookies in an airtight container at room temperature for up to a week. For longer storage, freeze them; just assemble the 3D trees after thawing.
Common Problems and How to Avoid Them
- Spreading: If the cookies spread too much, it’s likely the dough wasn’t chilled enough.
- Burning Edges: This can happen if your oven runs hot. Always keep an eye during the final minutes of baking.
- Soggy Cookies: Make sure to completely cool the cookies on a wire rack before storing.

Tips for Making This Recipe with Kids
- Safety First: Supervise the use of the oven and sharp cookie cutters.
- Get Creative: Let the kids decorate the cookies with edible markers or food coloring.
- Teachable Moments: Use the opportunity to teach kids about measurements and following recipe instructions.

Topping Options
- Royal Icing: For a classic look and taste.
- Sprinkles: Add colorful sprinkles for a festive touch.
- Edible Gold Leaf: For a luxurious finish.
Why This Recipe Works
- Flavor Depth: The combination of brown sugar, molasses, and spices offers a rich, deep flavor.
- Texture: The all-purpose flour ensures a soft yet firm texture that holds the 3D shape well.
- Versatility: The basic recipe is a canvas for various flavors and decorations, making it perfect for all taste preferences.

So there you have it, everything you need to know to make the perfect 3D Christmas Tree Gingerbread Cookies. Happy baking and happy holidays!
Here are some more fun Christmas Tree Cookie Recipes:
- The Best M and M Christmas Cookies
- Easy Reindeer Cookies With Premade Sugar Cookie Dough
- Easy Christmas Snickerdoodle Cookies
- Easy Nightmare Before Christmas Cookies
- Christmas Candy Cane Cookies

3D Gingerbread Christmas Tree Cookies
Elevate your holiday festivities with these 3D Christmas Tree Gingerbread Cookies, a delightful blend of spices and sweetness in an eye-catching, three-dimensional form. Crafted from a rich dough that includes butter, brown sugar, and molasses, these cookies are as fun to assemble as they are to eat.
Ingredients
- Cookie Ingredients:
- ½ cup (1 stick) butter, softened
- ½ cup brown sugar, packed
- 2 tablespoons granulated sugar
- 1/3 cup molasses
- 1 large egg, at room temperature
- 1 teaspoon vanilla extract
- 3 cups all-purpose flour
- 2 teaspoons ground cinnamon
- 2 teaspoons ground ginger
- ½ teaspoon all spice
- ½ teaspoon salt
- Royal Frosting
- Ingredients:
- 5 tablespoons warm water
- 3 tablespoons meringue powder
- 2 teaspoons vanilla extract
- 4 cups powdered sugar
- Food coloring, optional
Instructions
- Preheat oven to 375F. Line a large baking sheet with parchment paper; set aside.
- In a large mixing bowl, mix the butter, brown sugar, and granulated sugar together with an electric mixer, just until blended (do not over-mix).
- Add the molasses, egg, and vanilla and mix until incorporated.
- In a separate bowl, whisk together the flour, cinnamon, ginger, all spice, and salt. Add the dry mixture to the wet and mix with the electric mixer until a crumbly dough forms.
- Turn the dough out onto a sheet of parchment paper and press the dough into a ball. Place another sheet of parchment paper on top of the dough and use a rolling pin to roll the dough out to ¼-inch thickness (the dough should be just slightly thinner than the cut out area of the cookie cutter where the cookies will interlock. If the dough is too thick the cookies will not interlock to form the trees).
- Use a 3D Christmas tree cookie cutter to cut the trees out of the dough. Transfer the trees to the prepared baking sheet.
- Bake the cookies at 375F for 9-10 minutes until set. Cool on the baking sheet for 2-3 minutes, then use a spatula to transfer to a wire cooling rack to cool completely to room temperature.
- Use royal frosting and sprinkles to decorate the cookies.
Royal Frosting Directions
- In a medium mixing bowl, beat together the water, meringue powder, and vanilla extract with an electric mixer on medium speed until soft peaks form.
- Add the powdered sugar and mix on low speed until soft peaks form.
- If desired, add food coloring and mix well.
- Use the frosting immediately to decorate cookies, then allow to air fry until fully set, about 1-2 hours.
Notes
- This cookie recipe is both no-chill and no-spread.
- The cookies are soft if rolled thickly and more sturdy if rolled thin. It’s best to roll them just slightly thinner than the cut out part of the tree where the cookies will interlock because if they’re too thick they won’t fit.
- I learned this lesson the hard way: it’s best to not frost the area of each cookie where they will interlock. It makes it less likely that the cookies will fit together after the frosting is dry.
- I frosted one side of each cookie tree, let them dry fully, then turned them over and frosted the other side. I made sure they were completely dry on both sides before putting the trees together. Another way to do it would be to put the trees together and use a piping bag to frost them once together.
- The leftover cookies should be covered with plastic wrap and stored at room temperature for up to five days. They can be frozen for up to three months, but I would suggest freezing them before they’re put together into the 3D trees.
- The royal frosting should be used immediately, but if it needs to be held for a little while before use, keep it covered well with plastic and at room temperature.
Nutrition Information
Yield
8Serving Size
1Amount Per Serving Calories 551Total Fat 3gSaturated Fat 1gTrans Fat 0gUnsaturated Fat 2gCholesterol 23mgSodium 176mgCarbohydrates 126gFiber 2gSugar 87gProtein 6g

Before you go, Grab Your Free Printable Recipe Kit!
Keep track of all your favorite recipes and ingredients with this free printable book!
Hi! I’m Nellie. I am an entrepreneur, a busy mama of 3 and a wife to my high school sweetheart. I have been sharing content for over 12 years about how to cook easy recipes, workout tips and free printables that make life a little bit easier. I have been featured in places like Yahoo, Buzzfeed, What To Expect, Mediavine, Niche Pursuits, HuffPost, BabyCenter, Mom 2.0, Mommy Nearest, Parade, Care.com, and more!
Get comfortable and be sure to come hang out with me on social. Don’t forget to grab your free fitness journal before you go!