The Best Harry Potter Butterbeer Drip Cake
This Harry Potter ButterBeer Drip Cake is so great for Harry Potter themed parties! If you love butterbeer this cake is for you!
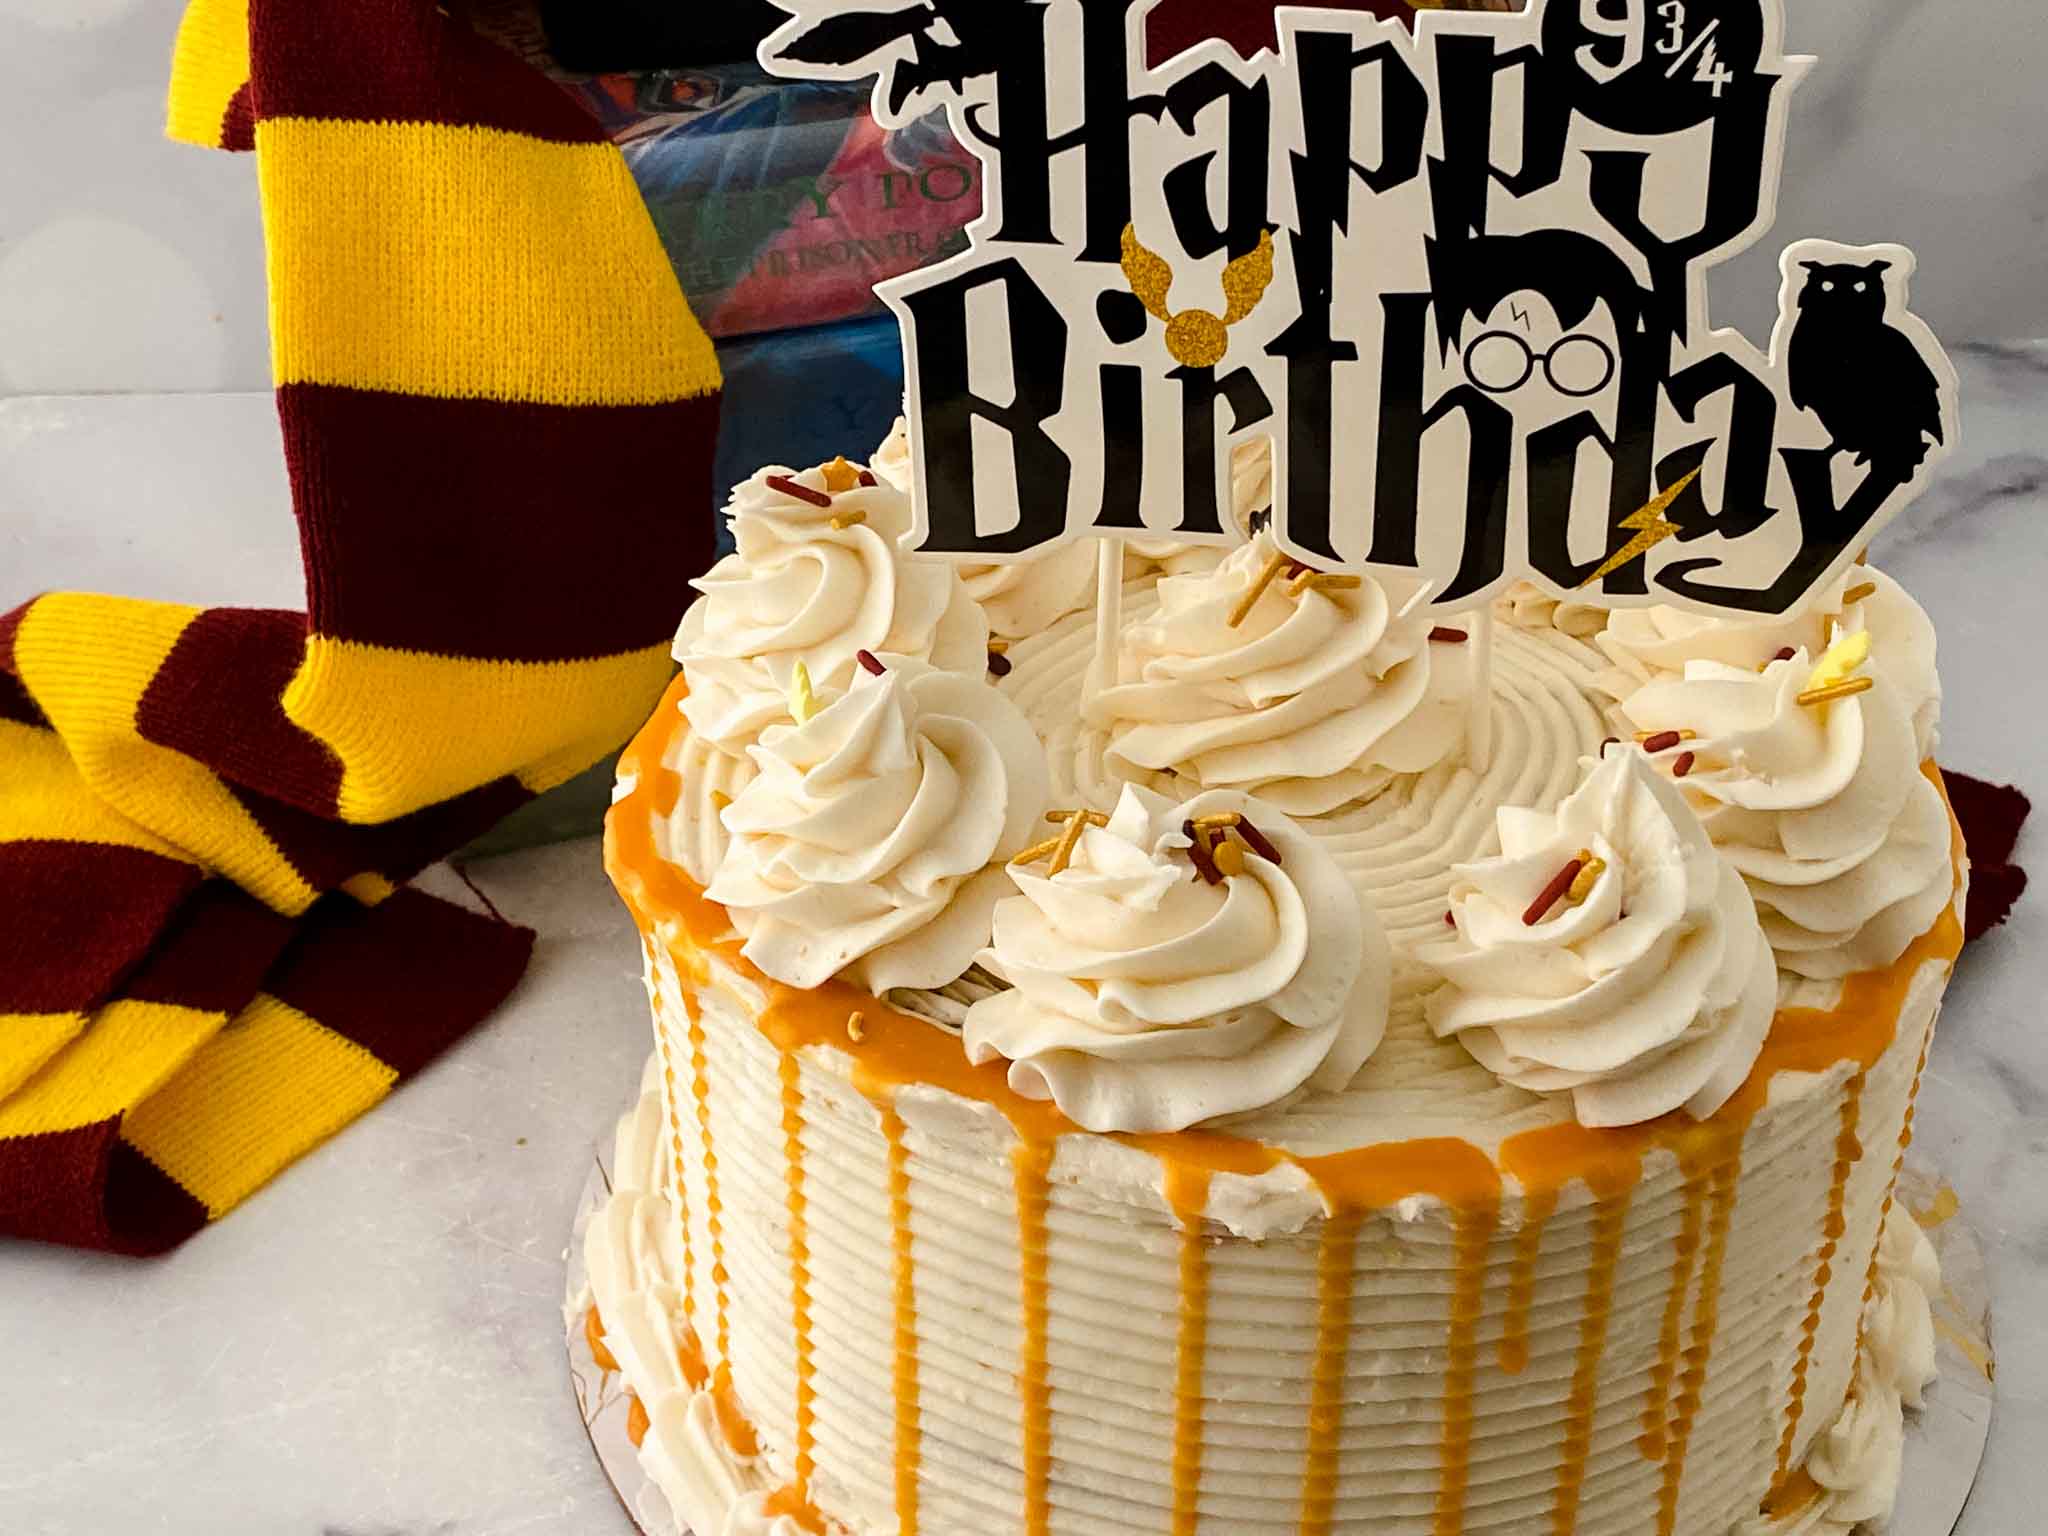
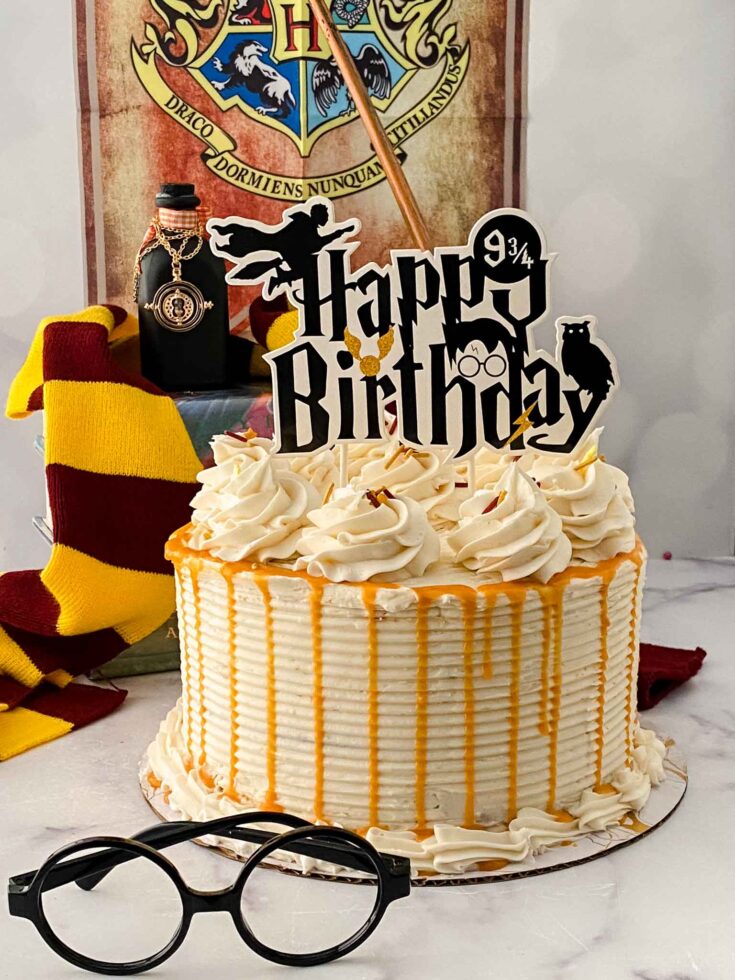
My youngest is a Harry Potter kid the way I was a Harry Potter kid — obsessively. When birthday cake requests started, there was exactly one answer: butterbeer. Not just the flavor. The whole thing. The drip, the rosettes, the golden color, the butterscotch. It had to look like something from Hogsmeade.
This is that cake. It’s a doctored yellow cake mix with butterscotch pudding and cream soda baked in — which sounds like a shortcut but is actually a technique. The pudding mix keeps the crumb tight and moist, the cream soda adds a subtle fizz and sweetness that you can’t get from water alone, and the result is a cake that tastes homemade in the best way. The frosting is butterbeer-flavored — cream soda worked into a butter and shortening base — and the drip is straight butterscotch ganache.
It takes some time and the right tools, but it’s more approachable than it looks. I’ll walk you through every step.
What ingredients do you need for this Harry Potter ButterBeer cake?

Butterbeer cake:
2 (15.25oz) Yellow Cake Mix
1 (3.9oz) Jello brand instant butterscotch pudding mix
6 large eggs
2 cups water
2/3 cup vegetable oil
½ cup cream soda
2 tsp vanilla extract
Butterbeer Frosting
1 cup unsalted butter, room temperature
1 cup vegetable shortening (Crisco)
5 cups powdered sugar
1/2 cup cream soda
Butterscotch Ganache for Drip
¾ cup butterscotch chips
¼ cup heavy cream
INGREDIENT NOTES
Cake
2 boxes yellow cake mix (15.25 oz each) — Two boxes gives you enough batter for four 8-inch rounds, which makes a tall 4-layer cake, or you can bake two thicker layers. Most home bakers do two pans and get two layers. If you want four thinner layers with more frosting between them, use all four.
Jello brand instant butterscotch pudding mix (3.9 oz) — This is the secret to the crumb texture. Instant pudding mix added dry to cake batter is a classic box mix doctoring technique — it adds moisture, density, and a tighter crumb that holds up better to frosting and stacking. Use instant, not cook-and-serve.
Cream soda (½ cup in cake, ½ cup in frosting) — The cream soda does two things: it adds a subtle butterscotch-vanilla flavor and provides a slight fizz that lightens the batter. Use regular cream soda, not diet — the sugar content matters for the cake structure. IBC and A&W are both good options.
Frosting
Vegetable shortening (1 cup, Crisco) — Shortening in frosting isn’t just filler — it stabilizes the buttercream at room temperature and gives it a brighter white color than an all-butter frosting. It also makes the frosting easier to work with for the comb texture technique. Don’t substitute all butter or the frosting will be too soft to hold the pattern.
5 cups powdered sugar — Sift it before adding if your powdered sugar has been sitting for a while. Lumps in the sugar create lumps in the frosting that show up when you run the cake comb.
Ganache
Butterscotch chips (¾ cup) — Standard Nestle or Hershey’s butterscotch chips work fine. Make sure they’re fresh — old chips can seize during melting and won’t smooth out properly.
Heavy cream (¼ cup) — The ratio of chips to cream here is intentional. More cream makes a thinner ganache that drips too fast; less makes it too thick to drip at all. Stick to the ratio.
How Do You Make this Butterbeer Cake?
Bake the cake layers. Grease and flour two 8×2-inch round cake pans (or spray with baking spray that contains flour). Preheat the oven to 350°F. In a large bowl or stand mixer, combine both boxes of cake mix, the pudding mix, eggs, water, and oil. Mix on medium until incorporated — about 2 minutes. Add the vanilla extract and cream soda and mix until just combined. Don’t overmix after the cream soda goes in. Divide the batter evenly between the prepared pans and bake for 35–40 minutes, until a skewer or toothpick inserted in the center comes out clean.
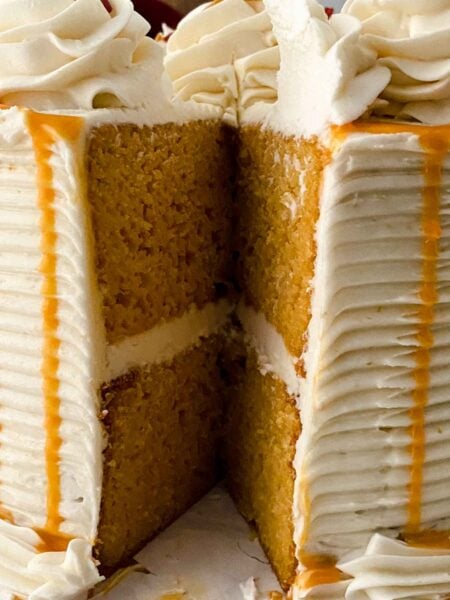
Cool and level. Let the cakes cool in their pans for 15 minutes, then turn out onto a wire rack and cool completely — at least 1 to 1.5 hours. Once fully cooled, use a serrated knife or cake leveler to trim any dome off the top of each layer, creating a flat, even surface. This is the leveling step — it’s done after removing from the pan, not inside it. Wrap and freeze if making ahead (see above).
Make the ganache. Pour the heavy cream into a microwave-safe bowl and heat for 40 seconds. Pour directly over the butterscotch chips and let it rest undisturbed for 7–9 minutes — this gives the hot cream time to melt the chips from the outside in. Then stir slowly from the center outward until smooth ganache forms. If any chips remain unmelted, microwave in 10-second bursts, stirring between each, until fully smooth. Transfer to a piping bag or squeeze bottle and let it cool to room temperature before using for the drip — it should be the consistency of slightly warm honey. Too warm and it runs; too cool and it won’t flow.
Make the frosting. Beat the room-temperature butter and shortening together on medium until completely smooth, about 2 minutes — no lumps. Add half the powdered sugar and ¼ cup of cream soda and mix on low until incorporated. Add the remaining powdered sugar and remaining ¼ cup cream soda. Mix on low until combined, then increase to high and beat for 4–5 minutes until the frosting is light, fluffy, and bright white.
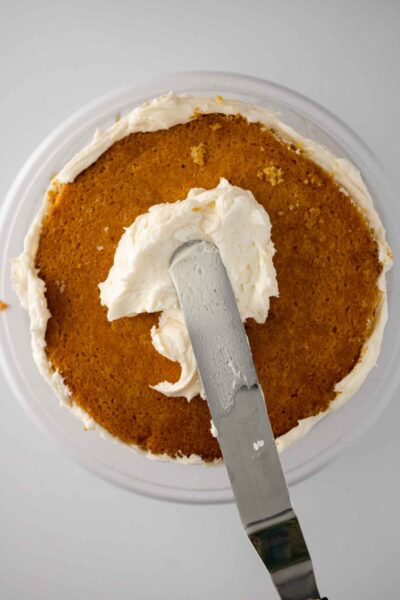
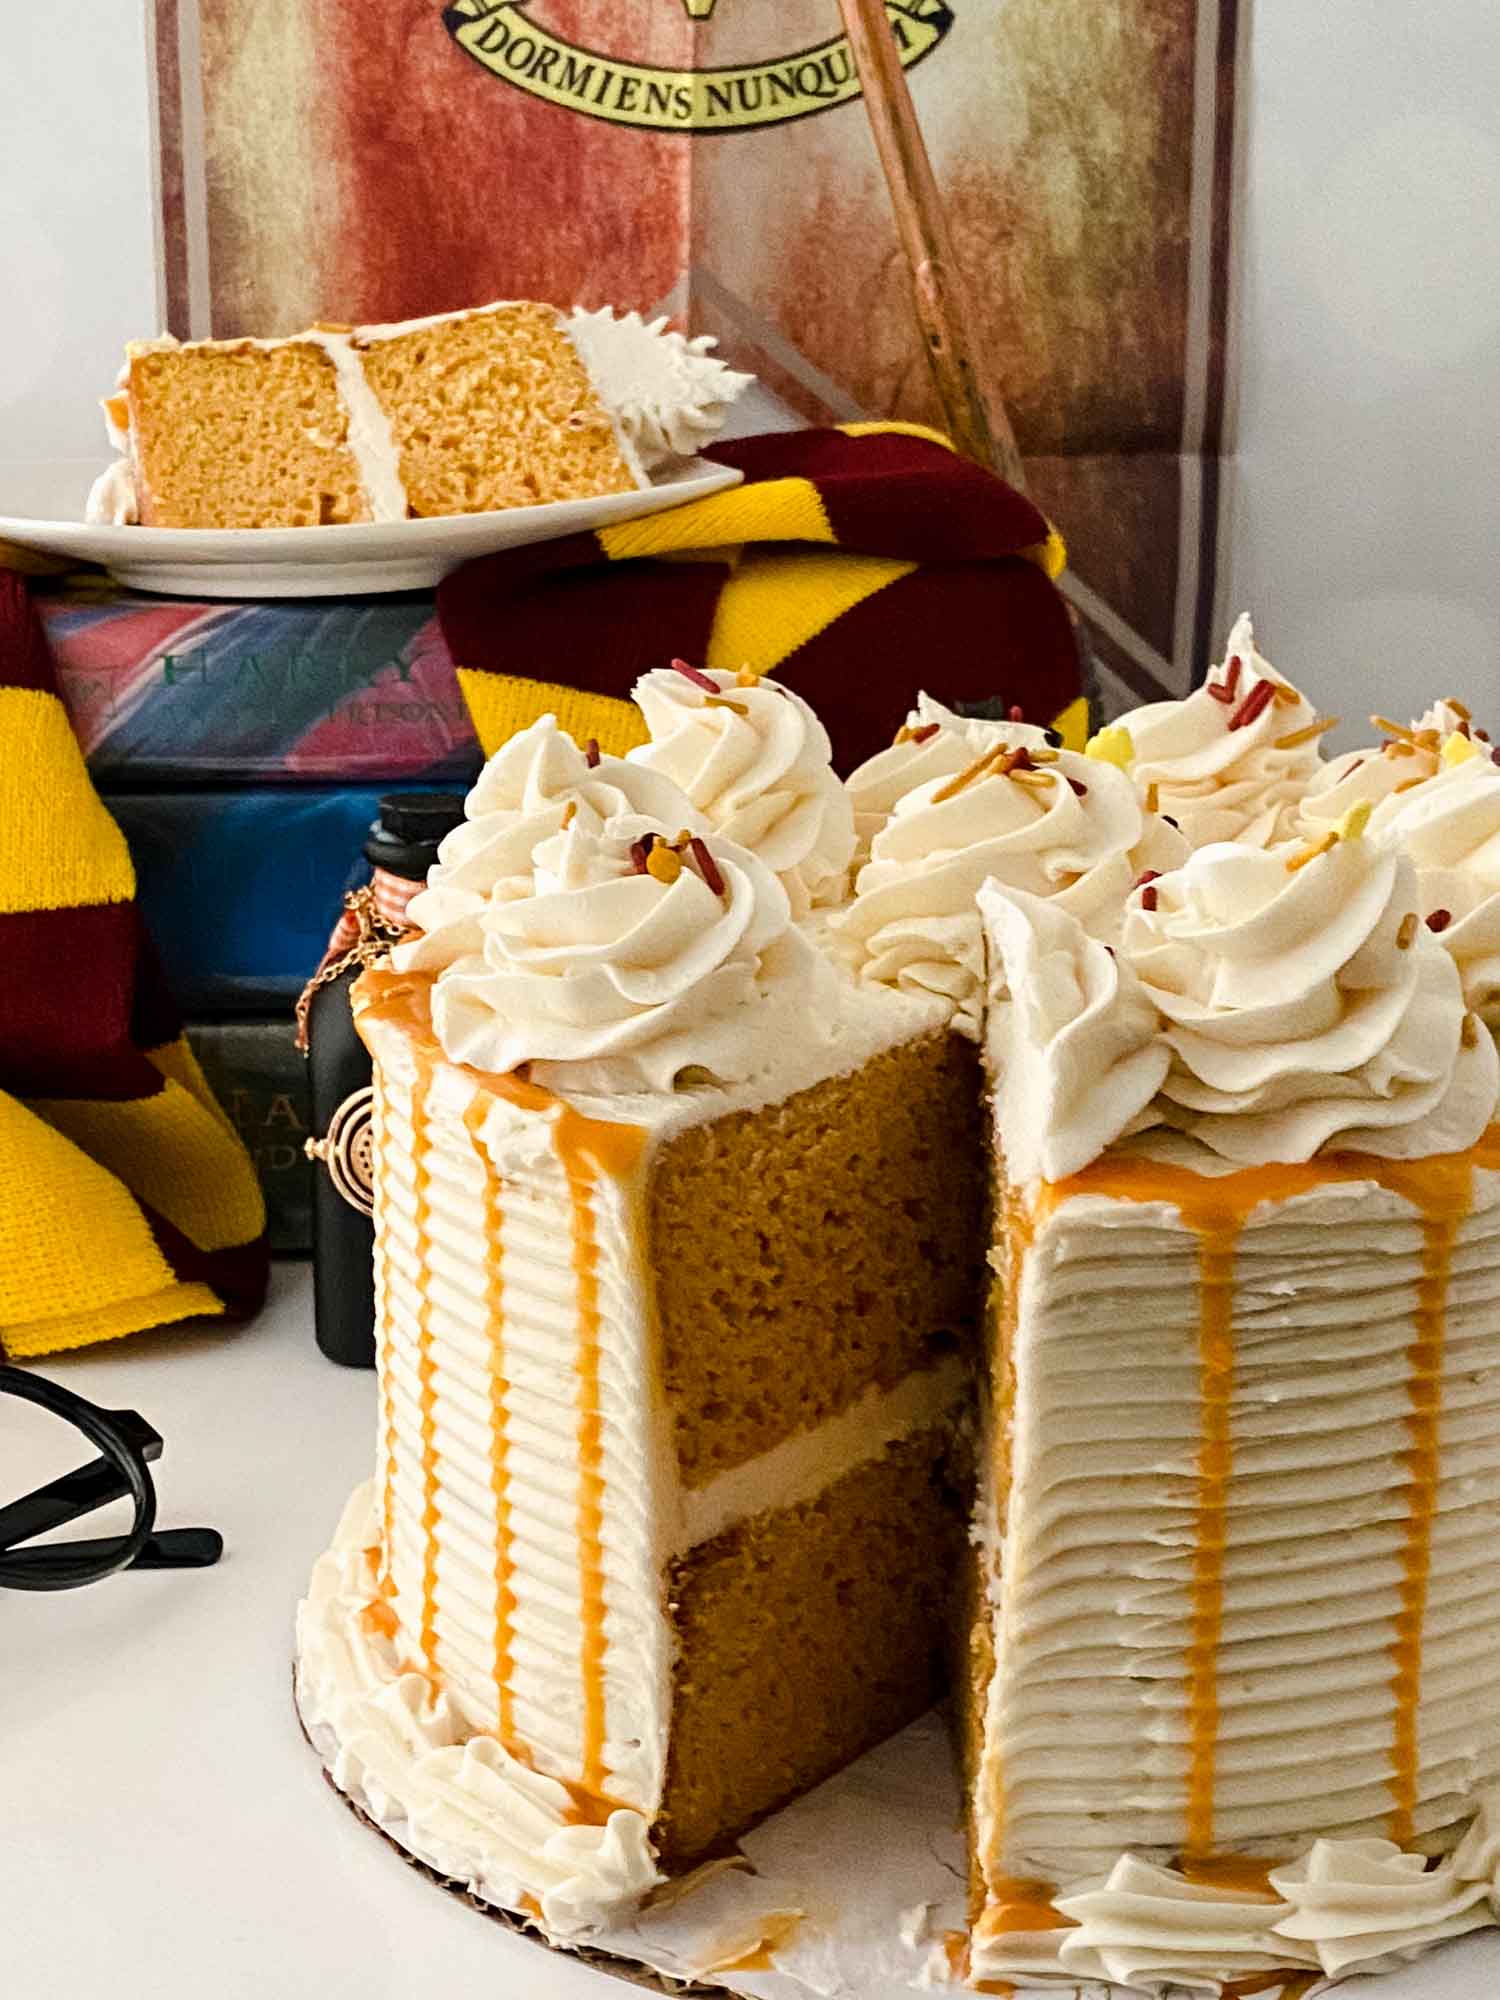
Assemble. Place a small dollop of buttercream on your cake board to anchor the first layer. Set the first cake layer cut side up. Add a generous layer of buttercream and spread it evenly to the edges with an offset spatula. Drizzle a small amount of the cooled butterscotch ganache over the buttercream filling — just a drizzle, not a full pour. Place the second layer cut side down on top.
Frost and texture. Apply a thin crumb coat of buttercream all over the cake — sides and top — and refrigerate for 15–20 minutes to set. Then apply your final, thicker coat of buttercream. Use a cake comb or bench scraper held against the side of the cake at a slight angle while slowly rotating the turntable to create the textured pattern and remove excess. Run the comb over the top edge as well. No cake should be visible through the frosting at this point.
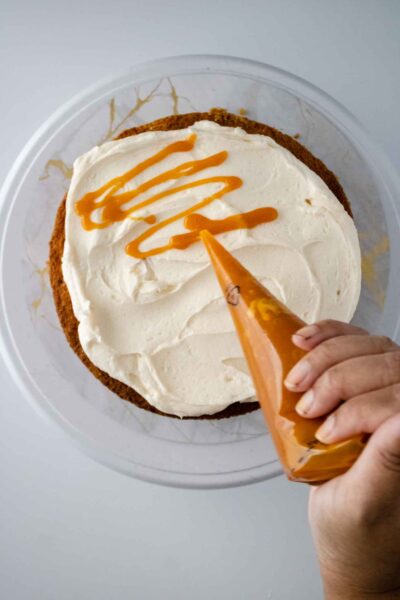
Apply the drip. Make sure your ganache is at the right temperature — warm but not hot. Starting at the edge of the top of the cake, use a piping bag or squeeze bottle to add small amounts of ganache around the rim, letting it drip down the sides. Work slowly and in small amounts. You can always add more; you can’t remove a drip that’s gone too far. Fill the top of the cake with a smooth layer of ganache if desired.
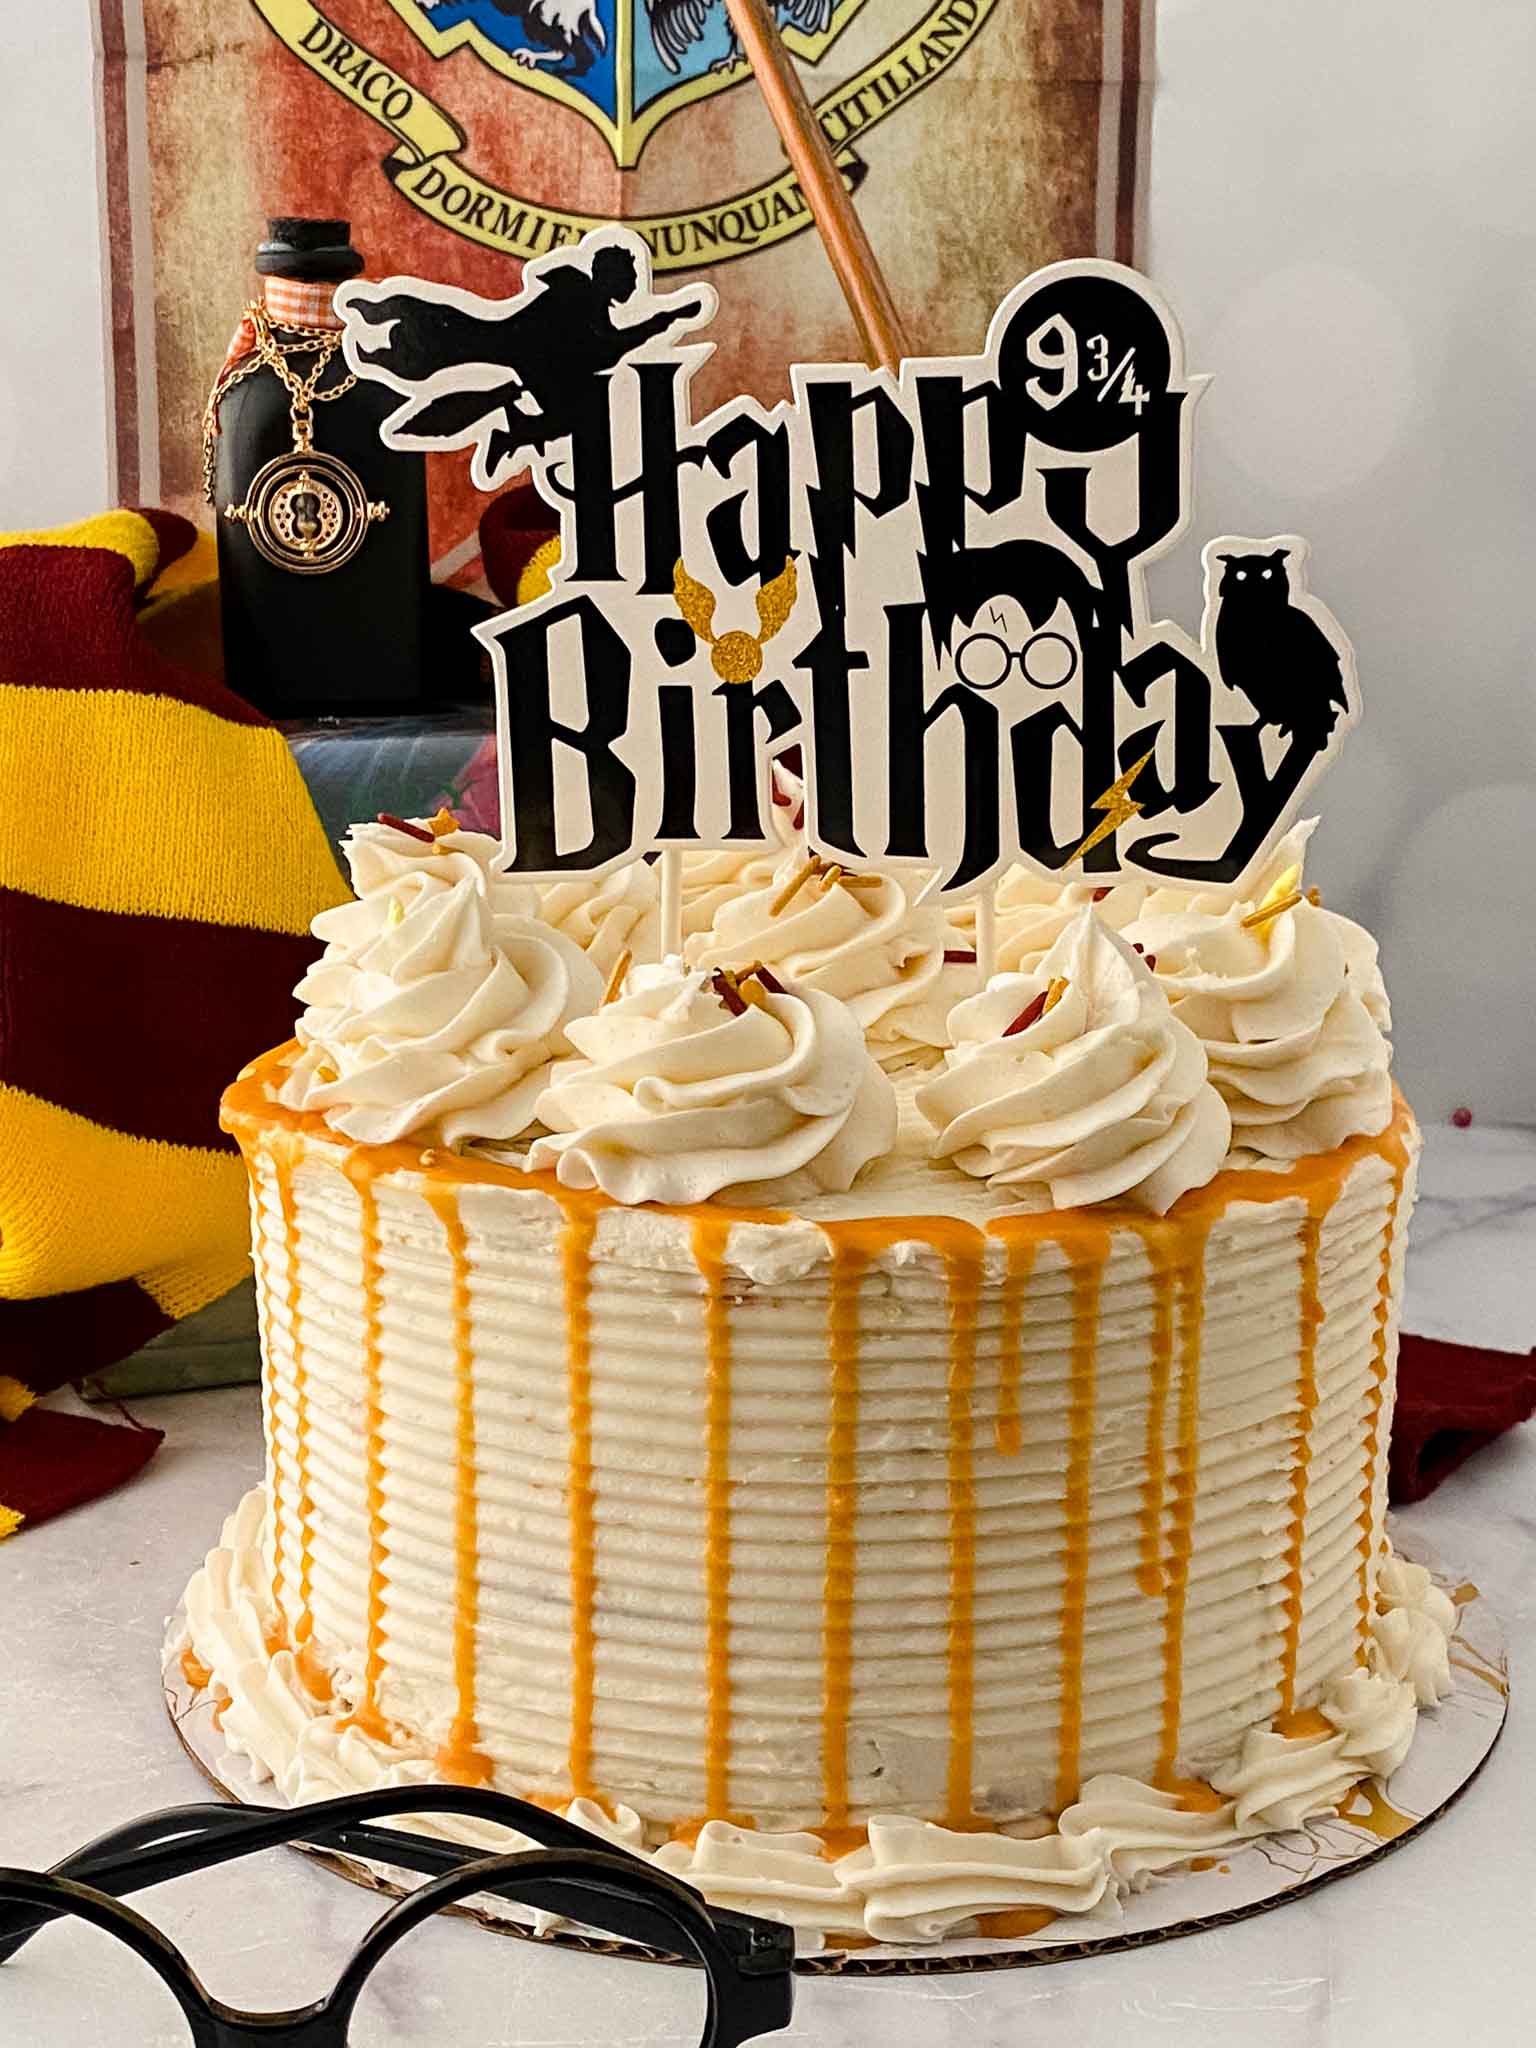
Finish with rosettes. Fit a piping bag with a 1M tip and fill with the remaining buttercream. Pipe rosettes around the top edge of the cake. Immediately add sprinkles before the buttercream sets.

WHAT IS BUTTERBEER AND WHAT DOES IT TASTE LIKE?
In the Harry Potter world, Butterbeer is the drink of choice at the Three Broomsticks in Hogsmeade — warm, frothy, and beloved by every student at Hogwarts. In real life (at Universal Studios and in fan recipes), it’s typically made with cream soda, butterscotch, and a whipped cream or foam topping.
The flavor is sweet and butterscotch-forward with a light caramel finish and just enough fizz from the cream soda to keep it from being heavy. It’s warm and cozy rather than sharp — think caramel with a little vanilla softness underneath. That’s exactly what this cake tastes like: the cake layers themselves are subtly butterscotch and vanilla, the frosting is sweet and buttery with a cream soda tang, and the ganache drip is pure butterscotch.
MAKE-AHEAD: THE FREEZE TRICK (STRONGLY RECOMMENDED)
This is the single most important tip for this cake and it’s worth doing every time you make a layered cake.
After your cake layers are fully baked, cooled, and leveled, wrap each layer individually in plastic wrap and freeze them overnight (or for at least 4 hours). When you’re ready to frost, remove them from the freezer and let them thaw for about 1.5–2 hours at room temperature before assembling.
Here’s why this works: freezing traps the moisture inside the cake. As the cake thaws, that moisture redistributes throughout the crumb, giving you a noticeably softer, more tender bite than a cake assembled the same day. It also makes frosting dramatically easier — a cold, firm cake layer doesn’t tear, doesn’t shift, and doesn’t crumble into your buttercream. If you’ve ever had buttercream mixed with stray cake crumbs, this technique eliminates that entirely.
TIPS
Temperature controls everything on a drip cake. The ganache should be around 90–95°F for a controlled drip — warm but not runny. If you don’t have a thermometer, test on the side of the bowl: it should flow slowly when tilted, not pour freely. If it’s too thick, microwave in 5-second bursts. If it’s too thin, let it sit at room temperature for a few more minutes.
Crumb coat is not optional. Skipping the crumb coat means your final frosting will be full of crumbs. It adds 20 minutes (15 in the fridge) and saves the whole finish.
Room temperature butter only. Cold butter in buttercream makes a lumpy, grainy frosting. If you forgot to pull the butter early, cut it into small cubes and microwave in 5-second bursts until it gives slightly when pressed but isn’t shiny or melted.
The cake comb direction matters. Hold the comb steady and rotate the turntable rather than moving the comb. Moving the comb creates uneven lines. If you don’t have a turntable, hold the comb still and slowly rotate the cake board.
Make this cake over two days. Day 1: bake, cool, level, freeze the layers. Day 2: make frosting and ganache, assemble, decorate. Spreading it across two days makes a project that feels manageable rather than overwhelming.

VARIATIONS
4-layer version. Use four 8-inch pans and divide the batter among all four. Thinner layers mean more frosting between them — which most people consider a feature, not a bug.
Chocolate Harry Potter version. Swap the yellow cake mix for chocolate and use chocolate ganache instead of butterscotch. Cross-link to the Chocolate Harry Potter Birthday Cake post for that full recipe.
Hogwarts house colors. Tint the buttercream to match a specific Hogwarts house — gold and scarlet for Gryffindor, green and silver for Slytherin, blue and bronze for Ravenclaw, yellow and black for Hufflepuff. Split the frosting and tint portions with gel food coloring, then apply in alternating horizontal bands before combing.
Mini individual cakes. Use 4-inch round pans and divide the batter into individual mini layer cakes. Perfect for a Harry Potter party where each guest gets their own cake.
WHAT IS A DRIP CAKE?
A drip cake is decorated with a controlled pour of ganache or sauce along the top edge of the cake, allowed to run partway down the sides in intentional drips. The effect looks complex but is mostly about temperature — the ganache needs to be warm enough to flow but cool enough not to run all the way to the bottom. On this cake, the drip is butterscotch ganache, which sets to a slightly firm finish and holds its shape beautifully against the pale gold frosting.
The key phrase in any drip cake tutorial is “a little goes a long way.” You always want less than you think. You can add more drips; you can’t undo a ganache that’s run to the cake board.
EQUIPMENT YOU’LL NEED
Before you start, make sure you have: two 8×2-inch round cake pans, a stand mixer or hand mixer, a cake board (10-inch works well for an 8-inch cake), an offset spatula, a cake comb or bench scraper for texturing the sides, a turntable (strongly recommended — not required but makes everything easier), a piping bag, and a 1M piping tip for the rosettes. You’ll also need a microwave-safe bowl for the ganache and a small piping bag or squeeze bottle for the drip application.
FAQS
Two boxes of yellow cake mix divided between two 8×2-inch pans makes a 2-layer cake. If you want more layers, use three or four pans and divide the batter evenly — you’ll get thinner layers with more frosting in between. The recipe as written with two pans makes a tall, sturdy 2-layer cake.
Yes. A bench scraper gives a similar smooth finish without the ridged pattern. You can also skip the texture entirely and do a simple smooth frost with an offset spatula. The drip and rosettes will still look beautiful.
Around 90–95°F — warm but not hot. It should flow slowly when the piping bag is tilted, not pour freely. Too warm and the drip runs to the bottom; too cool and it clumps rather than drips. Test on the back of a spoon before applying to the cake.
You can, but the frosting will be softer, slightly yellower, and harder to work with for the comb texture technique. The shortening is what gives the frosting stability and that bright white color. If you substitute all butter, refrigerate the frosted cake for 15–20 minutes before applying the drip.
Yes — this cake is actually better made ahead. Bake and freeze the layers the day before (see the Make-Ahead section above). The assembled and frosted cake keeps refrigerated for up to 5 days. Bring to room temperature for 45–60 minutes before serving.
Nestle and Hershey’s both make butterscotch chips — they’re in the baking aisle near the chocolate chips at most grocery stores. If you can’t find them, Walmart and Target carry them consistently, and they’re available on Amazon.
You can use 9-inch pans for slightly thinner layers — reduce baking time by 5–7 minutes and start checking at 28 minutes. A 9×13-inch sheet pan also works if you want a simpler presentation without the layering; bake for 28–33 minutes.
This is one of those cakes that earns a reaction the second you set it on the table. The golden drip, the rosettes, the butterscotch smell coming off the whole thing — it’s a showstopper, and it’s genuinely delicious on top of looking the part.
If your house has a Harry Potter fan, this is the birthday cake. No contest.
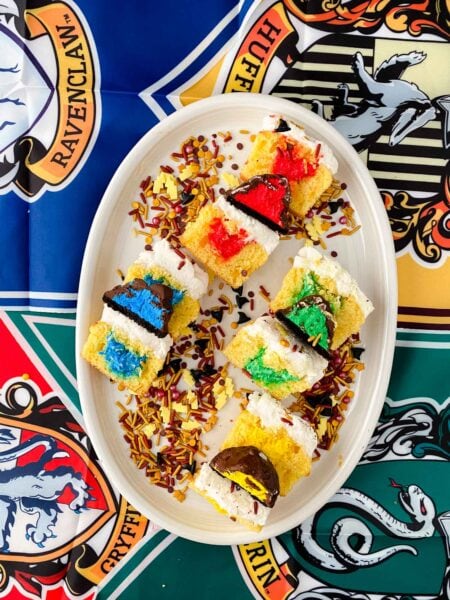
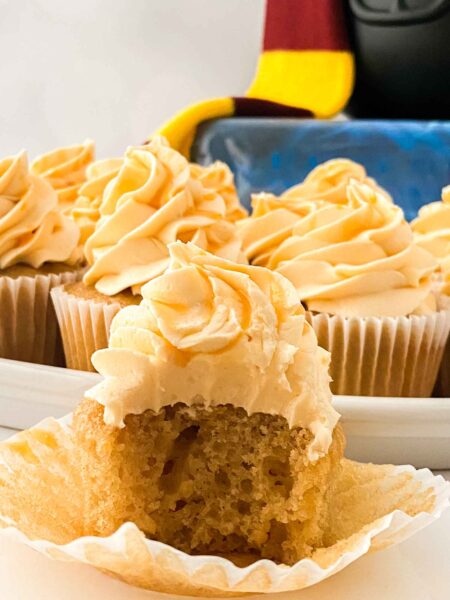
Tag me on Instagram (@glamnellie) when you make it — I love seeing how these cakes come out in everyone’s kitchens. And if you’re building out a full Harry Potter party spread, check out the Sorting Hat Cupcakes, the Butterbeer Cupcakes, and the Butterbeer Cookies — all linked below.
Here are some more fun Harry Potter themed treats to try:


The Best Harry Potter Butterbeer Drip Cake
This awesome Harry Potter Butterbeer Drip Cake is so good and great for Harry Potter fans!
Ingredients
- Butterbeer cake:
- 2 (15.25oz) Yellow Cake Mix
- 1 (3.9oz) Jello brand instant butterscotch pudding mix
- 6 large eggs
- 2 cups water
- 2/3 cup vegetable oil
- ½ cup cream soda
- 2 tsp vanilla extract
- Butterbeer Frosting
- 1 cup unsalted butter, room temperature
- 1 cup vegetable shortening (Crisco)
- 5 cups powdered sugar
- 1/2 cup cream soda
- Butterscotch Ganache for Drip
- ¾ cup butterscotch chips
- ¼ cup heavy cream
Instructions
- Preheat the oven to 350
- Add cake mix, pudding mix, eggs, water, and oil to mixing bowl and mix until incorporated.
- Add vanilla extract and cream soda.
- Fold in and immediately place into prepared 8*2 cake pans
- Bake for 35-40 mins or until a skewer comes out clean.
- Remove from oven and set aside
- Once cooled, level the top of the cake while still in the pan.
Make ganache
- Heat the heavy cream in the microwave for 40 seconds
- Pour on top of the butterscotch and let rest about 7-9 mins
- Stir until ganache begins to form
- If all of the chips haven’t melted, pop in the microwave for 10 seconds, stir and let Cool.
- Add to piping bag.
Make the frosting
- In a mixing bowl, mix butter and shortening until smooth.
- Add in the half the powdered sugar and ¼ cup cream soda.
- Mix until smooth
- Add the remaining powdered sugar and ¼ cup cream soda
- Mix until combined, then mix on HIGH until fluffy (about 4-5 mins).
Assembly
- Add a dollop of buttercream to the cake board.
- Place down the first layer, cut side up
- Add buttercream and spread out on the cake.
- Add a drizzle of the butterscotch ganache to the frosting.
- Top with the second layer of cake, cut side down.
- Frost the cake with the buttercream.
- Add thick layers of buttercream to the cake all the way around.
- Use a cake comb to create the pattern on the side of the cake (this also removes excess buttercream).
- No cake should be seen through the frosting.
- Run the cake comb in a circle around the top of the cake as well.
- Add the drip to the outside rim of the cake, a little goes a long way.
- Add remaining buttercream to a piping bag fitted with a tip 1M
- Add rosettes around the top of the cake and immediately add sprinkles
Notes
Nutrition Information
Yield
20Serving Size
1Amount Per Serving Calories 572Total Fat 34gSaturated Fat 14gTrans Fat 0gUnsaturated Fat 17gCholesterol 93mgSodium 266mgCarbohydrates 65gFiber 0gSugar 53gProtein 4g

Before you go, Grab Your Free Printable Recipe Kit!
Keep track of all your favorite recipes and ingredients with this free printable book!
Hi! I’m Nellie. I am an entrepreneur, a busy mama of 3 and a wife to my high school sweetheart. I have been sharing content for over 12 years about how to cook easy recipes, workout tips and free printables that make life a little bit easier. I have been featured in places like Yahoo, Buzzfeed, What To Expect, Mediavine, Niche Pursuits, HuffPost, BabyCenter, Mom 2.0, Mommy Nearest, Parade, Care.com, and more!
Get comfortable and be sure to come hang out with me on social. Don’t forget to grab your free fitness journal before you go!