Miami Vice Cocktail Recipe (The Layered Piña Colada Daiquiri You Need)
The first time I had a Miami Vice was at a rooftop party in the middle of summer, and whoever made it handed it to me in a clear cup with two perfect layers — white on the bottom, pink-red on top — and I genuinely couldn’t figure out what I was looking at. Then I took a sip and it all made sense: half frozen piña colada, half frozen strawberry daiquiri, combined in a single glass. Creamy coconut and pineapple on one end, bright tart strawberry and lime on the other.
I’ve been making these ever since. The technique sounds intimidating — two separate blends, a careful pour, a layered result — but once you do it once you’ll realize it’s actually one of the easiest impressive cocktails you can make. Ten minutes, two blender runs, one stunning drink. It’s the cocktail I make when I want something that looks like I tried harder than I actually did.
The key to getting the layers right is the pour, and I’ll walk you through exactly how to do it so yours comes out looking as good as it tastes.
Ingredients for this Tropical Drink
For the creamy, lighter piña colada layer:
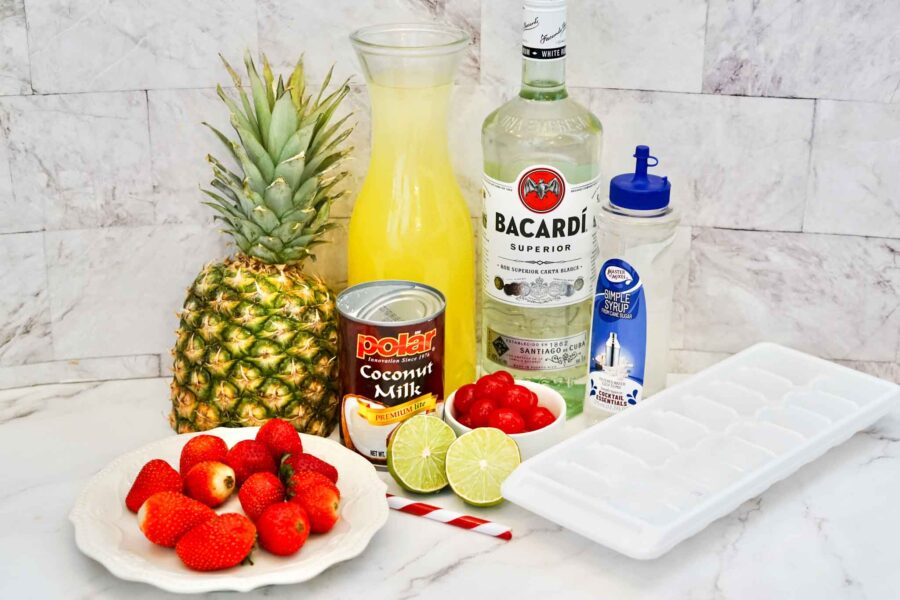
- 1 oz pineapple juice
- 1 oz cream of coconut (if you’re using coconut cream, ensure it’s well mixed before measuring)
- 1 oz good rum, white or spiced
- 1 cup of ice cubes
For the bright red, fruity strawberry daiquiri layer:
- 4 juicy, real strawberries
- 1 oz white rum
- 1 Tbs simple syrup
- 1 Tbs lime juice
- 1 cup of ice cubes
Perfecting the Miami Vice

- First, we’ll start with the piña colada layer. Add the pineapple juice, cream of coconut, rum, and ice into the blender. Blend on the frozen drink setting, or until the mixture is of a slushy consistency.
- Rinse out the blender to ensure distinct layers of flavors in your cocktail.
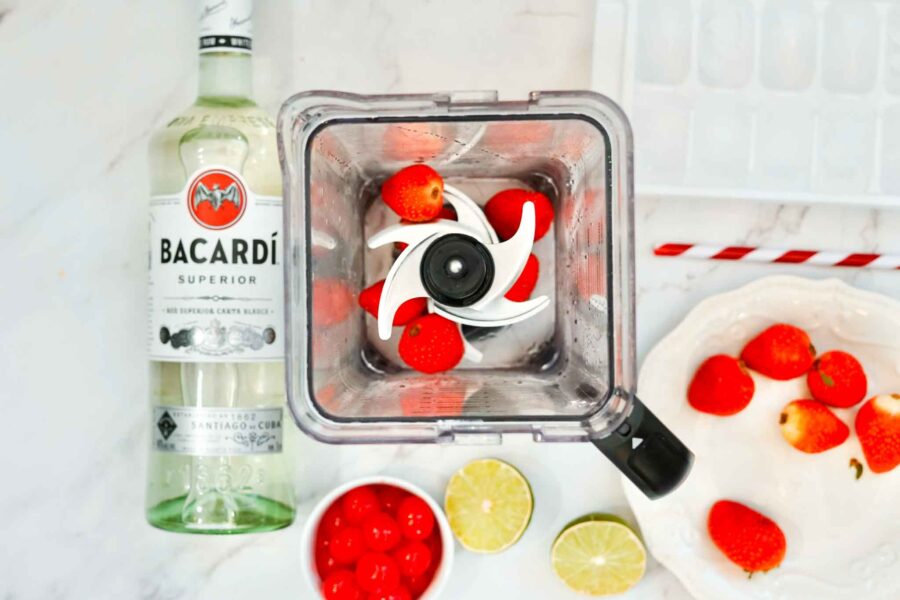
- Next, we move to the subsequent layer. Add the strawberries, lime juice, rum, simple syrup, and ice cubes into the blender. Again, blend until slushy. This combination creates the flavors of a strawberry daiquiri in its most basic form.
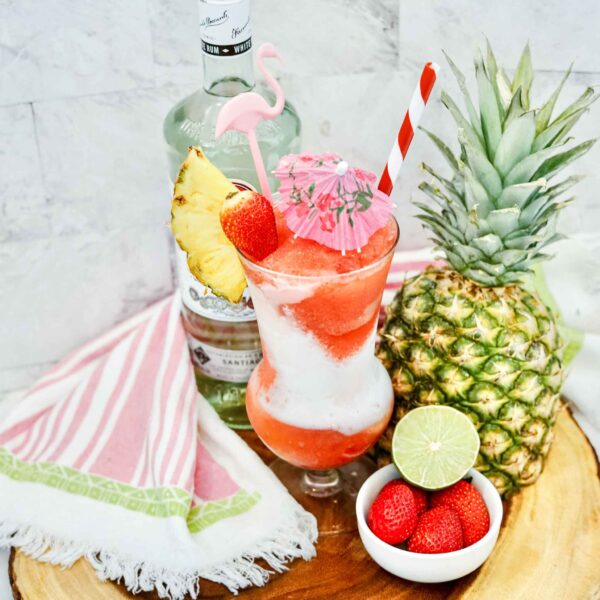
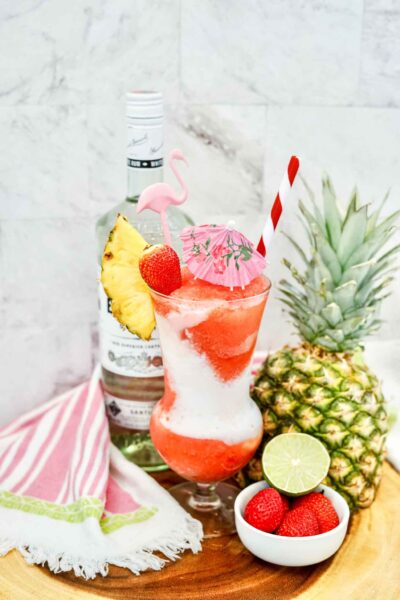
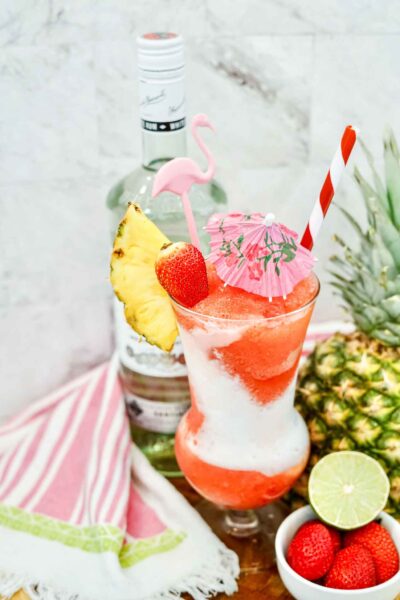
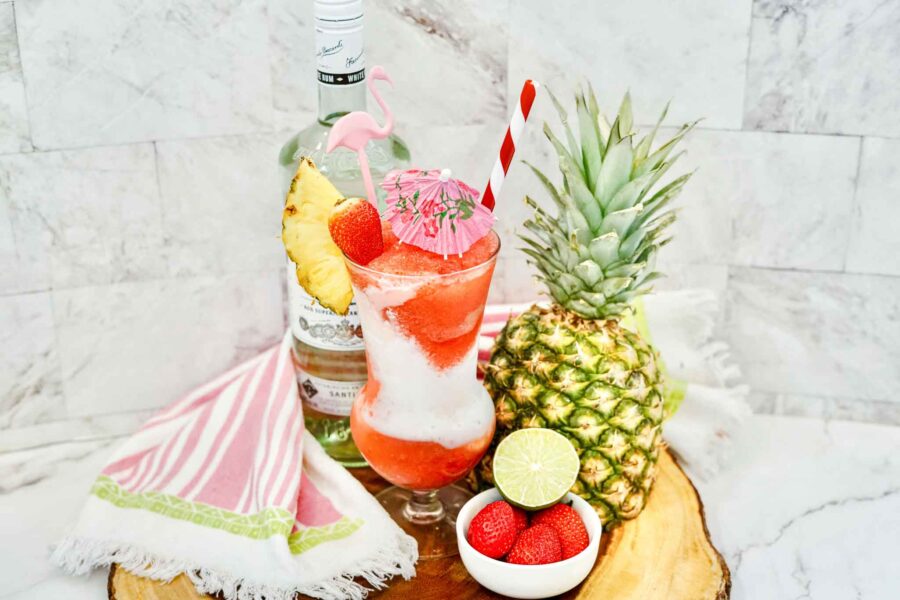
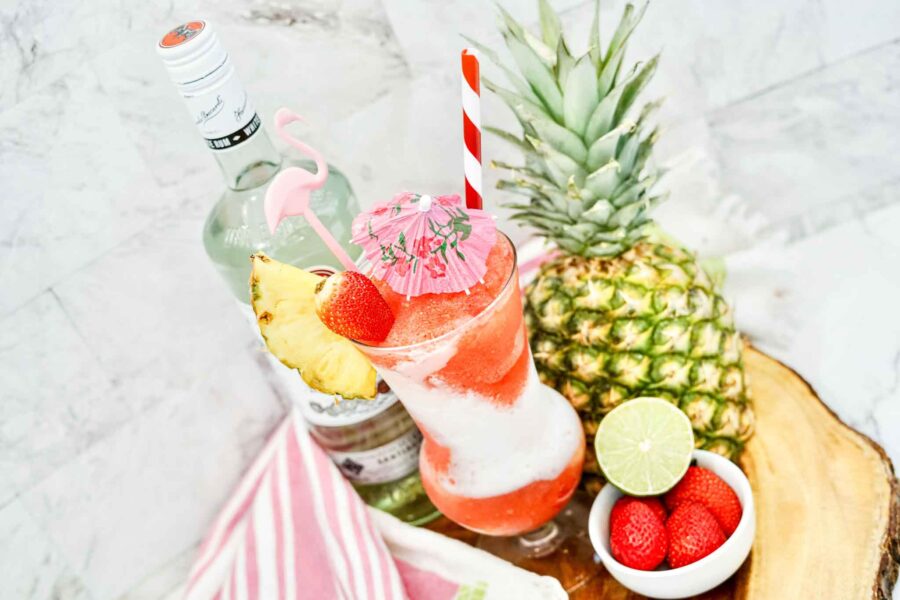
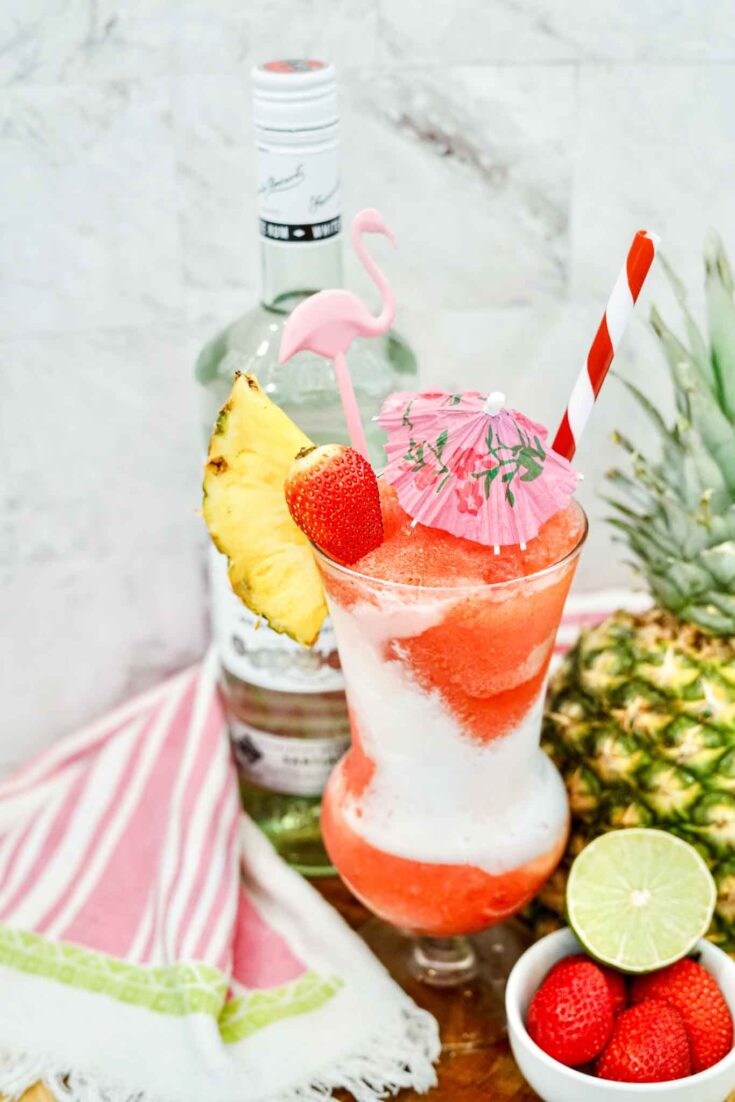
- Pour the first layer of frozen piña colada into a highball or hurricane glass, then carefully pour the frozen strawberry daiquiri layer on top. This striking visual of separate drinks layered creates a beautiful effect, akin to a lava flow.
- Garnish with a strawberry and pineapple wedge for that touch of fresh fruit, and enjoy. Cheers to the perfect drink for a hot summer day!
How to Get Perfect Layers Every Time
The Miami Vice’s signature look — that clean white and red divide — comes down entirely to one step: how you pour the second layer. Here’s the technique:
Make sure both layers are genuinely thick and slushy before you pour. If either layer is too thin or liquid-y, they’ll mix together immediately and you’ll end up with a pink smoothie instead of a layered cocktail. If your blends are coming out too thin, add a few more ice cubes and re-blend.
Pour the piña colada layer into your glass first — this is your base. Fill it about halfway.
For the daiquiri layer, hold a large spoon upside down (curved side up) just above the surface of the piña colada layer. Pour the strawberry daiquiri slowly over the back of the spoon. The spoon disperses the pour so the new layer floats down gently instead of punching through the first layer. Go slowly and keep the flow light and steady.
If the layers bleed together slightly at the meeting point, that’s totally normal and honestly looks beautiful — it’s part of the drink’s signature look. A perfect hard line takes a little practice, but even an imperfect Miami Vice still tastes incredible.
FAQs
Yes, you can use fresh strawberries. Just add a handful more ice to achieve the slushy consistency of a classic strawberry daiquiri.
Absolutely! Simply omit the rum for a refreshing drink that is just as enjoyable.
The two most important factors are consistency and pour technique. Both layers need to be genuinely thick and slushy — not pourable like a liquid. If they’re too thin, they’ll mix immediately. For the pour, hold a spoon upside down just above the surface of the first layer and pour the second layer slowly over the back of the spoon. This disperses the pour and lets the second layer float down gently onto the first.
A hurricane glass (the tall, curved one) is traditional and shows the layers best. A highball glass works well too. Whatever you use, make sure it’s tall enough to hold both layers with some headroom for garnish — at least 12 oz capacity. Chill your glass in the freezer for 10-15 minutes before pouring to keep the drink colder longer.
How to Make Miami Vices for a Party
This is one of the best cocktails to batch because both layers store separately in the freezer. Here’s how to scale it for a group:
Multiply each layer’s ingredients by however many drinks you’re making and blend in batches — most blenders handle about 4 servings at a time. Pour each completed layer into a separate airtight container or large pitcher and freeze until you’re ready to serve.
When it’s party time, give each frozen layer a quick 30-second re-blend or vigorous stir to loosen it back to slushy consistency. Then layer and serve as directed. The layers stay distinct as long as both are properly slushy — if one has thawed too much it’ll mix on the pour.
For a self-serve setup: put both layers in separate pitchers labeled “White Layer” and “Red Layer” and let guests pour their own. This is great for pool parties and actually becomes a conversation starter.
Where To Serve Miami Vices
The Miami Vice, with its vibrant layers and tropical flavors, is one of the most popular beachy cocktail recipes, ideal for:
Pool parties or BBQs: A delicious reminder of beach bars and hot weather.
Beach trips: As long as you’re not breaking any local public places rules, it’s a fantastic beachside sipper.
Themed parties: Caribbean, Hawaiian, or beach-themed parties.
Casual get-togethers: Anytime you want to add a tropical flair to your gathering.
Your very own tropical retreat in a glass, the Miami Vice cocktail is a simple, delicious drink that brings a taste of the tropics to your home, no matter where you are.
So, dust off that blender, put on some beachy tunes, and let your taste buds take a vacation with every sip. Cheers to tropical delights, fruity cocktails, and sunny days ahead!
Here are some more amazing recipes to try:
If you are looking for more fun cocktails be sure to check this comprehensive list 40+ Easy Mixed Drinks That You Can Make At Home!
Easy Miami Vice Cocktail
This delicious layered drink is so good and easy to make. This drink will have you feeling like you are in the tropics!
Ingredients
- White Layer
- 1oz Pineapple Juice
- 1oz Cream Of Coconut
- 1oz White Rum
- 1 Cup Ice Cubes
- Red Layer
- 4 Strawberries
- 1oz White Rum
- 1Tbs Simple Syrup
- 1Tbs Lime Juice
- 1 Cup Ice Cubes
Instructions
- Add the pineapple juice, coconut milk, white rum & ice into the blender.
- Blend on the frozen drink setting on your blender.
- Rinse out the blender.
- Add the strawberries, lime juice, white rum, Simple syrup & ice cubes into the blender.
- Blend on the frozen drink setting on your blender.
- Pour both the red and the white frozen cocktails into a hurricane glass creating a layered look.
- Garnish with a strawberry & pineapple slice and enjoy.
- Cheers!
Nutrition Information
Yield
1Serving Size
1Amount Per Serving Calories 264Total Fat 6gSaturated Fat 5gTrans Fat 0gUnsaturated Fat 0gCholesterol 0mgSodium 24mgCarbohydrates 21gFiber 2gSugar 16gProtein 1g

Before you go, Grab Your Free Printable Recipe Kit!
Keep track of all your favorite recipes and ingredients with this free printable book!
Hi! I’m Nellie. I am an entrepreneur, a busy mama of 3 and a wife to my high school sweetheart. I have been sharing content for over 12 years about how to cook easy recipes, workout tips and free printables that make life a little bit easier. I have been featured in places like Yahoo, Buzzfeed, What To Expect, Mediavine, Niche Pursuits, HuffPost, BabyCenter, Mom 2.0, Mommy Nearest, Parade, Care.com, and more!
Get comfortable and be sure to come hang out with me on social. Don’t forget to grab your free fitness journal before you go!